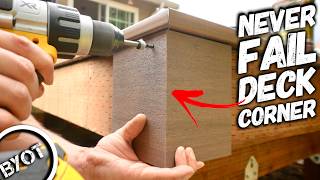
DIY Deck (Part 9): How to picture framing Azek deck boards and install fascia like a pro?

Вставка
- Опубліковано 13 чер 2019
- This is #Azek Deck series on how to properly install deck boards and fascia boards. Before going into details, you need to check if you have Low-e glass windows before purchasing the PVC deck boards. Then I will show you how I solved the Helical pile problem with fascia boards. Next, I will show you the proper way to install the solid deck boards for picture frame and grooved boards installation tips. Also I will show you how I installed the LED low voltage lighting. There are many lesson learned and DIY tips I want to share with you.
Hope this has some good information if you are planning to build a deck yourself. I hope I can inspire more people to DIY. I am NOT affiliated with any of these products, companies or people, I just want to share my experience as a serious DIYer and try to help other DIY people out there. Please give it a thumbs up and SUBSCRIBE to support me!
Reference Links:
---------------------------------------------
- Energy-efficient windows blamed for starting fires
tiny.cc/rf2a8y
- Low-E Windows and Melting Vinyl Siding: A Homeowner Story
tiny.cc/yf2a8y
- Deck Builder: Composite Fascia Installation Tips
tiny.cc/4f2a8y
Other videos on this project:
---------------------------------------------
Part 1 - Helical Screw Piles with TechnoMetalPost or GoliathTech?
• DIY Deck (Part 1): How...
Part 2 - How to use pressure washer to dig 12" post hole? Homemade Hydro Excavator!
• DIY Deck (Part 2): How...
Part 3 - How to install code approved ROT FREE Ledger Board brick veneer without flashing?
• DIY Deck (Part 3): How...
Part 4 - How to avoid getting a deck building permit even with Pergola?
• DIY Deck (Part 4): How...
Part 5 - How to build paving stone landing for decks in just 1 day?
• DIY Deck (Part 5): How...
Part 6 - 3 ways to notch a 6x6 wood post and how to build a bridge for the decks?
• DIY Deck (Part 6): 3 w...
Part 7 - How to build a pergola on the deck? No additional footings needed!
• DIY Deck (Part 7): How...
Part 8 - How to frame privacy screen for deck? Why Azek PVC over Wolf and Trex?
• DIY Deck (Part 8): How...
Part 9: How to picture framing Azek deck boards and install fascia like a pro?
• DIY Deck (Part 9): How...
Part 10: Why you should avoid Joist Tape on Azek or PVC deck?
• DIY Deck (Part 10): Wh...
Part 11: How to install diagonal decking using Azek PVC like a pro?
• DIY Deck (Part 11): Ho...
Part 12: How to transform a traditional pergola into a modern contemporary backyard?
• DIY Deck (Part 12): Ho...
Part 13: How to build a modern privacy screen and install Shade Sails like a pro?
• DIY Deck (Part 13): Ho...
Part 14: Ikea Sollerön review, assembly and how to protect it from rain and snow?
• DIY Deck (Part 14): Ik...
Part 15-Part XX: PlayList for this "Deck and Backyard DIY project":
• DIY Deck and Backyard ...
Music Credit:
----------------------
Song: Sappheiros - Lights (Vlog No Copyright Music)
Music promoted by Vlog No Copyright Music.
Video Link: • Sappheiros - Lights (V... - Навчання та стиль


I have made a 15 min time-lapse video on this whole DIY backyard project:
ua-cam.com/video/IXAOroJ9Prg/v-deo.html
Another great video. The LED lights is a great idea; Glad I saw this before I finished planking the deck. And the tile spacers; genius!
Thanks for the info, as an extra bit of lighting I personally prefer to rout under the stair lip and insert an led strip, it looks amazing and is simple to do.
Really good video, I picked up lots of good ideas from this (Lighting, picture framing etc). Subscribed!
Good attention to detail. Best deck building series on youtube!
Appreciate that
Amazing... Found you in one of my recommended video... Definitely inspiring... I'm also in the GTA... You got yourself a new sub
Thank you!!! I just want to inspire and help people. I hope that helps if you are into DIY. But even you are not doing it by yourself, all these knowledge I am sharing would help to screen out the best contractors for your job. I did A LOT of research before I start this project, hopefully I have some good information :) Hope this helps!!!
Wasn't expecting a tutorial from arnie.. Great vid
Count Dracula builds a hell of a deck.
Thank you Arnold. It is a very informative video.
You are very welcome. I will be back
Very useful tips, thanks!
You are welcome!!
Love me some COUNT DECKULA!
at first i started securing one/two boards and 4 boards in I was fighting a curve and it felt very bad when i had 20 more to go so i backed them up, laid them all out minus 2 at house and then as I did it i would push 4 in at a time to push them closer, but if its 20 ft long you need 2 people or a very wide grip and push, otherwise one side kicks out and you fight it and cause a curve. then when I secured them i only screwed them all in half way and then went around to fully seat the screws because if I fully seated one it would pull the next board up and sometimes mess up the clips. Lots of lessons learned, love it though. I had my joist with blocking sitting for a year before i bought the decking, expensive, also boards become more twisted than i would have liked and shims used but it all works :) composite shims. thanks for your videos
You keep saying you're not a pro but let me tell you something, you can put a lot of pro's to shame. Great work!
Maybe I should switch to become a pro if I got laid off from my full time job.
Very well built deck!
WOW!!!!...you are a true artisan!!!!!
Thanks, glad you like it!!!
Thanks this really helped me with my project.
Glad it helped.
Very nice video and lots of helpful information! I am planning to use AZEK Slate Grey deck board, I am thinking of doing butt-up mitre joint for picture framing (border), how do you find about this Azek deck board's "expansion & contraction" during winter and summer ? ( winter here sometimes -20 to -30 Celsius and summer could be like +35 ish Celsius)
Wow !! Great job
Great work!!! Can you please share the information on the led lights you used? Where did you get them from?
Nice work!
Thanks!
Thanks Yogi.
I build about 12 decks a year as a side business I just completed the deck with a Zagg hey Zach pretty nice to work with but it seems like it's solved a question a long-term durability
If you don't mind me asking, how did the fascia and picture frames hold up to the unnatural heat we've had in the US and Canada over the past few years?
What gap did you use where the end of the deck boards butt up against the picture frame board?
Hi i getting ready to instal composite board on my deck in replacement of Wood i never done picture frame could you make a vidéo showing how to measure or procede to do perfect 45 cut..
I've used trex a few times. The 1st gen of trex swells unbelievably. I have it on my own deck. Every 3 years I run a circular saw inbetween the boards just to keep a gap! The newer isn't as bad but a 3/16 gap would work better than an 1/8
Thanks for sharing! That's good information. I think you are referring to the fascia boards installation, I tried both methods I mentioned in the video (1) glue + screws (2) spacers + screws. After 2 seasons, passed Canadian harsh winter.. neither of them have given me any issues. The miter joints on the corners as well as the butt joints are totally fine. No screws popping. The ambient temperature during the installation is very important, according to Azek installation guide, on a summer hot day you don't actually need to leave any gap on miter/butt joint. However, if you are install on a cold day, you do need to leave a gap. That applies to both fascia boards and the deck boards.
Excellent video. Why didn't you use the joist tape?
Thanks!!! I will talk about it in next video, stay tuned :)
One question, that last piece you ripped down, arent you supposed to size the deck where there are nothing but full boards?
Great video series! If you are using a non-grooved deck board for your picture framing, how do you connect it to the next board that is grooved? Do you have to router a groove into the picture frame board?
Very good question. Glad you actually asked!!! Router is one option, but I didn't do it that way. I used "Cortex Fasteners" on one side of the grooved board. If you don't know about Cortex.. check out Part 20: ua-cam.com/video/TVEkeCp_6vU/v-deo.html
Hope that helps.
I am curious how the expansion is possible when we face screws from the top. The board can't move.
Thank you.
Where is you get power for the lighting? Just plugged into an outlet?
Awesome job, I am in the GTA as well. Is it possible for you to tell me what screws you used for attaching Deck boards? GRK?
I am using their CONCEALoc clipping system as well as Cortex Hidden Fastening System with matching color and pattern plugs specially for the Azek boards. I ordered them from Deck Stores
DId you use horizontal 2x4s around entire perimeter for your picture frame? How did you fasten these into place? Thanks for the great videos!
Yes I did. I fastened them by drill the deck screws at 45 degrees, either from the top or from the side
NICE!!!!!!!!!!!!!!!
Nice work. Did you cut all of the inside (non-picture frame) deck boards to length one by one, or did you cut a line across all of them with a circular or track saw? It’s hard to tell from the video. Thanks.
One by One, I cannot afford to make any mistake but I have to admit, it is VERY SLOW!!!!!! Usually professional cut a line across all of them in one shot, if you are confident doing that, go head. I don't have a track saw... I am worried that circular saw may not give me a perfect straight line, that's why.
Wouldn’t that sideways 2x4 blocking for the picture frame border trap a lot of water and eventually rot? Otherwise, nicely done!
Very good question. It does trap some water but it goes away pretty quickly. Same thing happens to the joists. Some suggest to use the joist tape on the blocking. Now, we are into another topic - joist rotting and joist tape. If you are using PVC board such as Azek, don't use bitumen based joist tape. There are butyl based tape which may work better with PVC decking. I did a video on this topic, check out part 10.
ua-cam.com/video/0hZCLGwdLFk/v-deo.html
He sounds like the bear from The Cleveland Show.
LMAO!!! I was thinking the same thing
where did you order it from I am in Hamilton ontario
I went to "The Deck Store", they are pretty good. The guys there are way more knowledgeable than the associates in Home Depot or Lowes. Good luck.
What kind of wood do you use for deck/ step? Cedar or treated wood
Those are Micropro sienna treated wood, they don't carry green color pressure treated wood locally in big box stores, they do look like cedar but they are not.
If you know the width of each board you can plan the size of your deck so that the last board won't have to be trimmed that much.
That's right. I have to admit I didn't do that detailed planning but that's very good tips
So you censor Dewalt but not Ryobi?
what store has the lights
Sorry for the late reply. The brand is called "Paradise", they are made in China, they are available in big box store or even Amazon. If you are in Canada, they sell it at Rona. Wait for them to go on sale, don't pay for regular price. Don't expect the quality is very high. I had to replace couple of them after my first installation about 2 years ago.
www.rona.ca/en/garden-lights---set-of-6-eco-garden-lights
www.rona.ca/en/set-of-6-deck-light-p15235025
"Click da link if you want to live!!!!"
Hi! Have you installed Trex decking?
No I haven't. But it's very similar. Remember to read the installation manual, both Trex composite and Azek PVC are known to expand and contract. The ambient temperature during the installation is very important, according to Azek installation guide, on a summer hot day you don't actually need to leave any gap on miter/butt joint. However, if you are install on a cold day, you do need to leave a gap. That applies to both fascia boards and the deck boards. I believe the same concept applies to Trex. However, always read the Trex installation guide carefully before you start the DIY project. Good Luck!
@@DIYable thank you!
Trex calls for 40°F above and below.
Above it's 1/8 for end to end and 1/4 abutting.
Below it's 3/16 and 1/2
It's not Count Drac, it's, I'll be back, Arnie. Lol
I was wondering whether I need to leave a gap at the miter picture frame corners…
no
Why is count dracula building decks now????
LOL... 😭😭😭😭😭
Dead. Fucking dead.
I thought it was a genie
Don't knock it. I'd sit and listen to him recite the phone book with that accent.
Get to the chopppaaaa
Some guys build from away from the house and leave extra to gap it and cut the joists to fit the end board length once they get about 3 boards away
I'm dying to know why you didn't use the joist tape.
Here you go Ian. This is Part 10: Why you should avoid Joist Tape on Azek or PVC deck?
ua-cam.com/video/0hZCLGwdLFk/v-deo.html
No gapping for your picture frame? I see you have the edges flush against each other. Interesting.
Many don’t use gaps on the miters. I don’t know why.
I said I think the a sack material is soft
When is Arnold started doing UA-cam videos?
I'll be back
U showed the pix frame but not how you did it. I thought the title was about pix framing the deck?
Is that you Arnie?
Sounds like Gru from Despicable Me”!
6:39 Still dreaming of a DeWalt sponsorship I see?
LOL... No. this channel is too small potato for Dewalt to get noticed.
@@DIYable Curious why you blurred the logo on the tool then?
Is that a computer generated voice?
That's my voice.. but there was some bad equipment. It made me sound like Terminator. Newer videos are more human hahahaha
Its easy to picture frame when u dont have posts. Looks good tho
Looks like a tank designer built that deck.
Sounds like a cross between Kermit the Frog and Arnold Schwarzenegger.....good video though!
How did they get Wimpy from Popeye the Sailor Man to narrate?
What’s up with the weird Arnold Schawrtzenegdger voice?
Hahaha, "Canader" and "Chiner"
Jesus how much does ur decks cost u use a crap load of wood
Yes, that's a lot of wood... arrgg.. it's not cheap
Nice job but next time try not to narrate underwater.
Hahhahahhaa... LOL.. you made my day LOL. Newer videos are better, I did them above water on the boat.
@@DIYable haha, nice one👍