Same here. My buddy was similarly working small pieces on table saw, alone, at night. A chunk came back, hit him just below ribs. Ruptured his spleen and intestine. He very nearly died from (internal) blood loss.
@@procrastinator41 Ah yeah, same here. The last panel to cut for a blanket chest. Tired and tablesaw are two things that don’t go well together. Hit me in the same place busted sheet rock on the rebound and cracked my garage door. That left a mark. Fortunately no lasting damage but placed me in a completely difference level of power tool safety.
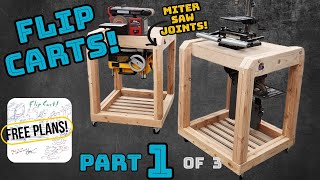
You’re like the first guy who’s assembled one of these flip top tables to lay it over on its side to make it easy when installing the pipe through the top. Everybody else’s video’s makes them look like they’re wrestling a pig getting the top on.
fixing to do the same thing for my PC jointer and Planer. The second one for me will be my router table and belt sander. maybe I will post a link for you to mine when I am done.
Do you have any fucking idea about how annoying it is to watch any video at high speed. It's 10 minutes of agony. You should watch your own videos to the end before unloading. If you feel like it was fun to watch, then up load it. If at the end your ready to throw something, think about aggravated others will be. Try editing, that way you can run the video at normal speed, narrate if you want, and you can show valuable footage, and the video might even be a little shorter. Other than that, those are great flip top stands. I'm just saying. Cheers!
Looks well built and sturdy. I like it. The video had some crazy fast and slow and wild sounds going on in the background. Kind of a trip. I'll sub and watch more.
Looks like a high school project. Fit and finish isn’t great and those cheap bolt locks means the table top will never be level and will move under use. Why didn’t you plane the wood so the joints were square and level?
This is fantastic, but to me shop projects need to be quick and dirty. It could be just me but I think to get things moving one should use about half the time. Having said this I think this was piece of art
It nice to see all these videos about making workbenches but the only problem I have is I don't have the tools needed to start making them. It's nice to see all these tools that you use. Give me a couple thousand dollars and I can get these tools.
Ah, I can tell you have Taylor Swift on the radio, from the incessant pretentious squeaking noise. hah Seriously though I was wondering "how they hell is he getting his tablesaw blade to move that way?! Then like a dumbass I realized that the camera's on the sled. LOL
Just found you. I like your style. New sub! Let's get you to 1,000 by end of summer! Keep up the real life projects, we all learn from watching others, even if you've got 25 years in like me. I thought your solution was perfect for my shop. I'm going to copy yours....but of course tell everyone "I got the idea from Goose". Best wishes. Tony "V" in the O.C.
It would have been easier if they were the same height. I just wanted them to fit the machines that were going on them. I would have preferred them to be the height of the shorter stand, I think it fits my height better.
I still use them every day. One has been turned into a shop cart, i roll stuff around with it but the one still holds the jointer and planer and works really well. The only “regret” would be the latches, I was being cheap and used the barrel latches and they work well enough that I haven’t changed them but there are better ways.
Nice job...Any for anyone looking to save a ton of time, use pocket screws for the same result. If you want to hone your skills you make the the styles rails and panels.
Do you get any play with using those latches? Was wonder if planing a long board and the weight shifting would show any change in level. I would really want to make some rolling cabinets like these but fear/question the flip tops. Nice job and camera placements.
Definitely play in the latches, I haven’t noticed it effecting the wood at all. Sturdier latches would def work better, that’s just what I had available to me with my budget.
Great build congratulations. can I ask what kind of bolts are you using to hold the weight of the planner? I'm building one but I'm afraid will not hold the weight.
+Daniel Torre Hey Daniel, I just used wood screws to hold everything down. Haven't had any issues with them tearing out yet. I didn't use bolts because I didn't want anything sticking out of the underside where it might interfere with the other tool.
Wish it had not been done using time-lapse video. it wood have been far more useful slowed down and with some details on what you were doing. and maybe some cut measurements would be nice.
Just seen this video of yours and you have done a brilliant job of the flip stands, one thing just to mention could you put some kind of block over the pipe that's sticking out either side? that way it wont accidentally be knocked through. Well Done though on your build. Barry (ENG)
sorry no plans right now, I'm not very good with the software and currently don't have the time to put into it, hopefully ill be able to come up with something this winter. check back later on.
Hey Phil. thanks for watching. They haven't been getting a ton of use lately, been too busy, but no problems so far, still on there solid. You just have to be careful when flipping them because the jointer is heavier and it does tend to want to rotate so it is on the bottom.
Nice project. I guess the wide cabinets require thicker pipe, hence 2 lots of 3/4 fillers rather than just using 3/4 pipe. Small, minor, picky comment: your plywood-stain combination is pretty ugly, and since you also left the wood labels on, maybe you could consider painting them. I like to use bright colours, red/green/blue, to brighten up the workshop.


I guess I watch to many lathe videos because every time I see a slow motion shot I am immediately terrified something bad is about to happen. Whew!
Same here.
My buddy was similarly working small pieces on table saw, alone, at night.
A chunk came back, hit him just below ribs. Ruptured his spleen and intestine.
He very nearly died from (internal) blood loss.
@@procrastinator41 Ah yeah, same here. The last panel to cut for a blanket chest. Tired and tablesaw are two things that don’t go well together.
Hit me in the same place busted sheet rock on the rebound and cracked my garage door. That left a mark. Fortunately no lasting damage but placed me in a completely difference level of power tool safety.
Nice job. Can you tell what brand mustard you use and recommend?
Looks good. Do you have plans for this by any chance? I have the same jointer and planer
This is the plans buddy
Excellent. I'm looking through loads of videos for these at the moment. I like the way you install the pivot bar. Thanks
You’re like the first guy who’s assembled one of these flip top tables to lay it over on its side to make it easy when installing the pipe through the top. Everybody else’s video’s makes them look like they’re wrestling a pig getting the top on.
good job from Italy 🇮🇹! ps: Where i can find tour mini planer?tanks
Please accept my suggestion ... Show the finished product first ... A complete spin around. Nice work otherwise. RWB
Is there anything from keeping the pipe from sliding one way or the other ? I really like the carts so just curious ?? Thanks for the inspiration !!!
looks very serviceable, I would prefer to use the spring loaded latches instead. Nice job.
fixing to do the same thing for my PC jointer and Planer. The second one for me will be my router table and belt sander. maybe I will post a link for you to mine when I am done.
Isn't it just as easy to grab your tool off the bottom shelf and put it on the top Shelf and vice versa, I don't see the point
Do you have any fucking idea about how annoying it is to watch any video at high speed. It's 10 minutes of agony. You should watch your own videos to the end before unloading.
If you feel like it was fun to watch, then up load it.
If at the end your ready to throw something, think about aggravated others will be. Try editing, that way you can run the video at normal speed, narrate if you want, and you can show valuable footage, and the video might even be a little shorter. Other than that, those are great flip top stands.
I'm just saying.
Cheers!
Thanks for the input.
Steve Austin the six million dollar man doing wood work love it
Next video: suction for my radial saw.
Nice job. Must go in shop and build this. Save a lot of space.
Was that French's wood glue?
Looks well built and sturdy. I like it. The video had some crazy fast and slow and wild sounds going on in the background. Kind of a trip. I'll sub and watch more.
i had the same rigid miter saw and my blade guard was removed also
Looks like a high school project. Fit and finish isn’t great and those cheap bolt locks means the table top will never be level and will move under use. Why didn’t you plane the wood so the joints were square and level?
Nice build. Great video!
This is fantastic, but to me shop projects need to be quick and dirty. It could be just me but I think to get things moving one should use about half the time. Having said this I think this was piece of art
It nice to see all these videos about making workbenches but the only problem I have is I don't have the tools needed to start making them.
It's nice to see all these tools that you use. Give me a couple thousand dollars and I can get these tools.
I wish I could've seen the other flip top in use at the end. :-( But, nice job in construction.
Nice work! This is a route I may take, I really like your table saw single blade joinery 👏🌹🇦🇺✌️
Doors light my fire at the 9:30 min time??
do you have plans for this?
Very nice..might have to copy your idea..Thanks..Ken
Dude! What are you doing?
Cool project, horrible video.
Sorry, thumbs down. What's the point of watching spasmasterflash?
That is a perfect set up, thanks for sharing and have a blessed weekend.
Subbed you as well. Keep up the fun videos.
dale
Nice but don’t think it’s wise to have the jointer on 4 wheels. I just have 2 on mine. Can still lift and roll about when I need it too.
Ah, I can tell you have Taylor Swift on the radio, from the incessant pretentious squeaking noise. hah
Seriously though I was wondering "how they hell is he getting his tablesaw blade to move that way?! Then like a dumbass I realized that the camera's on the sled. LOL
Great build. Love it!
👍👍👍👍👍👍👍👍👍❤❤❤❤❤❤❤❤❤
Finally someone that uses dark stain.i hate honey colored wood..
Can I get the plans for this because I am now in a wheelchair but still love to Build
Just found you. I like your style. New sub! Let's get you to 1,000 by end of summer! Keep up the real life projects, we all learn from watching others, even if you've got 25 years in like me. I thought your solution was perfect for my shop. I'm going to copy yours....but of course tell everyone "I got the idea from Goose". Best wishes. Tony "V" in the O.C.
When the Chipmunks put in a copyright claim for your video.
5* video, good build. Thanks for the video.
Good build.... It looks like that table weighs a 200lbs? It's built solid!
A beautiful piece of work, but seems a little over-engineered.
Build instructions?
Please post a cut list
Nice build. Do you happen to have dimensions on these?
I like to glue the panels and never use fasteners when making rail and stile panels
Great video - thank you! What tools do you have attached here?
All that work and you used the cheapest latches possible?
Gracias por mostrar. Buen trabajo. Un saludo desde España
Thank you for watching. The thumbs up is much appreciated.
Love everything about this build!
I love it ❤
1:06 Mustard
Nice work👍but i have a question, why those stands are in different height? I thought it will be more convenience in making parts and storage.
It would have been easier if they were the same height. I just wanted them to fit the machines that were going on them. I would have preferred them to be the height of the shorter stand, I think it fits my height better.
I really like your rectangular design. How’s it been holding up since making it? Any regrets?
I still use them every day. One has been turned into a shop cart, i roll stuff around with it but the one still holds the jointer and planer and works really well. The only “regret” would be the latches, I was being cheap and used the barrel latches and they work well enough that I haven’t changed them but there are better ways.
Nice job...Any for anyone looking to save a ton of time, use pocket screws for the same result. If you want to hone your skills you make the the styles rails and panels.
pocket screws are an abomination
Would you like some glue with your mustard ?
Has anyone noticed the mustard bottle with glue in it?
I need to do that in my shop.
I’ve upgraded to a barbecue sauce bottle since then 😉
Looks side to side unstable
Pretty sturdy. The one still holds the planer and jointer and has no problem being pushed around the shop.
Do you get any play with using those latches? Was wonder if planing a long board and the weight shifting would show any change in level. I would really want to make some rolling cabinets like these but fear/question the flip tops. Nice job and camera placements.
Definitely play in the latches, I haven’t noticed it effecting the wood at all. Sturdier latches would def work better, that’s just what I had available to me with my budget.
Hairyyetioes / How about a stop? Swing it up = stop & latch. Swing it down = stop & latch tight against the stop?
Great build congratulations. can I ask what kind of bolts are you using to hold the weight of the planner? I'm building one but I'm afraid will not hold the weight.
+Daniel Torre
Hey Daniel, I just used wood screws to hold everything down. Haven't had any issues with them tearing out yet. I didn't use bolts because I didn't want anything sticking out of the underside where it might interfere with the other tool.
Love it! I have the same Porter Cable joiner planer and a thickness planer looking for a new home in my shop. Going to try this build. Thanks!
very good job.I am impressed of seeing such a Brilliant mortise groove and joining the frame.Best of Luck
Wish it had not been done using time-lapse video. it wood have been far more useful slowed down and with some details on what you were doing. and maybe some cut measurements would be nice.
Todd Britt TBF this video wasn't described as a tutorial.
Nice, but you could have had 4 cabinets to store stuff in :)
The sturdiest flip too table I’ve seen so far!
Man, i wish i could build things as fast as he can! Ha ha ha. And nice finishing it with stain. Good job
Very, very nice!!
AWESOME just what am looking to do thanks for the video.
Excellent project. I need to do something like this for my small workshop.
Is that conduit your using to swing the tools?
By the way , nice work.
ive been needing a way to organize big tools in my tool trailer and a flip top like this might be the trick. thanks for sharing with us
u need to make yourself a nice scribe bro. nice vid
Nice Job. Looking to build one do you have plans
professionals spread the glue with their bare hands
Matching set of flip tops! I need to make a couple of them also! Thank you.
Just seen this video of yours and you have done a brilliant job of the flip stands, one thing just to mention could you put some kind of block over the pipe that's sticking out either side? that way it wont accidentally be knocked through.
Well Done though on your build.
Barry (ENG)
Thanks Barry. The blocks probably a good idea, I'll have to try and remember to throw something together the next time I get out to the garage.
What kind of pipe are you using? I am so concerned about a pipe bending on the ends, so I just started googling stuff, and found your video.
Very Nice, Thx’s for sharing, got plans for your flip top stands ?
sorry no plans right now, I'm not very good with the software and currently don't have the time to put into it, hopefully ill be able to come up with something this winter. check back later on.
👍👍👍 Going to build one for my shop!
Nice work Goose! Have you had any issues with the jointer on the fliptop? too heavy?
Hey Phil. thanks for watching. They haven't been getting a ton of use lately, been too busy, but no problems so far, still on there solid. You just have to be careful when flipping them because the jointer is heavier and it does tend to want to rotate so it is on the bottom.
Pourquoi avez-vous mis des vis que des chevilles ?
Hey Goose, What was the material you used between the sheets of plywood for spacing on the tool platform?
Hey reaper, I believe it was just more 3/4 inch plywood. Nothin fancy. Thanks
Hey Goose - Looks like a 1/8 or so pink looking material. I was guessing it was to get the spacing right, but couldn't tell what it was.
Nice job by the way!
How are you able to move the actual cutting blade back and forth to get those uniform cuts??
Or is that just some type of throat plate?
I think it was a table saw sled with the camera on the sled. He was moving the sled not the saw?
Great job Goose. Thanks for sharing!
What's the meaning of the last word 'goose'?
Just a knick name.
I like it! Thanks.
Well done, that's the one for me !!! Thank you.
Great job and great vid.
Had to laugh......even though I have a dado set, I still do the random dado like that.
Pretty sure that Dewalt saw doesnt accept a stack dado blade. Ive never been a fan of the wobble dado, too hard to get accurate in a timely fashion.
I have the Dewalt DW746 and have no problem running a proper Dado.
That is awesome. Great job.
do you have any plans or measurements for this stand, greatly appreciate it
Really need to build it according to your own needs! You should be able to take what you have seen and build your own fairly easy.
Mustard glue! Nice!
where did you get your dust mask from ?
It's called an RZ Mask. I got mine off Amazon but they also have a website.
8:36 like a boss
That looks great!
what type of screw driver were u using?
I think it's a Porter Cable impact driver, maybe 60-80 bucks at Lowes, something like that.
I"m IMPRESS good job!
nicely done.
LEGIT!
Nice project. I guess the wide cabinets require thicker pipe, hence 2 lots of 3/4 fillers rather than just using 3/4 pipe. Small, minor, picky comment: your plywood-stain combination is pretty ugly, and since you also left the wood labels on, maybe you could consider painting them. I like to use bright colours, red/green/blue, to brighten up the workshop.
Genial!! Un ventilador perfecto!!