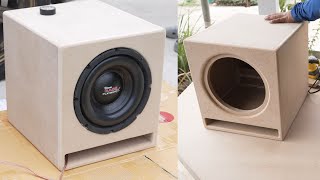
DIY LOUD SUBWOOFER BOX BUILD!

Вставка
- Опубліковано 27 бер 2017
- Subwoofer: bit.ly/2MJbIwh
Wire: bit.ly/2MJc321
Terminals: bit.ly/2nAOMUP
Hope you guys have enjoyed this video! Be sure to subscribe to my channel for more content!
Add me on Snapchat: Doublsmm
Add me on Instagram: Doublsmm
Spotify Music Playlist: open.spotify.com/user/thisisj...
Thanks for watching! - Авто та транспорт


As some mentioned, you don't need screws to hold the box together if you are using good glue. But, screws are nice instead of clamps sometimes. If you are going to use screws in MDF you need to pre-drill so you don't split the wood like you did.
I used to own an audio store and built a lot of custom speakers for customers. I admire your efforts.
mann i wish i had something like that around me
I loved this video man, since i am in carpentry class i might have to start making some Sub boxes for my self!!!
I love this style of video
Most definitely wanna see more content bro you going kuu wit the builds bro
the white paint looks soo good
Clean and simple keep it up.
:O I need to make boxes like that for mine looks so cool
Awesome! Love to see more.
*That's Awesome!*
Working with your old man, using a hand saw in 2017... that hit me in the feels!
3:27 And that's why you should always make pilot hole before putting screws in.
es para que tus pijas entren sin dañar el cajon y se provoque una abertura en la tabla..
I cringed when I saw that lol
Plus you should counter sink on the back side of the hole for chip clearance then driving the scew into the mating piece. At least when using MDF.
So you don’t split the wood...
It turned out great anyways.
thankyou for making this video. it was a major help to me
Good job man, looks amazing
enjoy watching your videos
Your subwoofer sound clear and clean oh my god it looks so awesome 👏
Руки с того места откуда надо! Респект
Very nice, excellent job!
Super dope video
This is awesome!
those boxes looked so fucking beautiful. good work
Love this video!
Great Work! :D
Very Nice Project !
wow looking good .good video to.
I love it lets see more.
Plz man do more off this videos o fkn love them😍😍😍
Perfect job
That's a beautiful circle to have been done freehanded.
ล
love it nice build
i have watched this video like 7 times now ahah
nice!
oh my god
coooooooool
helpfull video
Amazing video👍🔥
I prefer this long format because it prevents stationary waves.
Looks good. One thing to improve on them would be to taper the corner inside and flare the port ends. Makes for much smoother bass.
Nice brother
Love from India
I love this video
Nice Bro I love it 👍
Superb dude
Excision 👏👏👏👏
Love this vid
Ohhh sooo cooooll box
Did u put any sound insulation in those boxes?
Pls like so he sees this
Kim Helinkö well made boxes don’t really need poly fill/insulation, more or less intended for small sealed boxes.
Danny Devito thanks!
Kim Helinkö no problem
kletsinger5394 I know, that’s what I was saying.
@@user-se8nh3yu1e lol, words vs reading vs comprehending haha
Nice video. Good job.
Might be worth re-shooting scenes where the AF is taking forever, though.
I've also read that square speaker boxes can cause issues with reflections and interference - any plans to build a tapered shape?
Something that would help you with soldering buy some flux and makes Sauter run smoother it also helps clean the surface of the wire
Omg the suspense
Thanks for the Vlog
I am sure the subs fit your taste and you shake the building with them. Consider this as a positive critic for yout next project - always use bracing, especially on boxes of such size. It makes a difference, man!
Love it man!
what you could do next time is get someone to accompany you for doing time-lapse shooting leaving you to do all the work on the boxes :)
Coruphius exactly what I was thinking
Wow awesome
I LOVE These kinds of Videos,also love the new subs,you really did an AWESOME Job!
I really like the design its simple and cool. Do you add form inside the cabinet?
This box design is similar to the Bose B1/B2 BUT WITH WAY bigger drivers ✌🏻
I love it
can you give measurements of some sort. that and maybe some description for as to how you designed the box
your voice is so reassuring
awsome video :D i want more :)
Love it
I love your vids
Well done
Nice job
I've made a few boxes but haven't done a slot port. I usually end up doing triangle ports in the corners. I just like the look, and it braces the box. I have one with 3/8" ply and it's still really rigid. I haven't tried a flared triangle design, which might look quite cool as well, but a pain to angle cut. My subs aren't tuned super low but are 96 dB sensitivity with PA 12" woofers (Eminence Kappalite)
i love it
The boxes were very good !!!
How did you calculate the "Slot Port"?
Thank you very much in advance!!!
More videos like this would be nice...
GOOD JOB
I want this!
nice video:):) love these kind of videos:)
Also what about poly fill
It helps reduce port noise.
Correct port sizing does this too.
Heck yeah more vids b
Nice.
I'm also building my self-designed subs for my home cinema system. one 15" of 1000 watts. The box huge: 24 inches high/wide and 32 inches deep. It's all over 7 cubic feet! Because it's so big and I'm using 3 ports they only have to be 11 inches long, otherwise it would go TOO low! With al three open it's tuned at 25 hertz, with only one it's tuned all the way down to just 14 hertz! I didn't do it because it would be too low but could easily have tuned it to something like 5 hertz at one port.
I want to request detail the full size of the box, because I want to try making it,
thanks
Great video. My only concern, you not wearing breathing protection while cutting and sanding. Especially if it's MDF.
"When you work with MDF, the dust you release also contains this formaldehyde, which you may end up breathing. ... Formaldehyde is suspected of being a carcinogen, and MDF has some of the highest concentration of urea-formaldehyde adhesives out of all the engineered wood products that use it."
True.
good shit bro
I've recently built my first subwoofer. I used a 15inch driver. If I wanted it to have bass reflex (and as a result greater bass volumes compared to a sealed design), I ought to build the cabin with a volume of at least 60 liters. The bass reflex should be if cylindrical, 8cm in diametre and 1 meter in length. I did all that but I am facing a problem where the bass would rattle at certain frequencies (120hz and 79 hz to be precise). I used Russian birch plywood instead of weak MDF, but although the wood is strong, I also reinforced the cabin with extra internal wooden connections . I say all these stuff, because I got a point to make... The rattling is possily cause by poor reinforcement of the cabin... And seeing your design without any reinforcements whatsoever makes me think that the whole sub will plain and simple destroy itself. I have done my homework before building my sub, (and I failed :D ), I just wander if you can go through all low frequencies without any weird side effects :P
im pretty sure 60 liters is no way near enough for a 15 inch, also subs usually are meant to play up to 80hz, not 120. I built my 15 inch with 120 liters.
next up some crazy demo vids
superb
use damping material for better bass and use t nut for subwoofer mounting screw
Both of those aren't going to make a difference here. Tnuts aren't going to make it a stronger hold.
The front baffle should always be a quarter inch thicker if not more. And subs should be attached with washers and threaded screws at the very least. Or use t-nuts.
Cut a full circular metal plate and apply to both sides as well if you ever want to sell to friends, family, or others. Apply lock tight to the threads and add a rubber seal too.
I like my gear lasting a lifetime, not 18 months.
Alif Ramadhan
Alif Ramadhan Damping material only for sealed enclosures
I know this is replying to an old comment, but just in case someone is reading. Normal screws can work just fine. The only time you run into issues is if the baffle is flexing. Whether that is from lack of bracing or thin baffle thickness. Also Your front baffle doesn't necessarily have to be a quarter inch thicker. Baffle thickness is all determined by the application (box size/shape, amount of power going to sub, etc).
can u plz provide me the measures of this subwoofer box
Saludos de Uruguay amigo
Love it love it love it! Keep it up man. Keep making videos like this. Could watch it all day ;)
I like it
Nice 👍
when soldering dont hold the soldering iron onto the wire and put the solder onto the soldering iron you should heat the wire up and then soak the wire with solder while the soldering iron is still on
Joshua Hutton incorrect... you heat the wire with the soldering iron first and let the copper wire soak up the solder
@@Cdubb_Official "you should heat the wire up and then soak the wire with solder"
I think thats what he means.
Interesting stuff tho
You get fluxed solder to melt on the iron, and that transfers heat much quicker to the wire. If you try to heat heavy gauge wire first, it just sinks the heat away and melts the insulation. He just needed a hotter iron - at least 420C for that gauge.
Let the solder iron heat the wire first, THEN apply solder tin. You're hot glueing now :-)Nice build!
Keep screws away from edge and pre drill, don't solder wires that go in spring connection as it reduces surface contact 👍
so are these better than the old 18s before?
how loud is it in other parts of the house?
Didn't use POLIFILL ? Do you recommend to use it in factory made SUB ?
Got Energy ESW-v10 subwoofer but it's empty inside.
Pro electrical tip, if you don't trust your own solder joints, use a spade connector on the blade itself. Works just as well if not better than solder in a hot enclosure.
An impedance test to confirm the port tuning would be nice. I like the white colour :)
you should use T nuts to fasten the subs. re-usabe threaded fasteners that are machine threaded not just screws.
Super 👍
I am interested in the plans for the subwoofer project, and was wondering if you have plans for the two tower speakers.
Pro carpenter tip, when screwing into wood, be sure to drill pilot holes so the wood screw you're using doesn't cause the wood to split as you all saw when he ran his first screw in.
bwahaha! no joke!
I have build almost the exact same housing for my movic aw3000 3 or 4 years ago!
but I have a twin face plate, two cross braces in the middle of the box and the amp is integrated.
volume is around 100ltr. and it plays low around 32hz.
Love it!
ADD MORE VIDEOS THIS IS GREAT !!!!!!!!
NO FOOTAGE OF THE ACTUAL BUILD SMH NNNNOOOO DUDE THAT'S WHY WE WATCHED THIS VIDEO
Nice i rather 15" well..
i hope these sound good enough
i would say you should add a filter for the lows on the input conections so the amp only amplifies the low frequencies and not all of them and cutting tje highs at the output
The amps will be ran off of a crossover in the end.