Coming from a Honda technician, well done my friend;) Very informative and done correctly. And using a multimeter with continuity tester or test light both work well.
This bike was revolutionary when it came out and I can see why. All the little details show incredible engineering and design before computers were available for drawings, testing, etc. Your videos are both amazing and a testament to your vast knowledge of bikes and cars. If you lived close I would want to spend all day with you learning. I don't think I will ever restore a 750 but I could me working on a single or twin cylinder bike.
I remember when I had my 73-CB-750 back in the mid 80’s And the best thing I ever bought for that bike Besides a Vance a Hines four into one exhaust/jet kit was electronic ignition 😃 it started better it ran better it made better power at higher RPM and you never had to mess with it👍 nice build. makes me miss the old 750.
I was so happy to see you had new videos!!! My wife was so happy for me that she sat there and watched them with me!!! Glad you took a break for yourself, Happy holidays (a little late on my part, but better late then never) Great to have you back! Ggggggggggrrrrrrrrreeeeeeeaaaaaaattttttttt videos!!!!!
Hi HackAWeek, congratulations on all your videos specially these ones about Honda 750 Four build. I'll go changing my plates these weekend and came to review this video. Wanted to make sure I will not miss a thing. Thank you sir.
Very helpful info and great work. Gives me a some motivation to get on with mine , the carbs are the same too I need to make that small screw to retain the shaft. I`m loving these CB 750 videos. Thanks .
I am patiently waiting for more videos because I'm building a 71 Honda double overhead and your videos help allot because I have no idea what I'm doing I'm only 17
Merry belated Christmas and New year. I had no idea about engines, or motorbike parts for that matter, and after watching your series I am so much more clued up. I started watching the first episode 3 days ago and now I have watched all the way to this episode...Highly addictive to watch. Looking forward to seeing the next episode and development of your custom Honda CB750. I am highly inspired to do a custom job myself in the future. Brilliant and thanks :)
You can use the coils from the older goldwings for the cb750s. That way you can replace the wires. They are allt better than stock. You don't need to spend a lot for coils
Hey HAWTV, Dean, Glad to have you back! I have been a subscriber for years. I grew up on bike's & motorcycles, the first was a 1971 Hodaka Ace 100 B+, later I had a 1978 A-2, first year with disc brake, Kawasaki KZ 1000, 2mm bigger cop carb's, a real runner. I love electronic's and building Cigar Box Guitar's, in addition to other projects. If o.k., I might suggest some projects for future video's, where I'm sure you have your own Idea's for vid's, these could be of interest. I'd like to wish you & yours a Happy New Year & All the Best in 2016. Take care, be good, Cass.
Holy shit! What a huge help! You explained it AND demonstrated it so even us dummies could understand. My only question is what did you have your tester touching while you were turning the cam? Again, awesome video! Thank you so much!
+HackaweekTV Great video. I think it bad form that you ordered a refurb kit that did not include the back-plate. However, I suspect that if the back-plate was included, it would probably be twice the price including the rest of the components. The 00 steel-wool has to be bad for the chrome. Although a different solution, a friend of mine suggested using scrunched aluminium foil to remove corrosion... it works, but it isn't long before the corrosion returns (under aggressive conditions). It resolves the immediate problem anyway. Merry Christmas.
+Spoif Points and condenser were included in the parts that came with the bike. Backing plate is fine, all threaded holes ok so I just used it. 000 steel wool doesn't hurt the chrome and it does a good job of removing the pitting. Applying a bit of wax helps slow down the rusty spots from reappearing. Merry Christmas to you too and thanks for watching! :)
+truantray I'll no doubt switch to electronic at some stage, but I thought it would be good to just build this thing up stock first just to have the procedures on video.
Hello, I just recently started watching your videos after hearing about you from Delboy's Garage. I'm really enjoying them. Very informative and entertaing! I've only made it through the first 4 in this series, but skipped ahead to tell you about a good source for Japanese bike parts, in case you've not heard of them yet, Parts 'N More. I was shopping around for carburetor rebuild kits for a 1979 KZ1000 I'm working on. They sell kits I needed for $16 and change...about half of what Bike Bandit and others are asking...for the exact same kits! And they wasted no time in getting them to me! Check 'em out.
+Ichiban Moto Oh hey thanks! Now I know the EXACT pronunciation! Happy New Year to you too Ichi! We should do another collaboration in the coming year!
multimeter black lead to a clean ground on the engine, red lead clips onto the tail of the yellow points wire for 1/4, then change the red to the blue tail for 3/4 . hope this helps.
Merry Christmas and thanks for the great videos, not only this one but all the ones leading up to it. I've really been enjoying the whole series. Just one little thing: I heard you mention "Philips" screws - wouldn't they be JIS screws not Philips? Just wondering - I don't actually know about what the Hondas were built with back in those days. I can tell you, though, that in the 80s and 90s I used to repair synthesizers and the Yamaha DX series had LOTS of screws holding them together, and if I grabbed the wrong screwdriver it just felt wrong. The JIS driver fits nicely in a JIS screw, it grabs better and your hand isn't as sore after you've done up a couple of dozen of them. If you have a Philips screwdriver in a JIS screw, you need to keep more downward pressure to stop it slipping out and possibly wrecking the screw. As I said, I'm just asking, I don't know what they used on those bikes, Philips or JIS...
+Merlin Zener Right you are! JIS screws are what was used on these bikes. I need to get a set of those screw drivers for upcoming videos and explain the difference. Thanks!
Nice to see new videos from the project :) Did you checked the spark advancer? The springs get weak after a few decades and the advancer could be stuck. Best regards!
Thanks for your amazing and helpful videos . 10.13 I follow your procedures rotating the plate for cil 1 & 4 and the beep don't stop on any variable position . Same happened for cil 2 & 3 . I am making something wrong ? I'll appreciate your help . Thanks
I would have never guessed this from my haynes manual. My transistors just died and cant afford new ones. but a scrapped set of points and condensers. thanks for helping me go oldschool!
Thanks for the Christmas gift Dino! This is probably obvious to others but did you ground the battery to a point on the frame to get the test setup to work? Merry Christmas!
Ive been following your vids for awhile now. Im also rebuilding a cb 750. Mine is a 75 cb 750 ss. (Question) On the generator side, the rotor on the end of crankshaft was a solid magnet pre 1979 by Hondas design from what Ive read. Ive noticed mine has a bit of surface rust on it, will this have an effect on magnetic field operation? I touched a screw driver to its surface, seemed very week in magnetic attraction.....
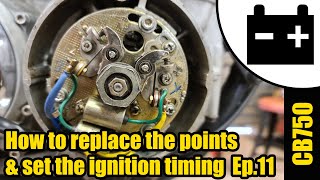
Dean - When setting the point gaps, how do you know when a breaker is at maximum opening width/full lift exactly? Are you just eye balling that? Is there a marker that you can see through the peephole that tells you what the max opening for each of the widths should be?
I took off the whole assembly and had a look at it. If you take off the 10mm nut it has two higher point. One of them is at the point where it has the most lift. At about 5:50 in the video you can se the higher points that the nut and "washer" fits into. Or in this picture: i857.photobucket.com/albums/ab139/dave500_01/advanced.jpg When turning the engine you should also be able to see when its lifting.
Very helpful video, I've been redoing a 76f. Couldn't help but notice the asheville sweatshirt you in town? I could use some help diagnosing a no spark issue?
Hi - again - so the continuity beep never stops on either blue or yellow side - i did some reading but cannot find anythiing on point...is it the coils which i saw? Going to go out and try to move the plate to get the beep to stop. Anyway, thanks for any advice you can give me.
I put in new points and capacitors, but never took the plate off or moved it. If I gap the points correctly, it seems I don't have to mess with timing.....am I right?
I need a bit of help. I am timing my honda cb 750 same as yours. When i m timing 1 and 4 point 2 and 3 are working. When i time 2 and 3 points 1 and 4 are working. I changed the wiring position also but remained the same. Any help please
Make project on automatic water controller which is build by using relay, 555 timer resistor and transistor this will automatically switch on and off the domestic water pump by sensing water level in tank help me making this project
+Cecil Childers Yes indeed there is one listed in the parts breakdown from Honda. It's listed as unavailable. Pretty common grommet and my local Mom & Pop hardware store has a great assortment. :)
mechanical stuff The coil steps up the voltage from the magneto, with the points triggering the spark. Generally this is pretty reliable, sometimes the points become electrically dirty with time though.


Coming from a Honda technician, well done my friend;) Very informative and done correctly. And using a multimeter with continuity tester or test light both work well.
This bike was revolutionary when it came out and I can see why. All the little details show incredible engineering and design before computers were available for drawings, testing, etc. Your videos are both amazing and a testament to your vast knowledge of bikes and cars. If you lived close I would want to spend all day with you learning. I don't think I will ever restore a 750 but I could me working on a single or twin cylinder bike.
So satisfying to watch someone stick through something hard, and slowly but surely make progress =))
Asheville local here gonna be doing something like this soon right off Charlotte Street. Cheers and thank you so much for making these videos
Loving that Asheville hoodie and the knowledge shared!
I remember when I had my 73-CB-750 back in the mid 80’s And the best thing I ever bought for that bike Besides a Vance a Hines four into one exhaust/jet kit was electronic ignition 😃 it started better it ran better it made better power at higher RPM and you never had to mess with it👍 nice build. makes me miss the old 750.
I followed your instructions and used my sight to set static timing then a timing light for the final---couldnq'tr be more pleased thanx
I was so happy to see you had new videos!!! My wife was so happy for me that she sat there and watched them with me!!! Glad you took a break for yourself, Happy holidays (a little late on my part, but better late then never) Great to have you back! Ggggggggggrrrrrrrrreeeeeeeaaaaaaattttttttt videos!!!!!
Hi HackAWeek, congratulations on all your videos specially these ones about Honda 750 Four build. I'll go changing my plates these weekend and came to review this video. Wanted to make sure I will not miss a thing. Thank you sir.
Nice work, Dino.
And yes, that is the correct clamp for connecting the coils to the bike.
+Ron Icard Thanks!
Very helpful info and great work. Gives me a some motivation to get on with mine , the carbs are the same too I need to make that small screw to retain the shaft. I`m loving these CB 750 videos. Thanks .
brings back fond memories...
I am patiently waiting for more videos because I'm building a 71 Honda double overhead and your videos help allot because I have no idea what I'm doing I'm only 17
loving the build getting me inspired to finish my bike now
Thank you for your present Dino..
Merry Christmas to you.
Here in Bremen, Gemany is it sunny at 10 degrees.
Merry Christmas to you too and thank you for sharing all your stuff.
Delkevic makes amazing stuff. I had a set on my VFR800. Fit and finish is great for the price!
Merry belated Christmas and New year. I had no idea about engines, or motorbike parts for that matter, and after watching your series I am so much more clued up. I started watching the first episode 3 days ago and now I have watched all the way to this episode...Highly addictive to watch. Looking forward to seeing the next episode and development of your custom Honda CB750. I am highly inspired to do a custom job myself in the future. Brilliant and thanks :)
This is an excellent video.
I love watching you build bikes. enjoing it. Keep it up.
Really clear and useful. Thanks Mr Hack
Out of all the videos! !! This was so fukn simple and this one worked for me. Fired right up and no issues. Thanks!!!!!!!!
Amazing dismount at the end of the video, LOL... that was highly unexpected!
Installing a new plate this weekend..thanks!
Dean-O you should build a motorized Drift Trike for your next or an upcoming project! Liking this build very much by the way! Keep it up!!
Dino....great videos. I can't wait to see the next upload.....makes me want to start a build myself!
Enjoyed very much, thank you! Can't wait till you fire it!
And a happy sparking Christmas to you.
Delkelvic great value for money I have a full system on my cb500
you can´t go wrong with Delkevic, continuation of a Merry Christmas
this video is the only thing I got for Christmas. thanks deano dino dino?
+nocomment Merry Christmas! From Dino!
You can use the coils from the older goldwings for the cb750s. That way you can replace the wires. They are allt better than stock. You don't need to spend a lot for coils
I have a full delkevic stainless system on my VFR 800. Easy to fit and looks great. Merry Xmas chief.
You did it the simplest.!
good job dude great video for cb owners
Merry Christmas to you to
+TheMeChaNic55 back to the base partner.
Thanks! And merry christmas to you too!
Twins Dino!! Stereo exhaust > Mono exhaust.
Well come back Dino great Video Happy Christmas and a great new year!!
Hey HAWTV, Dean, Glad to have you back! I have been a subscriber for years. I grew up on bike's & motorcycles, the first was a 1971 Hodaka Ace 100 B+, later I had a 1978 A-2, first year with disc brake, Kawasaki KZ 1000, 2mm bigger cop carb's, a real runner. I love electronic's and building Cigar Box Guitar's, in addition to other projects. If o.k., I might suggest some projects for future video's, where I'm sure you have your own Idea's for vid's, these could be of interest. I'd like to wish you & yours a Happy New Year & All the Best in 2016. Take care, be good, Cass.
+Cass Virgillo Glad to be back and glad you enjoy the videos. What kind of projects do you have in mind?
might i
get a drawn of da scimatica that little circle you made
Merry Christmas !
Nice video. Thumbs up.
Thanks Dino, another good vid, merry xmas from Australia.
Thank you! I'm about up to this on my build this was very helpful
Merry Christmas! Awesome video series!
Hi Dean, How Bad Ass is it to have the formidable Honda CB 750, a true Icon of the 1970's? Looks like fun to me, awesome job! Be good, Cass.
Holy shit! What a huge help! You explained it AND demonstrated it so even us dummies could understand. My only question is what did you have your tester touching while you were turning the cam? Again, awesome video! Thank you so much!
Great video mate, classic roll at the end! :)
+HackaweekTV Great video. I think it bad form that you ordered a refurb kit that did not include the back-plate. However, I suspect that if the back-plate was included, it would probably be twice the price including the rest of the components.
The 00 steel-wool has to be bad for the chrome. Although a different solution, a friend of mine suggested using scrunched aluminium foil to remove corrosion... it works, but it isn't long before the corrosion returns (under aggressive conditions). It resolves the immediate problem anyway.
Merry Christmas.
+Spoif Points and condenser were included in the parts that came with the bike. Backing plate is fine, all threaded holes ok so I just used it. 000 steel wool doesn't hurt the chrome and it does a good job of removing the pitting. Applying a bit of wax helps slow down the rusty spots from reappearing. Merry Christmas to you too and thanks for watching! :)
+Spoif A plastic dishwashing scourer and some auto polish would be just enough without scratching the plating .
+Steve Smith clear coat it , i did it on a 1977 Camaro front bumper . i sanded it with some 1000 grit , and the clear stuck good and looked good .
I cant wait to hear that engine bro merry chistmas from Venezuela!!!!!!
great hard work
wow..points, there are some UK companies selling solid state electronic ignitions for old Hondas.
+truantray I'll no doubt switch to electronic at some stage, but I thought it would be good to just build this thing up stock first just to have the procedures on video.
Hello, I just recently started watching your videos after hearing about you from Delboy's Garage. I'm really enjoying them. Very informative and entertaing! I've only made it through the first 4 in this series, but skipped ahead to tell you about a good source for Japanese bike parts, in case you've not heard of them yet, Parts 'N More. I was shopping around for carburetor rebuild kits for a 1979 KZ1000 I'm working on. They sell kits I needed for $16 and change...about half of what Bike Bandit and others are asking...for the exact same kits! And they wasted no time in getting them to me! Check 'em out.
Hi !! I am waiting to Part 30 ! come on...Bring it on !
Thanks
very informative! Thank you.
YaY Sparks ! and looking forward to that sweet Delkevic exhaust ( pronounced Delkevic ) ......... and have a Happy New Year Dino !
+Ichiban Moto Oh hey thanks! Now I know the EXACT pronunciation! Happy New Year to you too Ichi! We should do another collaboration in the coming year!
best Xmas present ever thanks and merry xmas to you
Hey Dino!
Where did you connect the leads for ground and the beeping test?
Seems like Dino isn't answering a key question 😪
multimeter black lead to a clean ground on the engine, red lead clips onto the tail of the yellow points wire for 1/4, then change the red to the blue tail for 3/4 . hope this helps.
M
Merry Christmas and thanks for the great videos, not only this one but all the ones leading up to it. I've really been enjoying the whole series.
Just one little thing:
I heard you mention "Philips" screws - wouldn't they be JIS screws not Philips?
Just wondering - I don't actually know about what the Hondas were built with back in those days.
I can tell you, though, that in the 80s and 90s I used to repair synthesizers and the Yamaha DX series had LOTS of screws holding them together, and if I grabbed the wrong screwdriver it just felt wrong. The JIS driver fits nicely in a JIS screw, it grabs better and your hand isn't as sore after you've done up a couple of dozen of them.
If you have a Philips screwdriver in a JIS screw, you need to keep more downward pressure to stop it slipping out and possibly wrecking the screw.
As I said, I'm just asking, I don't know what they used on those bikes, Philips or JIS...
+Merlin Zener Right you are! JIS screws are what was used on these bikes. I need to get a set of those screw drivers for upcoming videos and explain the difference. Thanks!
JIS screws have a dot on the head, Phillips don't.
Try DC-CDI it's much, much better than the classical ignition ;) Points can be problematic.
Estaría genial que este vídeo tenga subtítulos en español excelente trabajo
Nice to see new videos from the project :)
Did you checked the spark advancer? The springs get weak after a few decades and the advancer could be stuck.
Best regards!
+Tobbe M Yes. It's in good working condition.
Thanks for your amazing and helpful videos . 10.13 I follow your procedures rotating the plate for cil 1 & 4 and the beep don't stop on any variable position . Same happened for cil 2 & 3 . I am making something wrong ? I'll appreciate your help . Thanks
Why not convert to transistorized ignition? Love the series, thanks.
+emrguns1 I'm going to but I did the points to give viewers a how to on the subject.
I would have never guessed this from my haynes manual. My transistors just died and cant afford new ones. but a scrapped set of points and condensers. thanks for helping me go oldschool!
Why are you still using points? Don't they make a Pertronix or something similar for the older bikes?
Thanks for the Christmas gift Dino! This is probably obvious to others but did you ground the battery to a point on the frame to get the test setup to work? Merry Christmas!
+David Painchaud Grounded to engine case.
Could you do a video on installing electronic ignition? There's a couple on youtube but not very informative.
Ive been following your vids for awhile now. Im also rebuilding a cb 750. Mine is a 75 cb 750 ss. (Question) On the generator side, the rotor on the end of crankshaft was a solid magnet pre 1979 by Hondas design from what Ive read. Ive noticed mine has a bit of surface rust on it, will this have an effect on magnetic field operation? I touched a screw driver to its surface, seemed very week in magnetic attraction.....
hay man steel wool with oil is amazing try it next time you have rust on Chrome
Dean - When setting the point gaps, how do you know when a breaker is at maximum opening width/full lift exactly? Are you just eye balling that? Is there a marker that you can see through the peephole that tells you what the max opening for each of the widths should be?
I was wondering that also, I have to review the manual.
I took off the whole assembly and had a look at it. If you take off the 10mm nut it has two higher point. One of them is at the point where it has the most lift. At about 5:50 in the video you can se the higher points that the nut and "washer" fits into. Or in this picture: i857.photobucket.com/albums/ab139/dave500_01/advanced.jpg When turning the engine you should also be able to see when its lifting.
@@Madnesswillensure how can you tell the highest lift. Do you set your points at .014 or .016
Very helpful video, I've been redoing a 76f. Couldn't help but notice the asheville sweatshirt you in town? I could use some help diagnosing a no spark issue?
+michael keiser I'm in the Sandhills.
So the starter in this test, is the motorcycles ground wire, without being connected to the battery?
Hi - again - so the continuity beep never stops on either blue or yellow side - i did some reading but cannot find anythiing on point...is it the coils which i saw? Going to go out and try to move the plate to get the beep to stop. Anyway, thanks for any advice you can give me.
I put in new points and capacitors, but never took the plate off or moved it. If I gap the points correctly, it seems I don't have to mess with timing.....am I right?
Hi HackWeek !!! I broke my point nut the big one where come the 10mm nut. Do you know the part number ? My engine is seized! Too bad
I need a bit of help. I am timing my honda cb 750 same as yours. When i m timing 1 and 4 point 2 and 3 are working. When i time 2 and 3 points 1 and 4 are working. I changed the wiring position also but remained the same. Any help please
BEM EXPLICADO VALEU.
What is the part the plate slide over called and where can I get one? Mine is missing.
thank you (:
How do you know when you should change your points?
Helo sir i hv watched other videos about static timing but confused.Beeping or light on at the F Mark should be on or off
The circuit is about to break when points open continuity will be lost, so beep will stop light out when on f mark.
I don't get what sliding both 1&4 and 2&3 do. Can someone help me out?
Make project on automatic water controller which is build by using relay, 555 timer resistor and transistor this will automatically switch on and off the domestic water pump by sensing water level in tank help me making this project
Grommet Issue. I'd put one there anyway being close to road and all
+Cecil Childers Yes indeed there is one listed in the parts breakdown from Honda. It's listed as unavailable. Pretty common grommet and my local Mom & Pop hardware store has a great assortment. :)
Someone will get one clean classic CB if you was to sell it.
what did you do to make spark without ECU unit ?
thats a carburator bike it does not use any ecu
mechanical stuff The coil steps up the voltage from the magneto, with the points triggering the spark. Generally this is pretty reliable, sometimes the points become electrically dirty with time though.
CAN THIS BE TESTED FROM A BATTERY? HOW?
Same question, ive been trying to do it with a battery with no eucces
Success
RIP wiring with no grommet