FINALLY, someone who explained exactly how a Chaotic board is built. I have seen many videos on this topic only to be confused but you nailed it. Thank you. You have a new subscriber.
I use the TamBee Lazy Susan Hardware. It is heavy duty and I like the quality for the price. In this video, I used the 20" Heavy Duty. Appreciate the support and thank you for your service.
Amazing. I dont make end grain because i dont have a drum sander. I think if we round the back side and go very carefully, it’s perfectly possible to do it using the planer. Maybe a shelix works greater than the regular blades.
A straight planer blade, as long as it is sharp, works perfectly fine. That is what I had in the planer at this time of this build. The key is to round over that exiting edge and make sure that you are taking off as little as possible (1/64th or less). The best measurement is by the planer speed. You should see no reduction in speed and not hear any reduction in speed. Go for it!!!
AS you already said at 17:26 Absolutely Stunning !! 😁👍 I am newish to making cutting boards but I would love to try doing a few of these boards.....one day maybe 😁👍
Nice boards! I wanna make something similar but I only have enough to make 1 board. Can I still make a pattern like this with 6 different types ( purple heart, mahogany, maple, padauk, zebra, walnut) all about 2 inch strips?
Yes, you should be able to bring something together that will look really cool. Just think through your steps and make as many mixes of lumber as you can.
@Under the Water Design Thank you so much for the reply! This would be my first time attempting this type pattern, but I didn't wanna start cutting and waste beautiful pieces. Lol! Now I feel more confident 👍
Awesome job. When you first started out how long were your initial pieces of lumber roughly. It looked as if you were able to get 5 regular cutting boards out of the material. Great video on showing all of the steps
Thank you for the question and sorry for the late response. The original lumber was all around 4 to 6 board feet. So roughly 1 inch thick, by 4 to 6 inches wide by 8 feet long. And yes, plenty of material for a bunch of boards.
@@UndertheWaterDesign - Thank you for answering my question. As you can probably tell I’m pretty new to woodworking. Have the tools, still getting the 1/2 of a one car garage in order. Plan to get busy making things in two weeks. Looking forward to making this for my niece as a wedding present! 😁
@@jelias9247 She will absolutely love it. And, don't be afraid to buy a little extra as it will give you some options to replace pieces that might not look right.
I first cut a template out of MDF. Then I mark the board and rough cut on the band saw. Then double sided tape and a flush trim bit in the router to finish cut.
Yes, without question, but I prefer the finish off the table saw. You waste some wood on the table saw, but you make up for it by having a "glue up" ready surface. And the surface is flat. It can be hard to replicate that many cuts and get a flat surface.
Oily tropical woods can be problematic and specific glues can be used for better long term results. Here is link to review: www.wood-database.com/gluing-oily-tropical-hardwoods/
It is perfectly fine to plane end grain. The key point to planeing end grain is that you must cut as little wood off as possible with each pass. Think about trying to take off 1/64th to 1/100th or less per pass. Also make sure to add a small bevel to the edge that comes out of the planer last. This will reduce chip out of the vertical grain. People have planed end grain for 1000s of years, albeit by hand plane, so using a machine is perfectly fine. Hope that helps.
Thank you. I make a lot of boards... never tried this one, Lets see what am I gonna try tomorrow? :) I had to come back and do an edit. The more I thought about your video the more I liked it. Your attitude and explanations are great. You earned a sub from me. Would you check out Bearded Viking woodworks? If you like it, join in, I think you would be a good fit for the group. I don't say that lightly.
Gorgeous boards!! Subscribed! How did you make the boards that you used next to your clamps that hold the pieces during your glue ups? I’ve not seen that trick before. Thanks for a great video!
Thank you so much 😊 I don’t think I understand what you are asking, but will guess your asking about the risers? Those are made from plywood in a “T” shape with tyvex tape on top. This allows me to keep my clamps clean, the boards super flat and allows me to access the glue line on the underside of the board.
Love the videos! Definitely Subscribing! We are new to UA-cam, harder than it looks. Keep up the good work! If you get the chance stop by our channel, UA-camrs gotta stick together! 😉


First guy I’ve seen not scared to run end grain through planner👍😎
Fear nothing!!!
what i love is the realism, after a day of milling , its like , yup had enough of doing this , today , time out
Thank you and yes, you can only do so much before you have to call it!! 😀
FINALLY, someone who explained exactly how a Chaotic board is built. I have seen many videos on this topic only to be confused but you nailed it. Thank you. You have a new subscriber.
Thank you very much. Still learning the whole video thing, but I appreciate the support very much.
Very nice. Thanks for the video.
Thank you for the support.
Very cool, also makes a great looking coffee table.
Yes it would. That is a great idea!!
Love it! Keep up the good work.
Thank you so much!!
This will be my next board I attempt! Can’t wait, thanks for sharing
You are welcome. It really is a good looking and easy way to make a board. Have fun.
Did you perhaps video any of the Lazy Susan construction? And of the darware that you would recommend...They look amazing...
I use the TamBee Lazy Susan Hardware. It is heavy duty and I like the quality for the price. In this video, I used the 20" Heavy Duty. Appreciate the support and thank you for your service.
You can order the hardware on Amazon
Good job buddy beautiful
Thank you
Amazing. I dont make end grain because i dont have a drum sander. I think if we round the back side and go very carefully, it’s perfectly possible to do it using the planer. Maybe a shelix works greater than the regular blades.
A straight planer blade, as long as it is sharp, works perfectly fine. That is what I had in the planer at this time of this build. The key is to round over that exiting edge and make sure that you are taking off as little as possible (1/64th or less). The best measurement is by the planer speed. You should see no reduction in speed and not hear any reduction in speed. Go for it!!!
@@UndertheWaterDesign thank you!! I’ll try something like this soon!! And congratulations for your great and beautifull work, and for tour feed-back!
looks awesome, definitely gonna do one 👍
Thank you. Have fun and make sure to post up some pics when finished.
Thanks for explaining this all, i can't wait to try this
Thank you. Have fun and post some pics when done.
AS you already said at 17:26 Absolutely Stunning !! 😁👍 I am newish to making cutting boards but I would love to try doing a few of these boards.....one day maybe 😁👍
Thank you. This is a pretty easy process. Just don't let it overwhelm you. Step by step and then all of a sudden . . . done!!! Have fun.
Nice cutting board!! Keep it up!!
Thank you very much
Love it turned out awesome
Thank you. Good luck on your quest to build all 8 seasons of the builders challenge!!
Great video! Keep up the amazing work!
Thank you
I need to try one of these!
Share your pics with me.
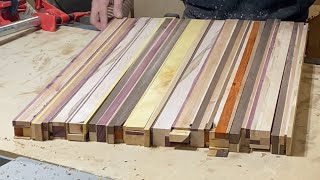
Nice boards! I wanna make something similar but I only have enough to make 1 board. Can I still make a pattern like this with 6 different types ( purple heart, mahogany, maple, padauk, zebra, walnut) all about 2 inch strips?
Yes, you should be able to bring something together that will look really cool. Just think through your steps and make as many mixes of lumber as you can.
@Under the Water Design Thank you so much for the reply! This would be my first time attempting this type pattern, but I didn't wanna start cutting and waste beautiful pieces. Lol! Now I feel more confident 👍
Awesome job. When you first started out how long were your initial pieces of lumber roughly. It looked as if you were able to get 5 regular cutting boards out of the material. Great video on showing all of the steps
Thank you for the question and sorry for the late response. The original lumber was all around 4 to 6 board feet. So roughly 1 inch thick, by 4 to 6 inches wide by 8 feet long. And yes, plenty of material for a bunch of boards.
How much wood did you start with to make that many boards? And they are beautiful boards! I’m definitely going to be making some of those!
This is a guess, but I think 20 board feet is plenty for a large board.
@@UndertheWaterDesign - Thank you for answering my question. As you can probably tell I’m pretty new to woodworking. Have the tools, still getting the 1/2 of a one car garage in order. Plan to get busy making things in two weeks. Looking forward to making this for my niece as a wedding present! 😁
@@jelias9247 She will absolutely love it. And, don't be afraid to buy a little extra as it will give you some options to replace pieces that might not look right.
Amazing work. How did you cut the circle?
I first cut a template out of MDF. Then I mark the board and rough cut on the band saw. Then double sided tape and a flush trim bit in the router to finish cut.
@@UndertheWaterDesign Thanks - really well done and appreciate the help.
@@stanleylee1974 Absolutely, appreciate the support as well.
Fascinating. Just wondering if making the random rips on either side of the glue lines might be done on bandsaw? Love the end product(s) for sure!
Yes, without question, but I prefer the finish off the table saw. You waste some wood on the table saw, but you make up for it by having a "glue up" ready surface. And the surface is flat. It can be hard to replicate that many cuts and get a flat surface.
Lots of work but worth the effort
Yes, but well worth the effort.
Are there any particular woods which will not glue up well or to another species?
Oily tropical woods can be problematic and specific glues can be used for better long term results. Here is link to review: www.wood-database.com/gluing-oily-tropical-hardwoods/
That link has a list of woods as well.
Thank you very much
Did you have any trouble with the planer on the end grain? I’ve always heard never to do it but I really want to lol
It is perfectly fine to plane end grain. The key point to planeing end grain is that you must cut as little wood off as possible with each pass.
Think about trying to take off 1/64th to 1/100th or less per pass.
Also make sure to add a small bevel to the edge that comes out of the planer last. This will reduce chip out of the vertical grain.
People have planed end grain for 1000s of years, albeit by hand plane, so using a machine is perfectly fine.
Hope that helps.
It works, until it doesn't. Often with disastrous results
Thank you. I make a lot of boards... never tried this one, Lets see what am I gonna try tomorrow? :)
I had to come back and do an edit. The more I thought about your video the more I liked it. Your attitude and explanations are great. You earned a sub from me. Would you check out Bearded Viking woodworks? If you like it, join in, I think you would be a good fit for the group. I don't say that lightly.
Absolutely and thank you.
Hi where can I get exotic hardwoods? I see you used a lot of nice pieces
You can order them online or go to your local lumber retailer.
@@UndertheWaterDesign Thx
Is the glue edible ? This is fantastic, thank you
It is TiteBond 3
Gorgeous boards!! Subscribed! How did you make the boards that you used next to your clamps that hold the pieces during your glue ups? I’ve not seen that trick before. Thanks for a great video!
Thank you so much 😊 I don’t think I understand what you are asking, but will guess your asking about the risers? Those are made from plywood in a “T” shape with tyvex tape on top. This allows me to keep my clamps clean, the boards super flat and allows me to access the glue line on the underside of the board.
Under the Water Wood Works - Thanks for the explanation! I need to make some of those now.
Dumb question but why avoid glue lines?
Once you complete a glue up, you don't want to recut the glue line just to reglue it. That glue line acts as your guide for different size pieces.
Love the videos! Definitely Subscribing! We are new to UA-cam, harder than it looks. Keep up the good work! If you get the chance stop by our channel, UA-camrs gotta stick together! 😉
I'll check it out!
Cayotic is it not cayotic
It really is . . . . chaotic
My adventure with woodworking began with projects from woodglut.
Woodglut looks like a pretty cool place for knowledge and plans
@CuttingBoardArtisan on IG for more
Nice