How to Replace Power Steering Rack 05-15 Toyota Tacoma

Вставка
- Опубліковано 16 кві 2020
- Buy Now!
New Rack & Pinion Assembly from 1AAuto.com 1aau.to/ia/1ASTG00017
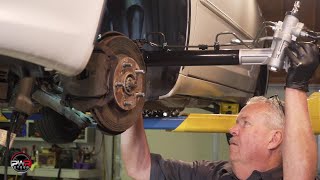
In many cases the steering rack will last the lifetime of the vehicle, but there are occasions where it won’t. If the steering rack in your vehicle is leaking fluid, was damaged, or otherwise needs replacement, it is often a more complicated job, but possible to DIY. This video shows you how to install a new steering rack in your 2005-15 Toyota Tacoma.
• Check here for more videos on the 2005-15 Toyota Tacoma • Toyota Tacoma 2005-15 ...
This process should be similar on the following vehicles:
2005 Toyota Tacoma
2006 Toyota Tacoma
2007 Toyota Tacoma
2008 Toyota Tacoma
2009 Toyota Tacoma
2010 Toyota Tacoma
2011 Toyota Tacoma
2012 Toyota Tacoma
2013 Toyota Tacoma
2014 Toyota Tacoma
2015 Toyota Tacoma
Tools you will need:
• Flat Blade Screwdriver 1aau.to/oaVU/1AXAA00013
• 17mm Wrench 1aau.to/oId/1AXAA00010
• 19mm Wrench 1aau.to/oId/1AXAA00010
• 12mm Socket 1aau.to/oaUr/1AXAA00015
• 17mm Socket 1aau.to/oaUr/1AXAA00015
• 22mm Socket 1aau.to/ojm/1AXAA00266
• Inner Tie Rod Removal Tool 1aau.to/oam/1AXAA00062
• Locking Pliers 1aau.to/ohK/1AXAA00139
• Needle nose pliers 1aau.to/ov9/1AXAA00051
• Needle nose pliers 1aau.to/ov9/1AXAA00052
• Side Cutters
• Air Chisel 1aau.to/oaM/1AXAA00270
• Ratchet 1aau.to/oa89/1AXAA00016
• Torque Wrench 1aau.to/oaft/1AXAA00044
• Brake Parts Cleaner
• Bungee Cord
• Copper Anti-Seize
• Gloves 1aau.to/orY/1AXSS00048
• Rust Penetrant
• Safety Glasses 1aau.to/ona/1AXAA00343
• Drain Pan 1aau.to/or2/1AXAA00320
• Floor Jack 1aau.to/oL9/1AXAA00068
• Hammer 1aau.to/oIL/1AXAA00091
• Wheel Chocks
Subscribe: / @trq
Check out our playlist:
Toyota Tacoma 2005-15 2nd Gen: • Toyota Tacoma 2005-15 ...
⚠ DISCLAIMER:
While TRQ strives to make the information provided in this video as accurate as possible, it makes no claims, promises, or guarantees about the accuracy, completeness or applicability of the content. No information contained in this video shall create any expressed or implied warranty or guarantee of any particular result. All do-it-yourself projects entail some risk. It is the sole responsibility of the viewer to assume this risk. TRQ is not responsible or liable for any loss damage (including, but not limited to, actual, consequential, or punitive), liability, claim, or any other injury or cause related to or resulting from any information posted in this video. - Авто та транспорт


√ *Watch the Video*
√ *Buy The Part at 1A Auto* 1aau.to/m/Shop-TRQ-Parts
√ *Do it Yourself*
√ *Save Money*
wish I could do it with my bad back, it helps to have a lift, just dropped it off at the Mechanic and got 290k outta it same color truck Barcelona red lol
Just did one of these today on a 05 Tacoma 4x4. You don't need to take boots or inner tie rods off or even the sway bar.
My grandfather taught me to spray all parts with penetrating oil as soon as you know you are gonna do a project. Hit it again the night before you are going to wrench. It’s life changing to think ahead. We live in Pennsylvania so we are always dealing with rust and frozen parts.
Excellent job, well done. Thanks for this video I was in the process of changing my rack after looking at your video I completed the job in less than 3 hours. Save myself at least $600.00 $$$$$
do you have a lift or did you do it on the ground?
This is by far the best and most comprehensive video I have seen on this project, I have a power steering fluid leak that I strongly suspect is a combination of the rack, the pump itself and possibly even the hoses, so I am planning to do this very project myself, but I plan to replace everything, so as to remove all doubts, since I have almost 215K on the clock. PS Just the fact that you used PB Blaster alone gets you an automatic like and sub.
I noticed a leak yesterday, and for the past 2 weeks, I hear a swishing noise when accelerating at low speeds not sure if they are related?
Textbook work bro. I learned from this and I'm 50. I've been fighting with those for at least 10 years
Very precise and professional video. Much better explanation than either Alldata or Mitchell.
The best video step by step on how to do this! I had to replace my high pressure line as i live on the rust belt but other than that it went well.
Very critical part you seemed to skip was the long bolt under the compressor. How did you get it out??
Very well explained in good detail . Well done.!
Awesome video! Thank you for this!
You guys are awesome! I’ve been wanting to do this job for 3 years on my truck but there were NO good videos on it.
THANK YOU!!!
+Colin Keeney Thank you! We love empowering our customers and showing how to perform DIY auto repairs with our high-quality auto parts. 1aau.to/m/Shop-TRQ
Very helpful, thanks so much !!
Very good and precise video.!
Excellent video!
Wow this is a big job. Over my head
This is a good technique!
Exelente amigo gracias por tu vídeo un 100 de calificación
Counting down the days until you do a Tundra rack next!
Yup don't think I'll attempt this one LOL. Know thy limits lol
Lol I was thinking the same after I watched it all. Looks like I won't be saving much money this time.
Same! Lol
Local mechanic will appreciate it lol
That is why, no one will remember your name.
But you still watch it so when you take it to someone you know what’s gonna get done to it..
So great to me!!!!
Funny how the impossible bolt to get out seems to already be flipped in this video. Why not do it on a truck that still has a factory rack that hasn’t been removed yet lmao. U make this look easy cuz the hard part is skipped.
In that case, the easiest thing to do is buy new bolts for a couple of bucks. Then pull the bolt out the top as far as you can get it, cut it, and when you put the new rack in just install the new bolts from the bottom. Only adds an extra minute or two of work.
You are completly right! Im doing the same job right now but with factory impossible to remove bolt! Now i have to maybe unscrew the a/c compresseur so i can waybe be able to remove that impossible to remove bolt! Haha thanks bro!!
Yo i jacked up the motor a little with a block and floor Jack. Grind the bolt down a tad as well
I like your video is the best video I’ve watched on the rock and pinion what’s the part number for those orings for the hyd lines
You probably came to this video to figure out what to do with the driver side bolt.
Cut about 3/8” of it off. The easiest way is to tighten the nut back on and just cut the bolt flush with the nut. You can use a dremel with a cut-off wheel or even a carbide multitool blade.
Once done, the bolt will clear the frame and you’ll be able to move the rack.
Great video! I have a 2017 leaking around the boots. Of course, she’s out of warranty. Only 50,000 miles and a 2 wheel drive. The dealer told me that my engine would have to come out to replace mine….only 4000 dollars? I can’t wrap my head around this!!
Excelent
how the phk did you get drivers side bolt off..hit ac compresser..had to get out sawzall to cut bolt
Aw man, wish I could get that guy to replace mine on my '06 Prerunner. I'll buy the part just need the installation done. Haha
Why are inner tie rods removed on gear removal but installed with them on?
Thanks , for this woork
you make a hard job look easy
Is it possible to get just the bypass line? my rack is ok but the line rusted out.
How does this new rack & pinion compare to something like what ya get from NAPA or Carquest? Rockauto?
I was working on a 2014 Tacoma with the 4.0 V6. The long bolt holding the driver side of the steering rack will not clear the AC compressor (bolt installed from the top). Added time needed to remove the compressor.
What is that aerosol that you're using to clean things up? Looks great.
brake cleaner
Love the videos!.........(side note: ya gotta put the hand down while talking!!!)
My Toyota highlander 2013 has a rack & pinion broke. It cost $1,350 the part and labor. What do you think of that price?
I used this video to do a 2006 4 Runner. I sat on the parts for a year before I had time to do the work. This video was perfect. Thank you for the detailed breakdown.
Question: new rack and pinion makes a creaky noise. What needs to be lubricated? The inner rod came installed.
I would check any suspension components 2006 was a long time ago lol
Anyone know the part number for the two O-rings? Toyota doesn’t have them. Thanks
That was a crusty taco! informative vid.
Great video, why do you have to center the rack?wouldn't the tie rod ends spun on the same turns as the original center it?
To get your steering wheel as close to center as possible and when you’re turning left, it takes the same amount of turns as when you’re turning right.
Wish my jam nuts would have been that easy.
I had to get the oxy acetylene torch.
The factory rack and pinion mounting bolts on mine were installed from the top. Had to loosen the air compressor in order to remove one of them. Very difficult to get to the air compressor.
+raildog100 Thanks for the feedback! 1aau.to/m/Shop-TRQ
Could have loosened the engine mounts and jack up the motor a little bit. Way easier than taking off the compressor!
@@jtech9326 Fighting with this right now. I will give it a shot.
Exelent video, the only desapointment is you only show how to remove 1 bolt of the rack and not the one on driver side .
I'll replace mine and that bolt wont go out because ac compressor is on the way.
so we are just going to gloss over the driver side steering rack bolt that the factory recommends to remove the ac pump to remove the bolt? do yourself a favor and grind the thread side of that bolt down about 3 threads worth before removing the nut, will save you a lot of cursing and flyin tools so it comes out.
do those rack and pinions sometimes come defective because they changed it and the steering is still hard when turning thanks for the info
Check the intermediate shaft that goes into the rack. It is common for that tiny cv joint to cease up and get stiff
Ive got cases that it did stop turning because of that tiny cv.. only 1/4 turn
What are the reasons you would need/want to replace the power steering rack? My '12 Tacoma makes a moaning noise when I spin my steering wheel while driving slow. That's kind of how I landed here at this video.
Did you ever replace it? Mines is making a whining noise when I turn as well, which also landed me here lmao
Where I work, we replace them because they are leaking usually. Sometimes because the rack gear is worn. You problem sounds like either the pump is on the way out, you have a blockage, or the fluid is low.
This makes it look easy, is it actually a difficult job to do yourself?
impossible to get get the driver side bolt out without removing the ac compressor or cutting a half inch off the bolt to get it out. In this video he already has the bolt flipped upside down so he doesn’t show u how to do it if your rack has never been taken out before
Short answer is yes it’s hard lol
What happens when you don’t undo the negative? Just had mine done and the airbag codes are on.
It must be frustrating for transplant from the south to work on northern vehicles. The rust. Down here in the south we are spoiled.
Of note. The two mounting bolts are put in one up one down. My trucks previous owner/shop put them both in top down. Which means cutting the bolt with a sawzall, lifting the engine or removing the ac compressor.
+Amnesia Iforget Thanks for the feedback! 1aau.to/m/Shop-TRQ
Vehicle manufacturers try to make you visit the dealerships for these type of jobs.
Release tension and remove serpentine belt from the AC compressor, unbolt the compressor from the block and *gently* manipulate it out and up. May need to release AC hose bracket from front of engine as well. Should give you juuuuust enough room to get the bolt high enough to be able to rotate the rack forward and pull the bolt. Source: worked for me to get it out yesterday. I believe I'll be mounting the bolt upside down to avoid the agony of dropping it in from the top this time.
Think this will work for the 18-19 Tacoma’s? I think I have to remove the front differential entirely.
+JamezN7 The install should be the same or similar. Buy this part on 1AAuto.com: 1aau.to/m/Shop-TRQ
@@TRQ thank you so much for the reply, luckily a buddy of mine had that type of tool but I got it out and in without removing the front diff. Thanks so much again man!
damn youre doing that on a new one?
The perks of having a 12in lift on mines, I have easy access to the whole thing.
Nice but it looks like a heavy job even with the huge lift.. I barely have a car jack... Haha I'm gonna have to pay someone 😪
This is awesome but I will hand it over to the pros to replace
Anyone have a lot of slop in the steering after the install? My steering is slipping a bit and my traction control light is coming on now after a few minutes of driving.
Mine was built with both bolts dropped from top, which means to turn a four hour job into a two hour job I have to cut the bolt and spend 10 on a new one. Oh joy.
I think I'll pass on the DIY for this one. Great video though.
Is this the same procedure for a 2005 4runner?
+Randy Schmidt Here's a how-to video for a vehicle similar to yours. These steps should be similar enough to complete this task: 1aau.to/m/Shop-TRQ
Got one for Highlander
@@TRQ can you send the link again? That link just takes me to your store
Why are you removing the inner tie rods???? Why???
Because it’s easier to remove the defective part dude. Work smarter not harder obviously the new rack will take some wiggling to put in but removing the inner tie rods on the old rack makes the job quicker and you don’t have to put to much energy removing it. Trust me you’ll need all the energy doing some of these jobs.
After step #25, I figured I’ll just add power steering fluid
How did you remove the left bolt?
Cut my driver side bolt and ordered a new one.
I cut the bolt with a grinder, still leaving an 1/8 + coming through the nut and put it up through the bottom this time. Just barely squeaked out.
this method is same as 2019 tacoma
vericle rearward pretty sure he is saying it that to mess with people that have issues with ppl saying things wrong
good video other than messing with my pet peeves
boss
Don’t forget to mention removing the ac compressor. You can leave the lines attached. Take the belt off. Remove the 4 bolts and move it up and out of the way. It’s a bear
SO MUCH RUSTY CRUSTY 8^{