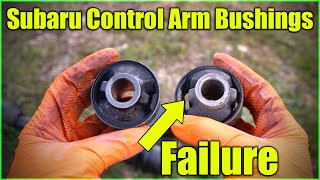
How to Replace Left Upper Control Arm Bushing Set 2002-2009 Chevrolet Trailblazer

Вставка
- Опубліковано 21 жов 2024
- Shop for New Auto Parts at 1AAuto.com 1aau.to/c/562/e...
This video shows you how to install a new left upper control arm bushing set from TRQ on your 2002-2009 Chevrolet Trailblazer.
This repair was done on a 2007 Chevrolet Trailblazer LT 4.2L Sport Utility 4-Door 4WD Automatic and the process should be similar on the following vehicles:
2002 Chevrolet Trailblazer
2003 Chevrolet Trailblazer
2004 Chevrolet Trailblazer
2005 Chevrolet Trailblazer
2006 Chevrolet Trailblazer
2007 Chevrolet Trailblazer
2008 Chevrolet Trailblazer
2009 Chevrolet Trailblazer
Tools you will need:
• Pry Bar 1aau.to/o2D/1AX...
• 10mm Wrench 1aau.to/o5c/1AX...
• 12mm Wrench 1aau.to/o5c/1AX...
• 13mm Wrench 1aau.to/o5c/1AX...
• 10mm Socket 1aau.to/obq8/1A...
• 12mm Socket 1aau.to/obMs/1A...
• 13mm Socket 1aau.to/obMs/1A...
• 15mm Socket 1aau.to/obMs/1A...
• 19mm Socket
• 21mm Socket
• 8mm Socket 1aau.to/obq8/1A...
• Ball Joint Press
• Trim Tool Set 1aau.to/oakV/1A...
• 1/2 Inch Ratchet
• 1/4 Inch Ratchet 1aau.to/obq8/1A...
• 3/8 Inch Drive Ratchet 1aau.to/obMs/1A...
• Torque Wrench 1aau.to/oaUz/1A...
• Gloves 1aau.to/oaAf/1A...
• Safety Glasses
• Floor Jack 1aau.to/oaiE/1A...
• Pick 1aau.to/oUQ/1AX...
• Punch
• Vise
• Wheel Chocks
Subscribe: / @trq
Check out our playlist:
Chevy Trailblazer 2002-2009 1st Generation: • Chevy Trailblazer 2002...
⚠ DISCLAIMER:
While TRQ strives to make the information provided in this video as accurate as possible, it makes no claims, promises, or guarantees about the accuracy, completeness or applicability of the content. No information contained in this video shall create any expressed or implied warranty or guarantee of any particular result. All do-it-yourself projects entail some risk. It is the sole responsibility of the viewer to assume this risk. TRQ is not responsible or liable for any loss damage (including, but not limited to, actual, consequential, or punitive), liability, claim, or any other injury or cause related to or resulting from any information posted in this video.


√ Watch the Video
√ Buy The Part at 1A Auto 1aau.to/m/Shop-TRQ-Parts
√ Do it Yourself
√ Save Money
What a lot of extra work, that’s crazy taking all that battery out of there and bending the body with a prybar to get at it, I did this without having to remove the battery, got it underneath the wheel well with a ratcheting wrench and a pipe, also why did you press new bushings in an old control arm but then installed a new control arm with bushings either preinstalled or put in by you?
Well my question why did you replace the bushing in the old control arm then out in a completely new one? Kinda daaa ain’t it
❤ thanks this is a very good instructional video
Great video thanks
This is laughable. You screw up the control arm the way you removed it by compressing the two sides together, then you continue on like nothing is wrong with no warning to anyone, and then swap out the whole control arm because of it. This video needs to be taken down before someone else follows this foolishness.
Anyone else doing this, you need to put something solid and strong between in space where the bushing resides so you don't push the two sides together like he did and end up needing to replace the whole thing. Better yet, don't use an impact and just use a c-clamp.
You don’t need to take the battery out 😂