How to Acrylic pouring - The swipe technique - Acrylic pouring, swipe-tekniken

Вставка
- Опубліковано 22 сер 2024
- This video shows you how to use the acrylic pouring swipe method.
Artist: Sara Olén
Photographer: Emelie Ingverud
Music: "Cute" by www.bensound.com
Use the acrylic swipe method with heat to create beautiful cells and exciting patterns in your painting
Exploring and experimenting with different pouring techniques can be very exciting. To let the cells emerge and form freely and then see the different colors mix on the board is a sensation. Every single painting is completely unique with its own patterns. This video and guide is here to show you the way through the acrylic swipe technique which is a method where you swipe a paper along the poured colors on your canvas and then create cells and patterns using heat. An exciting expression emerges that is difficult to achieve in other way and it's so much fun to play around with.
To use the acrylic swipe technique you need:
- Paper cups
- Canvas
- Acrylic paint
- Pouring medium
- Water
- Silicone oil
- Stirring sticks
- Paper towel
- Hot air gun or torch
Here's how to use with the acrylic swipe technique, step by step:
1) Pour your chosen colors into paper cups
Start by choosing which colors you want to use for your painting. We have used 4 metallic shades from SENSE by Veda’s Pearl collection, one of which is a going to be the black background color. Pour a little of each color into a separate cup. Acrylic paints of hobby quality are perfect for making this swipe technique because they are already very liquid.
2) Add water and a pouring medium
Then it's time to make the acrylic paint even more liquid by adding a pouring medium. Try to make each cups content consisting of ¾ acrylic paint and ¼ pouring medium. It may also be necessary to add some water to the colors to make them run smoothly, as in the video.
3) Add silicone oil to one of the colors
We chose to use black as the background color of the painting and therefore added 2-3 drops of silicone oil in the cup of that color.
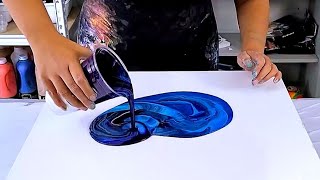
4) Pour the colors on the canvas
Now the colors are ready to be poured on a canvas whcih is laid horizontally. It is advantageous to raise the canvas with, for example, some paper cups and to have some protection underneath. Pour out the colors as you like. A tip is to pour the background color with silicone oil in it, at the edges where you'll soon start the swipe.
5) Swipe-time
Then it's time to use the swipe method. Take a sheet of kitchen paper and start pulling it along the board. A tip is to start the swipe method at a side where you have poured the background paint with silicone oil. If the spread of the paint misses a small stain, you can use a palette knife or similar to spread the paint everywhere.
6) Heat
Then you can take a hot air gun or a torch and aim at the board. This will push away the background color and create lovely bubbles and exciting cells in your painting.
---
Konstnär: Sara Olén
Fotograf: Emelie Ingverud
Musik: "Cute" by www.bensound.com
Använd acrylic swipe tekniken med värme för att skapa härliga celler och spännande mönster i din tavla.
För att använda acrylic swipe tekniken behöver du:
- Pouring Medium
- Akrylfärg
- Duk
- Vatten
- Palettkniv #105
- Värmepistol
- Hushållspapper
- Pappersmuggar
- Blandpinnar
- Handskar
- Täckplast
Du kan också använda SENSE by Veda FLUID som är en färdigblandad mix av akrylfärg och Pouring medium Floetrol.
Så här kan du, steg-för-steg, använda dig av acrylic swipe tekniken:
Steg 1) Häll upp dina färger
Börja med att välja vilka färger du vill använda för din tavla. Vi har använt oss av 4 metalliska nyanser från SENSE by Veda’s Pearl kollektion varav en av dem är en svart bakgrundsfärg. Häll upp lite av varje färg i en egen kopp. Akrylfärg av hobby kvalitet passar perfekt för att göra denna swipe teknik på grund av att de redan är väldigt flytande.
Steg 2) Tillsätt vatten och ett pouring medium
Sedan är det dags att göra akrylfärgen ännu mer flytande genom att addera ett pouring medium. Förslag är att satsa på att koppens innehåll ska bestå av ¾ akrylfärg och ¼ pouring medium. Det kan även behövas lägga till lite vatten i färgerna för att de ska bli tillräckligt rinnande som på videon.
Steg 1- 2 kan ersättas genom att använda färdigblandade SENSE by Veda FLUID akrylfärg
Steg 3) Addera silikonolja till en av nyanserna
Vi valde att använd svart som tavlans bakgrundsfärg och adderade därför 2-3 droppar silikonolja i den färgens kopp.
Steg 4) Häll ut färgen på tavlan
Nu är färgerna redo att hällas på en liggande tavla. Det är fördelaktigt att höja upp tavlan med exempelvis några pappersmuggar samt att ha något skydd under. Häll ut färgerna som du vill.
Steg 5) Swipe-dags
Sedan är det dags att använda swipe-metoden. Ta ett ark av hushållspapper och börja dra det längs med tavlan.
Steg 6) Tillsätt värme med värmepistol
Sedan kan du ta en gasolbrännare eller värmepistol och rikta mot tavlan. Detta kommer aktivera cellerna och skapa härliga mönster i din tavla.


Wow you got a lot of cells from that small amount of floretrol or it looked more like silicone. I thought that paper was going to rip! 😉 In other videos l’ve and myself, l used the plastic that is in folders for storing different papers etc. Makes it a lot easier and they do have large down to small ( for pictures) Your painting was so colourful 💖✨🌟
Smart!! I will pass that tip on! I sometimes use plastic wrapers used for food as they are easy to dispose of. But plastic folder - great tip 🫷💖!!