One other advantage of the miter gauge fence is that the kerf in the fence shows you exactly where it will cut. This makes measurement easier and more precise than to the blade.
Tip for the newbies: If you are using the nail trick to raise the edge of your miter fence rail, lay the rail flat on the table. If you whack it positioned as shown, you'll bend the rail.
I have used a few different table saws. I'm no expert; I do woodwork for fun and for home improvement, but I always find I learn something new watching your videos. You present in a way that is entertaining and most importantly not condescending. I am a long time viewer and I suspect I will be until the end of your videos or the end of UA-cam, whichever comes first! Many thanks
Hi Steve, I’ve been watching you for several years and haven’t left a message before. I ENJOY watching you and always benefit from your videos. Even though I subscribe to many woodworking channels, I’ve never canceled (even though often just temporarily) my subscription to your channel; which I’ve actually done to most of the others. You seem to have a very likable personality and appear to enjoy helping others. Many thanks for your efforts.
This is why we love you, Steve. I usually use my miter saw for cross cuts because there is too much slop in the miter gauge on my table saw. I never though of putting some tape on there to stabilize it. Thank you!
Most helpful. Out of all the tools in my shop, the table saw is the one I avoided for the longest time. BTW, I'm 67, retired, and brand new to woodworking and anything DIY for that matter. In fact when I was a kid, I couldn't tell you the difference between a hammer and a screwdriver. Now thanks to your WWMM course and all your other videos, I've literally unleashed the Mr. Fix-it character inside of me and I'm having A BLAST. And as an added bonus, my wife is THOROUGHLY impressed with my new skills! Gotta love that! Thanks again and again Steve!
To quickly reset the miter gauge to 90*, I turn it upside down, insert the runner in the table slot, slide the head up against the saw table, tighten the lock.
That works nicely if you have a symmetrical runner... if (e.g. DeWalt) you have a t-track piece of cr@p... Mind you, there are nice Chinese mitre gauges for $100 or so... and I'm ready for another bout of GAS (Gear Acquisition Syndrome). 😂
Thank you Steve for the best so far (watched 50+?..) concise, condensed, tutorial for safe! precise and easy cutting. Setting up a wood working shop in a shed here to renovate an old (1901) missionary house. Build with a timber log structure. Starting any day now. I saved your video as a “go back to”-reminder to keep me safe and accurate! My children appreciate me being cautious now at old age. 🙏🏻 Anders/Sweden
A couple tips that made me wonder why I hadn't thought of that, such as the way you lined up the combination square on the lumber and against the blade. Another with the mitered wood being used as a stop block...both A HA moments for me compliments of Steve Ramsey. Thanks, loving these tips videos!
After many years of using a table saw, i feel so inadequate never knowing (or possibly have forgotten after 50 odd years of working on a tabletop) about the alignment set screw on the underside. Glad to have seen your video.
I really appreciate table saws with rip fences that have a built-in flip plate. The 2" flip plate on my Dewalt 7491RS provides a nice buffer between the rip fence and the blade. When not needed it stows out of the away instantly. Almost all of my crosscuts and miters cut are made on a 10" Dewalt DWE713 miter saw. I only resort to cross cutting and mitering on the table saw when the miter saw can't handle the size of the material.
Good advice for newbies. I’m beyond that stage, an experienced woodworker with a healthy respect for the dangers inherent in the table saw. That said a neighbor friend, no newbie, just showed me his table saw injury where he lost a pretty good chunk of his thumb. It was bad, really bad! Enough to make one retch just looking at it and enough to think the Saw Stop is worth the money and then some.
My dad lost his toes in a farm auger accident. Shortly after I was looking at table saws. I'm cheap but I paid the extra for a sawstop contractor because the cost of fingers and therapy and pain is beyond the cost differential of saws.
When squaring the mitre gauge with the blade, be sure to avoid the teeth, which are proud of the disk. If you're not careful one of them can skew the angle and mess up your cuts.
5:16 - on stop blocks like this, I always nibble off the bottom inside corner (the part your workpiece is pressed against) to create a little sawdust pocket. That way, you're not accumulating extra dust in between your workpiece and your stop block. Just clipping off maybe 1/8th of an inch at a 45 degree angle is enough to create that little void and doesn't remove too much of the stop block as to make it impractical.
Thank you Mr Ramsey for your informative and fantastically made videos. I’ve just recently bought an entry level table saw (which looks completely different to the saws used on UA-cam), but was able to set it up after watching you and the Stumpy Nubz channel. Have made my first cut, a four foot rip cut in 9mm ply. You guys make it look so easy, I can’t believe it’s taken me so long to get this tool.
Thank you for the suggestions. We were cutting laminate and using the guide caused the pieces to bind, and occasionally kick and it actually cause me to be afraid of using the saw. Freehanding caused it to pinch. Wish I would have watched this earlier...
This is the best table saw video I have seen. Great tips for using the miter gauge, but more importantly, it is an outstanding table saw SAFETY video. Love your work, Steve!
Thanks for staying true to the "Woodworking for Mere Mortals creed" of enjoying the wonderful hobby and art of woodworking without the necessity of expensive equipment that is out of the reach for many of us.
Hello from Alaska hope you are all well. My solution for a perfect fit on the miter gauge that comes with a table saw and I mean all table saws is drill and tap 5 holes with a 10x32 tap and install nylon screws cut them off about a third the thickness of the miter bar then cut a slot on one end so you can turn it in for the perfect fit. I've done this on multiple gauges. Cheers All😜
That's how my new (expensive) miter gauge works, only it has steel grub screws instead of nylon. First time I ran it through the (Dewalt) table saw the sharp edges on the grub screws gouged large strips out of the track, since the table is aluminium. I sanded them down as smooth as possible, but it's still not good. I didn't realise there are nylon grub screws available .. I'll go hunting. Thanks for the tip!
Wow!!! I learned so much about using a table saw with a miter gage from this video. Where were you 62 years ago when I started using my Dad's old 8" home craft saw that is older than I am?
I came across a much better miter gauge at a used tool store than my saw came with but unfortunately the rail was a little sloppy. I drilled and tapped some holes in the rail and installed some nylon set screws to tighten it up. Works great.
Thanks for this video. I was wondering how I could learn to use the miter guage that came with my saw before purchasing a fancy one. One thing I was thinking while watching the video was, "I'll just use the fence as a stop block!" I'm just getting started in my woodworking hobby. Thanks for pointing out that using the fence in such a manner is a poor idea.
I definitely need to make an extension fence and tighten my miter gauge for my table saw. I gotten into building stuff for the house I just bought and finding out more and more I need an extension fence. I don't think a crosscut sled fits the bill I need right now. I think and extension fence is better suited for my needs. Thanks a bunch
My neighbor gave me a table saw that needs a lot of work, this video gave me some great ideas to rehab the accessories and get a bit more life out of it! Thanks!
.. This is brillant. I had this exact problems: an OK table saw, but a very poor quality miter gauge, somehow the t-slot was bigger than the sliding t and a bad fence. I just tried masking tape, and it's a tight fit now ! I somehow didn't even think about that. Thanks a lot for the tips !
The only comment I would add is to prop up the extension just enough (1/4" or so) to keep sawdust from building up at the bottom of it and messing up your alignment.
Excellent, I learned something NEW today..to use a scrap piece of wood between the Rip Fence and the blade,..I always did it the other way and yes…it IS dangerous!
A suggestion when installing an auxiliary miter fence is to place the board on two playing cards before screwing it to the miter gauge. This prevents the board from dragging on the table, amplifying any clearance between the miter gauge and the miter slot and reduces drag for a smoother cut. The amount of twist in the miter slot is severely limited by the length of the auxiliary miter fence. When making thin cuts, use a zero clearance sled when possible. If you haven't constructed one yet, clamp a board, that has been trued up, vertically on the rip fence before the blade and measure from that board. The clamp prevents the gage block from moving with the work and provides clearance so that the blade will not bind on the cutoff.
Worst miter gauge is on the Bosch GTS 10 XC2 Just purchased it and it was the last item I unpacked and assembled. The slots are also 16mm industry standard is 19mm. I was quite happy with the Bosch until I unpacked the miter gauge. £605 wasted the table that comes with it is very strong and stable.
The other COST advantage to the Miter gauge, is not having to spend another 600 dollars on a good miter saw. This is where people get the idea getting into wood working is expensive. I am starting on a the craftsman table saw, that cost me a whopping 139 dollars. yeah the miter gauge is MEH at best. but i can make a better one. SO THANKS FOR SOME OF THESE TIPS. it will improve the work of the little bench top table saw 100%
An early lesson was a piece of pine in the solar plexus. Fortunately just winded me and nothing more. But never used the mitre guide and the fence together again.
Nice video, tbh though sadly I've not been anywhere near my woodworking tools since the cost of MDF and Plywood sheets doubled in the UK, every planned project I had was immediately put on indefinite hold.
Just as a couple suggestions, but, First, check the fit of the gage in the slot. It’s impossible to get an accurate 90 when the gage is wobbling. Then when it’s good and solid, check and adjust for 90. Next, I like to start setting up the miter fence at the 45 first, extended past the blade to both for zero clearance and marking the kerf. Then, without moving the fence on the gage, turn the gage to 0. Next, leaving the screws in place for when I put it back, flip the fence, set it to just stick out past the blade, and screw it in. Then raise the blade and trim the end to make half of a zero clearance support. Reflip the fence, tighten the screws, and, done. That’s what works for me. Your results may vary. But, give it a try.
he didn't like the lack of freedom because he didn't have fun doing them. In this case it seems they were loose enough to let him crack some jokes between the mandatory script. So I can see why he accepted. Good for him!
I was surprised he didn't do anything really extreme with the sponsor. If you see the channel commentiquette that guy does some truly bizarre skits for Nord they are genius
I'm simply amazed how easy you make this look. I've had two table saws. They both bind, jam and won't cut. One is brand new. I cut one piece of 5/8" thick pine with it and now it hates me. My cuts are NEVER that smooth. It's a fight to get anything to go thru the thing. I really wish I could cut everything on my mitre saw.
Thanks Steve. I just bought a new DeWalt job site saw that if pretty awesome except for an sloppy miter guage that is all but unusable. Your video will help me to make adjustments. Also I appreciate you forgoing distracting background music on the video.
Scotch tape (that frosty clear office type) works well for me. As you apply each layer, press along the corner to start folding it over under the bar. My miter slot (not T type) has plenty of clearance underneath for the fold over.
You deserve 1 million views (at least) on every video you post. WWMM has truly inspired me to get into woodworking. Because you simply make it look fun. Then I get to try things and though they are tougher than you make them seem at first, they really make you learn and grow. Mate you are a legend.
Good ideas. the miter gauge for my Delta table saw is junk. Very loose and crooked. I tried tape but that didn't work. I'll try the nail method tonight. Frustrating to make a good project and then its out of square after you cut nice wood.
I have no room for a table saw sooo...circular saw it is. Blows that you are all the way out in Cali! Happy Bday to your dad! Also with the devices you pictured...im sure you are already safe.
Interesting video. I learned to use a punch on the top of the too-small miter gauge rail. Spread it a bit. But the real lesson was dump the gauge that came with the saw as I soon as I could afford it. Silly cost saving by the manufacturer. AND - although you didn’t mention it - the second lesson was upgrade the rip fence (to Biesemeyer), which may be even more important to consider. Mine (a Craftsman from the 1980s) was difficult to clamp securely and almost impossible to clamp straight. I think what I spent on these two upgrades came in at substantially less than a more expensive saw that would have come with acceptable accessories. By the way, these lessons came after a frustrating period of assuming my technique was the (main) cause of problems. I assumed the saw and accessories were “true” and stayed “true”. Ha! Periodic checking was the third lesson.
Those are some good tips.My table saw is super cheap.Its a Bluehawk table that I got from lowes when it was on sale for around 50 bucks. So my miter gauge moves around in the grove.So its not accurate. I am going to have to try that tape trick.
I loved the phone, laptop, and desktop images. You rock like the Rock of Ages. Oh, and these were some insightful table saw tips for using the miter gauge. Thanks
When adding an auxiliary piece to your miter gauge, chamfer the front bottom edge. This will keep built sawdust from building up and throwing off the angle.
I wish I would have watched this before I made my last video! My DeWAlt miter guage fits very sloppy so my case miter cuts I made were a little inconsistent.
3:48 " and not warped " - in reference to finding a piece of " scrap " for the mitre cross-fence. Good luck with that. It's possible to ensure that any warp is artificially straightened out by adding a flange to the fence to form an L or angle-section. OR alternatively an I section [ two flanges and a connecting web ] would be even stiffer.
Great hints Steve. Some of the more expensive miter gauges are also pretty crappy, as I've just found out the hard way. I wish I had seen this video earlier as the miter gauge that came with my Dewalt table saw (great saw, crap miter gauge) was a really sloppy fit in the track, but I couldn't think of any way to tighten it up. Looks like now I have a spare that I can leave set up for certain tasks.
Like from the book of Norm . Before we use any power tools let's talk about shop safety . Be sure to read ,understand and follow the instructions that come with your power tools.knowing how to use your tools correct can greatly reduce the chance of injury. And remember there is no more important safety rule than to were these safety glasses . 😁


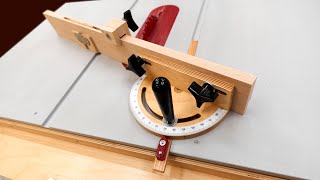


One other advantage of the miter gauge fence is that the kerf in the fence shows you exactly where it will cut. This makes measurement easier and more precise than to the blade.
Tip for the newbies: If you are using the nail trick to raise the edge of your miter fence rail, lay the rail flat on the table. If you whack it positioned as shown, you'll bend the rail.
Thank you for being straight forward and cutting out all the small chat. REALLY appreciated
Even after woodworking and watching your videos for over 6 years, I still learn from these "beginner" vids. You have inspired me tremendously.
I have used a few different table saws. I'm no expert; I do woodwork for fun and for home improvement, but I always find I learn something new watching your videos. You present in a way that is entertaining and most importantly not condescending. I am a long time viewer and I suspect I will be until the end of your videos or the end of UA-cam, whichever comes first! Many thanks
Humblest woodworker in YT. No fancy equipment, no fancy tools. Focused at the real craft and not blowing money on tools..
Hi Steve, I’ve been watching you for several years and haven’t left a message before. I ENJOY watching you and always benefit from your videos. Even though I subscribe to many woodworking channels, I’ve never canceled (even though often just temporarily) my subscription to your channel; which I’ve actually done to most of the others. You seem to have a very likable personality and appear to enjoy helping others. Many thanks for your efforts.
This is why we love you, Steve. I usually use my miter saw for cross cuts because there is too much slop in the miter gauge on my table saw. I never though of putting some tape on there to stabilize it. Thank you!
Most helpful. Out of all the tools in my shop, the table saw is the one I avoided for the longest time.
BTW, I'm 67, retired, and brand new to woodworking and anything DIY for that matter. In fact when I was a kid, I couldn't tell you the difference between a hammer and a screwdriver. Now thanks to your WWMM course and all your other videos, I've literally unleashed the Mr. Fix-it character inside of me and I'm having A BLAST.
And as an added bonus, my wife is THOROUGHLY impressed with my new skills! Gotta love that!
Thanks again and again Steve!
To quickly reset the miter gauge to 90*, I turn it upside down, insert the runner in the table slot, slide the head up against the saw table, tighten the lock.
That works nicely if you have a symmetrical runner... if (e.g. DeWalt) you have a t-track piece of cr@p...
Mind you, there are nice Chinese mitre gauges for $100 or so... and I'm ready for another bout of GAS (Gear Acquisition Syndrome). 😂
Good tip
nice trick!
Only works if table is square to blade. About a one in a hundred fifty chance of working
I am a newbie and learning a lot from you. I just put the fence to miter gauge and it’s working great. Many thanks for all you do.
Sponsored or not, never a bad idea to cover basics and safety. Thanks Steve.
i updated the miter gauge on my table saw right after i bought my first table saw . so much better .
Thank you Steve for the best so far (watched 50+?..) concise, condensed, tutorial for safe! precise and easy cutting.
Setting up a wood working shop in a shed here to renovate an old (1901) missionary house. Build with a timber log structure.
Starting any day now.
I saved your video as a “go back to”-reminder to keep me safe and accurate! My children appreciate me being cautious now at old age.
🙏🏻
Anders/Sweden
A couple tips that made me wonder why I hadn't thought of that, such as the way you lined up the combination square on the lumber and against the blade. Another with the mitered wood being used as a stop block...both A HA moments for me compliments of Steve Ramsey. Thanks, loving these tips videos!
After many years of using a table saw, i feel so inadequate never knowing (or possibly have forgotten after 50 odd years of working on a tabletop) about the alignment set screw on the underside. Glad to have seen your video.
I really appreciate table saws with rip fences that have a built-in flip plate. The 2" flip plate on my Dewalt 7491RS provides a nice buffer between the rip fence and the blade. When not needed it stows out of the away instantly. Almost all of my crosscuts and miters cut are made on a 10" Dewalt DWE713 miter saw. I only resort to cross cutting and mitering on the table saw when the miter saw can't handle the size of the material.
I've been getting into woodworking the last few months and wow, you've saved me so much time, money, and probably some fingers.
Good advice for newbies. I’m beyond that stage, an experienced woodworker with a healthy respect for the dangers inherent in the table saw. That said a neighbor friend, no newbie, just showed me his table saw injury where he lost a pretty good chunk of his thumb. It was bad, really bad! Enough to make one retch just looking at it and enough to think the Saw Stop is worth the money and then some.
My dad lost his toes in a farm auger accident. Shortly after I was looking at table saws. I'm cheap but I paid the extra for a sawstop contractor because the cost of fingers and therapy and pain is beyond the cost differential of saws.
My Dad just gifted me a cheap tablesaw. I've not used one very much and these videos are full of really good instructions for a noobie table saw user.
I love the quiet message conveyed by the rusty implements. Cute!
probably because they don't get much use anymore to busy with podcasts if you want to see a build video like before you have to pay for class
When squaring the mitre gauge with the blade, be sure to avoid the teeth, which are proud of the disk. If you're not careful one of them can skew the angle and mess up your cuts.
5:16 - on stop blocks like this, I always nibble off the bottom inside corner (the part your workpiece is pressed against) to create a little sawdust pocket. That way, you're not accumulating extra dust in between your workpiece and your stop block. Just clipping off maybe 1/8th of an inch at a 45 degree angle is enough to create that little void and doesn't remove too much of the stop block as to make it impractical.
Good point. Even more important to make this recess on your stop blocks at the miter saw where sawdust collects more quickly.
Thank you Mr Ramsey for your informative and fantastically made videos. I’ve just recently bought an entry level table saw (which looks completely different to the saws used on UA-cam), but was able to set it up after watching you and the Stumpy Nubz channel. Have made my first cut, a four foot rip cut in 9mm ply. You guys make it look so easy, I can’t believe it’s taken me so long to get this tool.
What table saw did you get?
@@johngardner3441 it’s a make from Germany I think, Metabo- TKHS 315C.
Thank you for the suggestions. We were cutting laminate and using the guide caused the pieces to bind, and occasionally kick and it actually cause me to be afraid of using the saw. Freehanding caused it to pinch. Wish I would have watched this earlier...
This is the best table saw video I have seen. Great tips for using the miter gauge, but more importantly, it is an outstanding table saw SAFETY video. Love your work, Steve!
Thanks for staying true to the "Woodworking for Mere Mortals creed" of enjoying the wonderful hobby and art of woodworking without the necessity of expensive equipment that is out of the reach for many of us.
Hello from Alaska hope you are all well. My solution for a perfect fit on the miter gauge that comes with a table saw and I mean all table saws is drill and tap 5 holes with a 10x32 tap and install nylon screws cut them off about a third the thickness of the miter bar then cut a slot on one end so you can turn it in for the perfect fit. I've done this on multiple gauges. Cheers All😜
That's how my new (expensive) miter gauge works, only it has steel grub screws instead of nylon. First time I ran it through the (Dewalt) table saw the sharp edges on the grub screws gouged large strips out of the track, since the table is aluminium. I sanded them down as smooth as possible, but it's still not good. I didn't realise there are nylon grub screws available .. I'll go hunting. Thanks for the tip!
Wow!!! I learned so much about using a table saw with a miter gage from this video. Where were you 62 years ago when I started using my Dad's old 8" home craft saw that is older than I am?
I came across a much better miter gauge at a used tool store than my saw came with but unfortunately the rail was a little sloppy. I drilled and tapped some holes in the rail and installed some nylon set screws to tighten it up. Works great.
Thanks to your tips/pointers I know have a Mitre Gauge on my Saw Table that’s actually useful
Thanks for this video. I was wondering how I could learn to use the miter guage that came with my saw before purchasing a fancy one.
One thing I was thinking while watching the video was, "I'll just use the fence as a stop block!"
I'm just getting started in my woodworking hobby. Thanks for pointing out that using the fence in such a manner is a poor idea.
I definitely need to make an extension fence and tighten my miter gauge for my table saw. I gotten into building stuff for the house I just bought and finding out more and more I need an extension fence. I don't think a crosscut sled fits the bill I need right now. I think and extension fence is better suited for my needs. Thanks a bunch
My neighbor gave me a table saw that needs a lot of work, this video gave me some great ideas to rehab the accessories and get a bit more life out of it! Thanks!
Great tip for putting tape on the mitre track. Going to try that with my wobbly mitre guage!
.. This is brillant. I had this exact problems: an OK table saw, but a very poor quality miter gauge, somehow the t-slot was bigger than the sliding t and a bad fence. I just tried masking tape, and it's a tight fit now ! I somehow didn't even think about that. Thanks a lot for the tips !
I'm new to wood working......this is very helpful....Thank You.
The only comment I would add is to prop up the extension just enough (1/4" or so) to keep sawdust from building up at the bottom of it and messing up your alignment.
And from making that horrendous squawking noise. Wax beneath the extension helps with this.
A small chamfer on the bottom of the extension fence can help with that, in lieu of trying to mount it both evenly and on a prop. 😊
Excellent, I learned something NEW today..to use a scrap piece of wood between the Rip Fence and the blade,..I always did it the other way and yes…it IS dangerous!
A suggestion when installing an auxiliary miter fence is to place the board on two playing cards before screwing it to the miter gauge.
This prevents the board from dragging on the table, amplifying any clearance between the miter gauge and the miter slot and reduces drag for a smoother cut.
The amount of twist in the miter slot is severely limited by the length of the auxiliary miter fence.
When making thin cuts, use a zero clearance sled when possible.
If you haven't constructed one yet, clamp a board, that has been trued up, vertically on the rip fence before the blade and measure from that board.
The clamp prevents the gage block from moving with the work and provides clearance so that the blade will not bind on the cutoff.
You explain things so simply and easy to understand. Thank you, i have learnt so much from you. Much appreciated. Si
Even though your videos have some length to them, they are always filled with good information and no dross. Thanks.
I appreciate the Info. I recently bought a table saw and this should hold me over until I save enough for my miter saw. Thank you.
Using a GRR Gripper is a good idea particularly if you want to be near the fence with a narrow cut
Thanks, Steve. I have been a hobby wood worker for more than 40 years. I learned some new things here! It is never too late to learn.
My Delta 36-725 miter gauge is actually pretty good. Nice that it works with my bandsaw too. But yeah, most of my other gauges are junk.
Worst miter gauge is on the Bosch GTS 10 XC2 Just purchased it and it was the last item I unpacked and assembled. The slots are also 16mm industry standard is 19mm.
I was quite happy with the Bosch until I unpacked the miter gauge. £605 wasted the table that comes with it is very strong and stable.
The other COST advantage to the Miter gauge, is not having to spend another 600 dollars on a good miter saw. This is where people get the idea getting into wood working is expensive. I am starting on a the craftsman table saw, that cost me a whopping 139 dollars. yeah the miter gauge is MEH at best. but i can make a better one. SO THANKS FOR SOME OF THESE TIPS. it will improve the work of the little bench top table saw 100%
An early lesson was a piece of pine in the solar plexus. Fortunately just winded me and nothing more. But never used the mitre guide and the fence together again.
Nice video, tbh though sadly I've not been anywhere near my woodworking tools since the cost of MDF and Plywood sheets doubled in the UK, every planned project I had was immediately put on indefinite hold.
Just as a couple suggestions, but,
First, check the fit of the gage in the slot. It’s impossible to get an accurate 90 when the gage is wobbling. Then when it’s good and solid, check and adjust for 90.
Next, I like to start setting up the miter fence at the 45 first, extended past the blade to both for zero clearance and marking the kerf. Then, without moving the fence on the gage, turn the gage to 0. Next, leaving the screws in place for when I put it back, flip the fence, set it to just stick out past the blade, and screw it in. Then raise the blade and trim the end to make half of a zero clearance support.
Reflip the fence, tighten the screws, and, done.
That’s what works for me. Your results may vary. But, give it a try.
Thanks for this great video! I just got a table saw for an early Christmas present and I love learning all the different things I can do with it!
I'm surprised you're doing a sponsor again after what you've said about them in past!
he didn't like the lack of freedom because he didn't have fun doing them. In this case it seems they were loose enough to let him crack some jokes between the mandatory script. So I can see why he accepted. Good for him!
Sometimes we gotta do things at work we don't like... bills don't pay themselves.
I was surprised he didn't do anything really extreme with the sponsor. If you see the channel commentiquette that guy does some truly bizarre skits for Nord they are genius
Thanks for the great content Steve. I'm a hobbyist and appreciate your sensible approach to woodworking. Cheers from Canada!
I'm simply amazed how easy you make this look. I've had two table saws. They both bind, jam and won't cut. One is brand new. I cut one piece of 5/8" thick pine with it and now it hates me. My cuts are NEVER that smooth. It's a fight to get anything to go thru the thing. I really wish I could cut everything on my mitre saw.
Great video! Definitely a newbie here and this bit of info could have very well just saved a few fingers. Many thanks and a great find
Thanks Steve. As always good tips. Greetings from El Salvador. Central America.
Thanks Steve. I just bought a new DeWalt job site saw that if pretty awesome except for an sloppy miter guage that is all but unusable. Your video will help me to make adjustments. Also I appreciate you forgoing distracting background music on the video.
Scotch tape (that frosty clear office type) works well for me. As you apply each layer, press along the corner to start folding it over under the bar. My miter slot (not T type) has plenty of clearance underneath for the fold over.
Holy crap this video was amazing. I have a cheap craftsman miter for my table saw and I did these upgrades and it just makes it so much better.
You deserve 1 million views (at least) on every video you post. WWMM has truly inspired me to get into woodworking. Because you simply make it look fun. Then I get to try things and though they are tougher than you make them seem at first, they really make you learn and grow. Mate you are a legend.
Good ideas. the miter gauge for my Delta table saw is junk. Very loose and crooked. I tried tape but that didn't work. I'll try the nail method tonight. Frustrating to make a good project and then its out of square after you cut nice wood.
Wow, that table saw was over ten years ago. Time flies. Thanks for getting me started Steve!
Thanks for this, Steve. I recently bought a Rigid table saw, so this video is exactly what I needed.
Your channel is awesome, I love how you don't talk down to the viewers. Keep up the great work!!
Good stuff! Lots of great tips in this one!
Yes Matt...Steve rocks!!
I have no room for a table saw sooo...circular saw it is. Blows that you are all the way out in Cali! Happy Bday to your dad! Also with the devices you pictured...im sure you are already safe.
Love the channel 👌. I have had countless 'oh that's how I can fix this' moments. Excellent advice
Thank you 👍
those tips are so valuable for beginners like me
This was a great video . Thank you for this content as it has me as a beginner.
Your videos are great for a beginner like me, thank you.
Hey Steve, I’m an old man but I learned from this video. Thanks. Alan
Thanks, Steve! Great info, as usual! I always learn something new while watching your videos!
These are all good tips. Keep it safe out there and enjoy your tools.
Thank you so very much for all your time and effort!
Interesting video. I learned to use a punch on the top of the too-small miter gauge rail. Spread it a bit. But the real lesson was dump the gauge that came with the saw as I soon as I could afford it. Silly cost saving by the manufacturer. AND - although you didn’t mention it - the second lesson was upgrade the rip fence (to Biesemeyer), which may be even more important to consider. Mine (a Craftsman from the 1980s) was difficult to clamp securely and almost impossible to clamp straight. I think what I spent on these two upgrades came in at substantially less than a more expensive saw that would have come with acceptable accessories. By the way, these lessons came after a frustrating period of assuming my technique was the (main) cause of problems. I assumed the saw and accessories were “true” and stayed “true”. Ha! Periodic checking was the third lesson.
Those are some good tips.My table saw is super cheap.Its a Bluehawk table that I got from lowes when it was on sale for around 50 bucks. So my miter gauge moves around in the grove.So its not accurate. I am going to have to try that tape trick.
Good tips, could save a lot of injury's.
I loved the phone, laptop, and desktop images. You rock like the Rock of Ages. Oh, and these were some insightful table saw
tips for using the miter gauge. Thanks
How to get the most use out of the miter Guage:
Leave it in the holder on the saw unless you ABSOLUTELY have to
4:19 just make sure the board you use is flat and non-twisted, too :D
When adding an auxiliary piece to your miter gauge, chamfer the front bottom edge. This will keep built sawdust from building up and throwing off the angle.
You're such a godsend Steve! Only thanks to you have I had the confidence to use my tablesaw effectively and safely. Thanks again 😁
I wish I would have watched this before I made my last video! My DeWAlt miter guage fits very sloppy so my case miter cuts I made were a little inconsistent.
My miter guage is pretty minimalistic but I can easily attach my fence to it which is pretty cool
Excellent video. I appreciate all the knowledge that you share with us beginners. Awesome!!
3:48 " and not warped " - in reference to finding a piece of " scrap " for the mitre cross-fence. Good luck with that. It's possible to ensure that any warp is artificially straightened out by adding a flange to the fence to form an L or angle-section. OR alternatively an I section [ two flanges and a connecting web ] would be even stiffer.
Any straight board is fine. Doesn't need that much precision. Plywood also works great!
Great hints Steve. Some of the more expensive miter gauges are also pretty crappy, as I've just found out the hard way. I wish I had seen this video earlier as the miter gauge that came with my Dewalt table saw (great saw, crap miter gauge) was a really sloppy fit in the track, but I couldn't think of any way to tighten it up. Looks like now I have a spare that I can leave set up for certain tasks.
Read my comment I just wrote on Steve's video. It's very easy I did it to my DeWalt table saw before I purchased the Laguna fusion F2
Thanks, Steve!
Like from the book of Norm . Before we use any power tools let's talk about shop safety . Be sure to read ,understand and follow the instructions that come with your power tools.knowing how to use your tools correct can greatly reduce the chance of injury. And remember there is no more important safety rule than to were these safety glasses . 😁
Great video to review the basic...thanks.
Nice job Steve and happy birthday to Dad
Thank you for the great information! Peace and Good Fortune and Good Health to you and your family.
You're videos are great Steve. Always very helpful 👌
That old phone and computer in the ad were so funny! Good video lesson. Thanks.
Mr Ramsey,
Have you ever consider to do cnc work?
I would like to see your step by step ideas on a cnc machine
Great video discussion/demonstration/lessons
Don't forget to align the blade parallel with the miter slot when adjusting your miter gauge in this manner.
5:44 If I take just 1 thing away from this video it's THIS STATEMENT! I had this very bad idea as I begin down the path of working wood.
Thanks and Happy Birthday to your dad🎂🍻