I tried to guess the clamping solution. I would have had an epic failure! Without fail I learn something on every single one of your videos. I refer back to your older videos repeatedly each time I work on a piece. It's my reference book.
Thanks for the encouraging feedback Sean. My goal is to build a supportive community for furniture repair work, and your comment demonstrates that is starting to come to life. Thanks for that! Scott
Templates, jigs and a caul in this instance are my heroes. I have spent more time creating those to assist with a project than I do on the project at times. Thanks for the sound advice. Hope you have a great new year.
Thank you for sharing this project. Who knew that something as a call was the solution to the problem. I enjoy your videos as I learn something new each time. Please keep them coming. You approach each project and are not afraid to take something apart to solve the problem. Your approach is very basic.
I love watching your videos. Your smooth delivery and great explanations make them a joy to view and very educational. I don't really repair furniture, but I do like building some...
When putting screws back, first always turn the screw by hand counterclockwise until the screw finds or “falls” into its old thread thereby avoiding cutting a new thread and enlarging the pilot hole
I'm lazy, so I would have put a piece between the broken part, and the vertical support board. That way, I could use a clamp on the vertical part, and the broken part. In order to get the clamp to stick on the rounded, broken support, I would have used the 'masking tape/ CA glue' trick. Of course, I'm not a pro. That's why I love watching this channel.
I have been watching several of your videos and have become addicted! Your explanation is top-notch. By the way I'm an American living in Malaysia and even know it is a very 'tree-filled' country, the choices of wood you have here are horrible. If I could make a small suggestion : Veery often you will say : OK, we are now we will remove the clamps and the glue is dry... If you could say : It has been 20 hours or 8 hours - to give us a time frame - as to how long you're doing this, that would be nice. Thank you very much for the wonderful content.
You're welcome. Here's a play list with 3 other videos showing Vector Clamping if you're interested ua-cam.com/play/PLOgTcCDjpIJVNoA_T51wzhz7PTzs7ObK0.html
I recommend searching: "rubbed glue joint" Very easy and straightforward way to deal with many (not all!) hard to clamp situations. This particular repair would have been a snap with a rubbed joint.
Just finished repairing an everyday use oak chair for my mom using your technique. Hammering apart the loose joints, scraping the old glue off, drilling out broken off dowels, glued, new dowels and clamped it all up. Came out solid.
To David C . Drill a hole in the smoothest piece 1/4 inch , Woodcraft sells CLESCO dowel and tenon centers = Woodcraft Parkersburg wv.26102 ( 304 485 4050) the little nipples have a point on them so when you put the two pieces of wood together it makes a mark an you drill it the dowel fits just fine , or put the dowel in the 1/4"hole you drilled an the little cap will go over the dowel an mark the joining piece
It can be difficult to get string/rope to provide enough clamping pressure. Next time I suggest using rubber tubing, which provides continuous pressure when wrapped around something. Here's a link as an example amzn.to/30k26QP
Your vids are like a trade school course by a mellow, super competent teacher. Nice repair. If I had done this repair I wouldn't have thought of using that sheet of acetate. I would have raised the work up off of the bench to prevent sticking. I've done that in the past. Question. How did you clean up what little squeeze out that may occured? If it's a water based glue I would have just used a damp rag, then dried it with a dry rag. Anyway, good work, as usual.👍
I also operate a furniture repair shop in Ormond Beach, Florida. Chairs are the bread and butter of my business. Chairs are notoriously difficult to clamp because of few square angles to work with. Each project seems to have its own unique solution. I also get anal in respect to putting them back together exactly as they were, which is very rare. You know exactly what I'm talking about! Here's a quick tip for you - use the markers on the edges to be joined before glue up. And just say no to gorilla glue! Ken
A few weeks, yes. I publish videos on 2 channels so I balance between each. Im presenting at the Virtual Wood Show this weekend too... a busy few days, but I enjoy it! Scott
I still don't know why I find your videos extremely soothing in addition to being informative. Keep up the good work! A question though: Why did you glue both of the surfaces? It is wood glue, so gluing just one side would be enough, I assume?
Thanks for the supportive feedback. To answer your question about applying glue to both sides, this is a best practice to ensure proper glue coverage. For example if the glue is applied thin in spots on just one side, there is the risk that the wood absorbs too much of the glue and it wouldn't bond properly. By applying glue to both surfaces that risk is eliminated as both sides have a chance to absorb some glue before the parts are assembled. I hope that helps. Scott
2 years ago I found a dresser set on Kijiji for $80. Called the guy went and made the purchase, he said back in the mid 80's he paid $2500 for it new. When I was wiping it all down from the travel dust I seen it was a set made by Gibbard.
Wax won't penetrate in wood like grease will, so it will continue to lubricate the parts for a long time. I would only use grease as a lubricant between metal parts. I hope that helps. Scott
I clean them with soap and water. If you use PVA or hide glue and the glue dries on the brush by accident, it can be soaked in warm water and worked loose to wash it out. One brush will last for years so there's very little waste. I hope that helps. Scott
I clean them with soap and water. If you use PVA or hide glue and the glue dries on the brush by accident, it can be soaked in warm water and worked loose to wash it out. One brush will last for years so there's very little waste. I hope that helps. Scott
I've had success with using a plywood backer and screwing blocks to the plywood where the curves are to hold the piece in place while the clamps do the work. Hard to explain in a comment but hopefully that gives you an idea of the technique. Both ways work great, it just depends on what you have on hand. I don't have a bandsaw so making those cuts for me is very difficult.
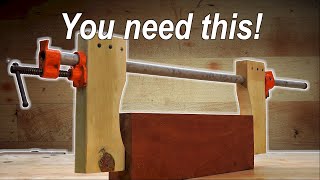
The material slid because the clamping force was not perpendicular to the repair joint. Looking at the bar where it crosses the joint, you can see this. It is interesting how our eyes give priority to the places where the clamping pads are rather than the bar crosses the joint.
I have a solution: Two strips of wood for each side. Use long screws to draw the strips together. Clamp the strips of wood directly to the flat side of the board. Works like a charm. Vector clamping is cool, though.
Hard surfaces never fit precisely; that’s why anything assembled from parts that has to hold a seal, is joined with a mating gasket. The clamping block you cut from the traced outline couldn’t perfectly fit, thus when lubricated with glue, the glue up joint slipped. Next time place a silicon rubber strip between the curved part and its mirror clamping block, which will distribute the clamping pressure more evenly. Signed a mechanical engineer.


I tried to guess the clamping solution. I would have had an epic failure!
Without fail I learn something on every single one of your videos. I refer back to your older videos repeatedly each time I work on a piece. It's my reference book.
Thanks for the encouraging feedback Sean. My goal is to build a supportive community for furniture repair work, and your comment demonstrates that is starting to come to life. Thanks for that! Scott
Thank you for the informative information.
Such calm clear explanations. This really is a wonderful channel.
Glad you think so! Thanks for watching. Scott
Better then getting yelled at... my fav...
Great video. The Vector clamping is brilliant. Thanks for sharing!
Another quality video!!!
Appreciate that. Thank you! Scott
Well done Scott. Thinking out loud works well for me.
Excellent!
Looking forward to the touch up marker video!
I'm glad you're interested in it. Thanks for sharing that. Scott
Like the clamp method.
Here's a list of vector clamping videos if you'd like to see more ua-cam.com/play/PLOgTcCDjpIJVNoA_T51wzhz7PTzs7ObK0.html
Templates, jigs and a caul in this instance are my heroes. I have spent more time creating those to assist with a project than I do on the project at times. Thanks for the sound advice. Hope you have a great new year.
Thanks for sharing that Terry. Happy New Year too! Scott
Thank you for sharing this project. Who knew that something as a call was the solution to the problem. I enjoy your videos as I learn something new each time. Please keep them coming. You approach each project and are not afraid to take something apart to solve the problem. Your approach is very basic.
Thanks for sharing your encouraging comments Eddie! Scott
Great job, Scott! Good to see you back
Thanks Clark! Cheers
I love watching your videos. Your smooth delivery and great explanations make them a joy to view and very educational. I don't really repair furniture, but I do like building some...
Great tips, I love to fix things
That's great to hear you like to fix things. I find it rewarding too. Thanks for being a subscriber! Scott
When putting screws back, first always turn the screw by hand counterclockwise until the screw finds or “falls” into its old thread thereby avoiding cutting a new thread and enlarging the pilot hole
I'm lazy, so I would have put a piece between the broken part, and the vertical support board.
That way, I could use a clamp on the vertical part, and the broken part. In order to get the clamp to stick on the rounded, broken support, I would have used the 'masking tape/ CA glue' trick.
Of course, I'm not a pro. That's why I love watching this channel.
Thanks for sharing your suggestion. Glad to hear you're enjoying our videos. Thanks. Scott
This was awesome
Thank you. Glad you enjoyed it! Scott
More excellent techniques. I like that you leave the real life issues in as it helps us learn too. Can’t wait for your next video.
Thanks so much Jeanine! Scott
Thank you.
You're welcome! Cheers. Scott
The design of that table looks as though they started to make a sawhorse and changed their minds! 😀
I have been watching several of your videos and have become addicted!
Your explanation is top-notch.
By the way I'm an American living in Malaysia and even know it is a very 'tree-filled' country, the choices of wood you have here are horrible.
If I could make a small suggestion :
Veery often you will say : OK, we are now we will remove the clamps and the glue is dry...
If you could say : It has been 20 hours or 8 hours - to give us a time frame - as to how long you're doing this, that would be nice. Thank you very much for the wonderful content.
Vector clamping technique, thanks!
You're welcome. Here's a play list with 3 other videos showing Vector Clamping if you're interested ua-cam.com/play/PLOgTcCDjpIJVNoA_T51wzhz7PTzs7ObK0.html
Tnx for sharing your valuable knowledge and experience wit us
I have nothing to say really, but I appreciate your content, and wish to help with the yt-algorithms.
Thanks for your support! Scott
Thanks for another great video!
I recommend searching: "rubbed glue joint" Very easy and straightforward way to deal with many (not all!) hard to clamp situations. This particular repair would have been a snap with a rubbed joint.
I would never have thought of this caul method. Brilliant
I love your content, I thought too much clamping pressure was a bad thing
Just finished repairing an everyday use oak chair for my mom using your technique. Hammering apart the loose joints, scraping the old glue off, drilling out broken off dowels, glued, new dowels and clamped it all up. Came out solid.
Beautifully explained. 👍🏻😁🇦🇺
Thanks for sharing
You're welcome. Thanks for watching. Scott
Nice video. A quick domino or dowel could have helped with the alignment and sliding, but certainly not necessary for strength.
I like your idea. Can you explain how you would drill the hole in the broken-off piece so the holes would align? Thank you.
@@davec3689 place down a piece of tape, draw a straight line where you want to make either your plunge or hole for dowel.
@@batmansdad3195 yup - this is exactly how it's done
Yes, that would work if you have accurate equipment to do that. Thanks for sharing that tip with our furniture repair community Nyla! Scott
To David C . Drill a hole in the smoothest piece 1/4 inch , Woodcraft sells CLESCO dowel and tenon centers = Woodcraft Parkersburg wv.26102 ( 304 485 4050) the little nipples have a point on them so when you put the two pieces of wood together it makes a mark an you drill it the dowel fits just fine , or put the dowel in the 1/4"hole you drilled an the little cap will go over the dowel an mark the joining piece
Brilliant
Brillant idea I will definitely use this technique. On my restoration projects.
This channel is awesome! Great job!
Always such a nice job! I really enjoy your videos.
Love your channel and all the great tips. I also hum that theme music all day after hearing it.
Thanks for the encouraging feedback. I'm glad that theme music is catchy! Scott
Learning a lot!
That's great to hear Carol. My purpose is teaching so that means a lot to me. Scott
I just clamped a new piece of wood to a chair leg that has a 4” long chip out of it. I used coarse twine and wrapped it.
It can be difficult to get string/rope to provide enough clamping pressure. Next time I suggest using rubber tubing, which provides continuous pressure when wrapped around something. Here's a link as an example amzn.to/30k26QP
WOW, what a great video. I learn something from all your videos - Thank you for sharing your knowledge :-)
You're welcome. Thank you for the supportive feedback. I find that encouraging. Scott
“Gupped Up”, is that a technical term? 😜
Your vids are like a trade school course by a mellow, super competent teacher. Nice repair. If I had done this repair I wouldn't have thought of using that sheet of acetate. I would have raised the work up off of the bench to prevent sticking. I've done that in the past. Question. How did you clean up what little squeeze out that may occured? If it's a water based glue I would have just used a damp rag, then dried it with a dry rag. Anyway, good work, as usual.👍
Wouldn't it be a good idea to put a couple of dowels in the the middle to prevent slide when clamping and add extra strength?
I also operate a furniture repair shop in Ormond Beach, Florida. Chairs are the bread and butter of my business. Chairs are notoriously difficult to clamp because of few square angles to work with. Each project seems to have its own unique solution. I also get anal in respect to putting them back together exactly as they were, which is very rare. You know exactly what I'm talking about! Here's a quick tip for you - use the markers on the edges to be joined before glue up. And just say no to gorilla glue! Ken
Great video that why you shold put this on video and sell them
It's been awhile
A few weeks, yes. I publish videos on 2 channels so I balance between each. Im presenting at the Virtual Wood Show this weekend too... a busy few days, but I enjoy it! Scott
I still don't know why I find your videos extremely soothing in addition to being informative. Keep up the good work!
A question though: Why did you glue both of the surfaces? It is wood glue, so gluing just one side would be enough, I assume?
Thanks for the supportive feedback. To answer your question about applying glue to both sides, this is a best practice to ensure proper glue coverage. For example if the glue is applied thin in spots on just one side, there is the risk that the wood absorbs too much of the glue and it wouldn't bond properly. By applying glue to both surfaces that risk is eliminated as both sides have a chance to absorb some glue before the parts are assembled. I hope that helps. Scott
2 years ago I found a dresser set on Kijiji for $80. Called the guy went and made the purchase, he said back in the mid 80's he paid $2500 for it new. When I was wiping it all down from the travel dust I seen it was a set made by Gibbard.
Wow, you got a great deal then! Nice!
I would have reached for a dab of grease-- you chose wax however. Is it because wax is less likely to run and/or stain?
Wax won't penetrate in wood like grease will, so it will continue to lubricate the parts for a long time. I would only use grease as a lubricant between metal parts. I hope that helps. Scott
Would it be possible to use something like an Ace bandage wrapped tightly around the two pieces?
I thinks I love Robertson screws, what do you think? I dislike it when I strip out a Phillips head.
Yes, Robertson screws are the best invention. Nothing works better. Scott
after you use your artist brush to spread the glue, do you throw it away? or do you know a good way to clean them so they can be reused?
I clean them with soap and water. If you use PVA or hide glue and the glue dries on the brush by accident, it can be soaked in warm water and worked loose to wash it out. One brush will last for years so there's very little waste. I hope that helps. Scott
@@FixingFurniture Thanks for the reply! That definitely helps, thank you.
Harbor freight has shorter brushes (8”) that are about 30 for $2.99
I use them daily and just toss them after each chair or project. Easy peasy!
You say you use an artist brush. Do you clean them after or just chuck them in the bin every time?
If you do clean them how?
I clean them with soap and water. If you use PVA or hide glue and the glue dries on the brush by accident, it can be soaked in warm water and worked loose to wash it out. One brush will last for years so there's very little waste. I hope that helps. Scott
@@FixingFurniture Thank you and thanks for the response.
I've had success with using a plywood backer and screwing blocks to the plywood where the curves are to hold the piece in place while the clamps do the work. Hard to explain in a comment but hopefully that gives you an idea of the technique. Both ways work great, it just depends on what you have on hand. I don't have a bandsaw so making those cuts for me is very difficult.
I think I understand what you're describing. It's adding material instead of cutting it away. Sounds like it works! Thanks for sharing that. Scott
Hey that is a good tip for me, another no bandsaw shop guy. Thanks
Hi Scott was the failed piece a factory defect? The break line was just too straight!!!
Yes, it was a manufacturing defect. Likely not enough glue applied so the joint was what's referred to as "glue starved". Cheers. Scott
The material slid because the clamping force was not perpendicular to the repair joint. Looking at the bar where it crosses the joint, you can see this. It is interesting how our eyes give priority to the places where the clamping pads are rather than the bar crosses the joint.
I have a solution: Two strips of wood for each side. Use long screws to draw the strips together. Clamp the strips of wood directly to the flat side of the board. Works like a charm. Vector clamping is cool, though.
I don't understand. would you please explain it more detailed.
Hard surfaces never fit precisely; that’s why anything assembled from parts that has to hold a seal, is joined with a mating gasket. The clamping block you cut from the traced outline couldn’t perfectly fit, thus when lubricated with glue, the glue up joint slipped. Next time place a silicon rubber strip between the curved part and its mirror clamping block, which will distribute the clamping pressure more evenly. Signed a mechanical engineer.
Why don't you use dowels?
Rule for glue. If it does not ooze,you lose!
Yeah, good one! Thanks for the chuckle this morning. Scott
Acho que deveria ter colocado pinos na emenda, vai quebrar novamente
The way to solve this is with 2 wooden plugs, like it should have been done originally….
I do not understand this. This is a video about clamping yet you don't use any clamps.? 'Quick-grips' © aren't clamps, and it is impossible for the quick-grips to create a high enough pressure to get a good glue joint. You need to use REAL clamps and you need to tighten them as hard as you possible as you can. It is the pressure, not the glue, that makes the bond. p.s. I am a skilled cabinet-maker and this is basic material in ANY school.