This is the best video on this topic I have found. The mistakes and small notes on band positions and honesty on the bearing removal from axle splines are all very helpful and accurate to my experience.
Good stuff. I’ve done both sides and it took me 4-5 hours each side. One thing I’ve been told is leave the circle lock thingy on and rotate the open part down when installing. Cheers!
OEM toyota boot stainless bands are the best, but in a Toyota forum some one suggested marine 304 stainless smooth band clamps worm type, i tried them ON Lexus & Toyota boots and have had success with them staying on tight. McMaster-Carr of Santa Fe Springs has them PN 5574K24 and 5574K16 much better than local parts stores.
Great video. A little trick on axle nut. Once it is loosen off a bit before disconnecting knuckle from lower control arm tap axle in a bit to free it up. This will be easier for you. Thanks for the great video to help out people. You work like me nice and clean environment.
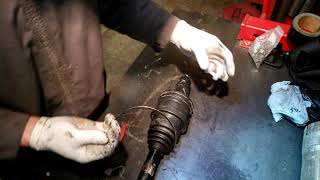
In the toyota manual, it said before the cv bearings are removed, you should put a mark on cv bearing and the shaft. This way, the marks can be lined up during assembly. I didn't see you doing that step. Is it really necessary. What are your thoughts and reasons why toyota indicated the cv bearing and shaft alignment? The only issue i see is that both cv bearing might not align a certain way from each other the way you assembly them together.
I did make them before disassembly, guess I didn’t cover that well. I think the reason is the machined parts have been warn in a certain way and best practice is to put them back into their warn position. Hope this is helpful.
This is what I should have done instead of tossing some aftermarket cardone well I have to use since got them 3 yrs ago never put em in but should have saved the oem well still didn't do passenger side so I think ima keep that one and hopefully cardone won't fail so quick and ima rebuild my oem
@AdventureBuilt yessir it's done not forgotten though... but damn can't get passenger side out for nothing 2 hrs had to put back together need car for work tomorrow sucks last resort is a torch to the bracket car is from up north I moved to Florida but wow it's in there I beat it up I'm gonna try amd torch then try remove bracket somehow if camt torch it .. that 1 bolt mam for the bracket who built it that way damn haha
Great video, thanks for taking the time to shoot. Question: is it possible to replace the outer boot without removing the axle? I’m assuming yes but wanted to confirm, thx.
Thank you so much. Unfortunately I don’t think it is possible and if you find any info to the contrary let me know. The axle is disassembled by removing the end of the axle that inserts into the axle housing, not from the wheel knuckle. The only other way would be to remove the axle from the inboard joint tulip. The only hang up for me was now you have to insurt the axle and tripod joint back into the tulip, add grease and get the clamp back on while under the rig. For me have the ability to work on a bench and get the axle rebuilt properly was worth the 20 minute to pull the tulip out of the axle. IMHO. Hope this helps.
Thank you for taking the time to respond. If I do find a way I’ll respond here. I was installing new shocks & struts on my Taco and I cut the outer boot with a cutoff wheel, probably when I had to cut off the sway bar links. I wrapped electrical tape around the accordion pleats to “stop the bleeding”, after I noticed that grease was being slung out. I don’t put a lot of miles on the Taco, mainly 5 miles to the dump, but I can’t put this off for too long.
Happy New Year to you Kelly, all the best in the New Year. BTW, what are your thoughts on the new 4 cyl. Turbo Tacoma, thinking of trading up..?? I would like to test drive the I-Force Max model, I`m kinda leaning towards that for my next purchase..
Happy New Year! There is a lot I like about the new Tacoma, I like the boxed frame, the sway bar disconnects and the new interior. I’m just not sure about the Turbo 4. My 6 cylinder is really underpowered and don’t know if Toyota got it right. I’ve seen a couple acceleration tests and it’s faster than the 3rd Gen but would like to know about the torque. I really like the way it looks though.
I may have to think about it myself, just found out that the Offroad premium package is $70,000.00 out the door which means the I-Force will be loser to $80,000.00 out the door, that’s Canadian, pricing is really getting out of control.
How does this compare (cost & time wise) to just buying and replacing the entire axle. Toyota OEM vs aftermarket. Probably save several hours work and do it for similar price?
A replacement factor axle is $500ish dollars. I looked into aftermarket but haven’t found anything less expensive that is as high of quality. Rebuild is definitely the best bang for the buck.
Thank you. I actually went to my local dealership asking the same questions. It was like $2500 per side and they would only do a full replacement. They wouldn’t rebuild the cv for me if I brought them in. Wish that was an option.
Great video, but FYI: The text your video displays about your mistake with the grease, says "the tan grease goes in the outer boot". However, your commentary after that text says "the tan grease goes in the inner boot". I believe the displayed text is incorrect.
You are absolutely correct. The tan grease goes in the inner boot. I messed that up a thousand times making that video. Apparently even in the edit. Thanks for catching that.
Sorry but I can’t like this video until that is fixed, it was quite confusing. I’d also recommend including something about marking the shaft and bearing before removal. Great video otherwise, but a shame it’s incomplete.
Yes they are completely interchangeable but I would swap sides unless you have to. The way the metal parts break in the make certain wear patterns and you don’t want to change that.
@@AdventureBuilt This is good news. I would keep one spare axle with the truck just incase something happens. Seem a Tacoma at a Toyota dealership with a broken axle. It was clearly someone that go off roading....maybe some rocks broke it. Seem jeep guys carrying spare axles with them.
@@useryggfdccit is definitely good news. Just don’t forget to bring the tools to do the job. It’s definitely not an easy trail fix but can definitely be done!!!
Hey Kelly, great and very informative video I must say. What I would like to know is what the big difference between one grease and the other.? What if you would have used the more heavy duty grease for both joints, what would be the harm..? Don`t you just hate it when you have to do the same job twice..?? It drives me nuts, so I always either take pictures or make note on paper, the differences of things like that, even gaskets, if they go on a certain way but you dont quite remember when you go to put them back... Happy New Year to you and your family Kelly.
Thank you so very much. Yes it is insanely frustrating but I think I learn more from making mistakes unfortunately. As far as the grease goes, I spent a ton of time in forums researching those different greases and what I could substitute. The grease has different viscosity and heat rating…I’m sure I am using the wrong terms. The needle bearing take a thinner grease- tan and the roller type bearing take a thicker grease- black. Totally going off memory, so I could have those mixed up. Either way I couldn’t find a suitable replacement grease for the tan as everyone had a different opinion on every different line. In the end I went with the Toyota spec grease which I wish they would sell seperate. Happy New Year!!!!
I'm confused which grease goes where because you said the first time that tan goes on the inner but you stop the video and add the caption that you made a mistake and the black goes on the inner. Then when you start the video up again you say the tan goes on the inner. Which one is it?
Sorry buddy, that confused the shit out of me too. The tan grease goes on the inner joint which is closest to the center of the truck. The dark grease goes into the outer joint. Hope this clears it up.
You can saw the axle in half, remove the old boots, install new boots and join the axle with a hose and two clamps or weld it together if you have a welder. If you want to. 🤔
CV Boots Fix Without Removing Your CV Axle? Let save you guys the hassle because his title is misleading. Answer: NO in this video. The shiny replacement is appearing to be made of silicone. Let me save you the hassle if you're working with silicone boot, answer: YES but not in this video. They have an air tool for $50 to expand the silicone so it stretches right over the CV. Don't use it on neoprene boot, it won't work. Unfortunately, no one makes inner silicone boot so you can work around this by using existing boot for the inner moon shape triangular area and apply universal boot right over then clamp down.
PS using $50 CV expander air tool, this is actually a 30min job. And every silicone boot on the market stinks. They're too thin. I'm looking for longevity answer if anyone used it let me know by posting a video on YT tx


This is the best video on this topic I have found. The mistakes and small notes on band positions and honesty on the bearing removal from axle splines are all very helpful and accurate to my experience.
I’m glad you found it helpful!
Just did my struts and wouldn't you know a boot tore.... so this is a next week project. Thanks for the clear video
That sucks. You are welcome and hopefully your repair goes smooth.
Good stuff. I’ve done both sides and it took me 4-5 hours each side. One thing I’ve been told is leave the circle lock thingy on and rotate the open part down when installing. Cheers!
I will have to try that! Thanks for the tip.
OEM toyota boot stainless bands are the best, but in a Toyota forum some one suggested marine 304 stainless smooth band clamps worm type, i tried them ON Lexus & Toyota boots and have had success with them staying on tight. McMaster-Carr of Santa Fe Springs has them PN 5574K24 and 5574K16 much better than local parts stores.
Great advice, thanks.
Great video. A little trick on axle nut. Once it is loosen off a bit before disconnecting knuckle from lower control arm tap axle in a bit to free it up. This will be easier for you. Thanks for the great video to help out people. You work like me nice and clean environment.
Great tip!
Great video….going to do the needle bearing swap out of curiosity, did you changethe axle seal around the diff?
Thank you so much. No I didn’t change out the seal. It was in perfect condition.
In the toyota manual, it said before the cv bearings are removed, you should put a mark on cv bearing and the shaft. This way, the marks can be lined up during assembly. I didn't see you doing that step. Is it really necessary. What are your thoughts and reasons why toyota indicated the cv bearing and shaft alignment? The only issue i see is that both cv bearing might not align a certain way from each other the way you assembly them together.
I did make them before disassembly, guess I didn’t cover that well. I think the reason is the machined parts have been warn in a certain way and best practice is to put them back into their warn position. Hope this is helpful.
This is what I should have done instead of tossing some aftermarket cardone well I have to use since got them 3 yrs ago never put em in but should have saved the oem well still didn't do passenger side so I think ima keep that one and hopefully cardone won't fail so quick and ima rebuild my oem
Absolutely. Everything I have read said that the factory axles are the best out there. Rebuilding just makes sense.
@AdventureBuilt yessir it's done not forgotten though... but damn can't get passenger side out for nothing 2 hrs had to put back together need car for work tomorrow sucks last resort is a torch to the bracket car is from up north I moved to Florida but wow it's in there I beat it up I'm gonna try amd torch then try remove bracket somehow if camt torch it .. that 1 bolt mam for the bracket who built it that way damn haha
Great video, thanks for taking the time to shoot.
Question: is it possible to replace the outer boot without removing the axle? I’m assuming yes but wanted to confirm, thx.
Thank you so much. Unfortunately I don’t think it is possible and if you find any info to the contrary let me know. The axle is disassembled by removing the end of the axle that inserts into the axle housing, not from the wheel knuckle. The only other way would be to remove the axle from the inboard joint tulip. The only hang up for me was now you have to insurt the axle and tripod joint back into the tulip, add grease and get the clamp back on while under the rig. For me have the ability to work on a bench and get the axle rebuilt properly was worth the 20 minute to pull the tulip out of the axle. IMHO. Hope this helps.
Thank you for taking the time to respond. If I do find a way I’ll respond here.
I was installing new shocks & struts on my Taco and I cut the outer boot with a cutoff wheel, probably when I had to cut off the sway bar links. I wrapped electrical tape around the accordion pleats to “stop the bleeding”, after I noticed that grease was being slung out. I don’t put a lot of miles on the Taco, mainly 5 miles to the dump, but I can’t put this off for too long.
Happy New Year to you Kelly, all the best in the New Year. BTW, what are your thoughts on the new 4 cyl. Turbo Tacoma, thinking of trading up..?? I would like to test drive the I-Force Max model, I`m kinda leaning towards that for my next purchase..
Happy New Year! There is a lot I like about the new Tacoma, I like the boxed frame, the sway bar disconnects and the new interior. I’m just not sure about the Turbo 4. My 6 cylinder is really underpowered and don’t know if Toyota got it right. I’ve seen a couple acceleration tests and it’s faster than the 3rd Gen but would like to know about the torque. I really like the way it looks though.
I may have to think about it myself, just found out that the Offroad premium package is $70,000.00 out the door which means the I-Force will be loser to $80,000.00 out the door, that’s Canadian, pricing is really getting out of control.
How does this compare (cost & time wise) to just buying and replacing the entire axle. Toyota OEM vs aftermarket. Probably save several hours work and do it for similar price?
A replacement factor axle is $500ish dollars. I looked into aftermarket but haven’t found anything less expensive that is as high of quality. Rebuild is definitely the best bang for the buck.
10:26 BRO! That sound FX had me thinking a accident happen outside!!!
Haha. Love my sound FX!!!!
Do you have the part number for the reboot kit?
I don’t. I just went to Toyota dealership and garage them the vehicle info.
I wonder what the dealer would charge to do this? Either for the complete job or if you took them the axle assembly? Great video BTW
Thank you. I actually went to my local dealership asking the same questions. It was like $2500 per side and they would only do a full replacement. They wouldn’t rebuild the cv for me if I brought them in. Wish that was an option.
Get rid of the frickin music
😂just thinking the same trying to watch this late at night
Great video, but FYI: The text your video displays about your mistake with the grease, says "the tan grease goes in the outer boot". However, your commentary after that text says "the tan grease goes in the inner boot". I believe the displayed text is incorrect.
You are absolutely correct. The tan grease goes in the inner boot. I messed that up a thousand times making that video. Apparently even in the edit. Thanks for catching that.
Sorry but I can’t like this video until that is fixed, it was quite confusing. I’d also recommend including something about marking the shaft and bearing before removal.
Great video otherwise, but a shame it’s incomplete.
@@rypurncan you please explain this further?
so, no. GREAT attempt though! I dig a lot of your videos, keep up the great work!
Yup, so no. Thanks so much.
Are the CV axles interchangeable?
Port can go starboard?
Yes they are completely interchangeable but I would swap sides unless you have to. The way the metal parts break in the make certain wear patterns and you don’t want to change that.
@@AdventureBuilt
This is good news. I would keep one spare axle with the truck just incase something happens.
Seem a Tacoma at a Toyota dealership with a broken axle. It was clearly someone that go off roading....maybe some rocks broke it.
Seem jeep guys carrying spare axles with them.
@@useryggfdccit is definitely good news. Just don’t forget to bring the tools to do the job. It’s definitely not an easy trail fix but can definitely be done!!!
Hey Kelly, great and very informative video I must say. What I would like to know is what the big difference between one grease and the other.? What if you would have used the more heavy duty grease for both joints, what would be the harm..? Don`t you just hate it when you have to do the same job twice..?? It drives me nuts, so I always either take pictures or make note on paper, the differences of things like that, even gaskets, if they go on a certain way but you dont quite remember when you go to put them back... Happy New Year to you and your family Kelly.
Thank you so very much. Yes it is insanely frustrating but I think I learn more from making mistakes unfortunately. As far as the grease goes, I spent a ton of time in forums researching those different greases and what I could substitute. The grease has different viscosity and heat rating…I’m sure I am using the wrong terms. The needle bearing take a thinner grease- tan and the roller type bearing take a thicker grease- black. Totally going off memory, so I could have those mixed up. Either way I couldn’t find a suitable replacement grease for the tan as everyone had a different opinion on every different line. In the end I went with the Toyota spec grease which I wish they would sell seperate. Happy New Year!!!!
@@AdventureBuilt no need for OE any cv grease with moly from part store will do been running them for year without any problems
I'm confused which grease goes where because you said the first time that tan goes on the inner but you stop the video and add the caption that you made a mistake and the black goes on the inner. Then when you start the video up again you say the tan goes on the inner. Which one is it?
I see the answer was given a few months ago. I really think you should fix that part of the video. Other than that, it's great!
Sorry buddy, that confused the shit out of me too. The tan grease goes on the inner joint which is closest to the center of the truck. The dark grease goes into the outer joint. Hope this clears it up.
@@AdventureBuilt i heard the opposite lol
all that for a frickin cheap boot. man they need to make those things more durable.
Says without removing cv axel yet he removed it
Smart 👌🏽
Title of video is incorrect. Decent job thou
You can saw the axle in half, remove the old boots, install new boots and join the axle with a hose and two clamps or weld it together if you have a welder. If you want to. 🤔
With my welding skills…what could possibly go wrong !
Terrible noise that is no music totally hate it very annoying
Sorry I can’t hear you, I had headphones on!
CV Boots Fix Without Removing Your CV Axle? Let save you guys the hassle because his title is misleading. Answer: NO in this video. The shiny replacement is appearing to be made of silicone. Let me save you the hassle if you're working with silicone boot, answer: YES but not in this video. They have an air tool for $50 to expand the silicone so it stretches right over the CV. Don't use it on neoprene boot, it won't work. Unfortunately, no one makes inner silicone boot so you can work around this by using existing boot for the inner moon shape triangular area and apply universal boot right over then clamp down.
PS using $50 CV expander air tool, this is actually a 30min job. And every silicone boot on the market stinks. They're too thin. I'm looking for longevity answer if anyone used it let me know by posting a video on YT tx
If you go through all that hassle you might as well change it would never put boots on it
Just buy new shaft with boots .not worth messing with it….
Napa