25 yeaes ago I was an exposed (finish) timber framer when I met my wife, who was terrified of me getting hurt. So I made a shift to working for a finish carpentry/bench carpentry contractor. Not having a clue about how to work with such little and fine pieces, I picked up a book, I think it was titled the "Finish Carpenter's Handook", by Nick Engler. I learned everything I needed to know to be a successful carpenter to this day. I am so delighted to find you here, online. I have the chance to say THANK YOU NICK! You are an inspiration, a teacher and a wizard. I am grateful for all that I have learned from you!
I’ve watched a million woodworking videos and this one is up there with the best. Not for the idea, which is excellent, but for the way he presents his videos. No whacky stuff, no silly gimmicks, no ridiculous music (the speed up music is fine) and no filler. Everything to the point. Excellent. Subscribed.
Einstein is the best out there, I agree 💯!!!... He has the best way of explaining himself!... If he was my teacher at school, I would never have gotten distracted (I suffer from ADD)... Most often he's too clever for me, therefore I watch all his videos at least 10 times!... Unfortunately I am able to like (👍) each video only once... I wish UA-cam would allow me to like and subscribe to this absolutely great channel a million times!!! 👍👍👍🏅🏆🖐️🍻
I have been watching a lot of wood working videos, and it occurs to me that I want to go and listen to all of them. Thank you sir for being the first person on u-tube to make me want that.
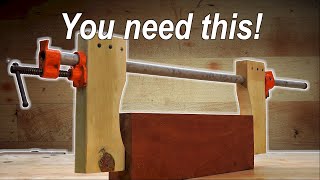
Nick has a gift for explaining woodworking techniques. It is very useful to understand the different ways this jig can be used and modified. I love how he explains everything. I didn't understand why the slots were 6 3/4" apart versus 6".
The clamps I use most often -- bar clamps -- have a throat of 3 to 3-1/2 inches depending on the brand. So I don't let the distance between the slots extend beyond 7 inches. That way I can reach every square inch of the assembly table with the clamps I keep closest at hand. But if you want to space the slots at 6 inches -- or 5 or 4 or 3 -- you can. If all your most treasured clamps all have 5-inch throats, you can space them at 10 inches. Your call. In fact, I encourage readers to modify my jigs for their own needs. I present the jig designs on this channel as a jumping-off point.
I feel like you know this about yourself Nick. I feel like you're the type of guy who understands himself really well and is truly genuine. So it should come as no surprise to you that the way you spin your hammer in the intro (and the clamp in this video) is exceedingly charming. If you don't current have any sons, I'd happy fill out an application to be one of yours. Also, I'll be building this gluing jig.
I sincerely appreciate your sentiment and compliment, but UA-cam, Facebook, and other streaming media are crushing syndicated television. I was once a successful how-to author, and that career was wiped out as social media replaced print media as a way to share how-to information. Can't afford to go that route again.
I was drawn to watch this video as I'm at the planning stage of building my own aircraft (a Jodel D11.) I thought this jig would be ideal for setting up fuselage bulkheads and I suspect it will have a great many more uses too along the way. Thank you!
Whooooooaaaaa!!!!! your the director of the Wright Brothers Aeroplane Company??? How cool is that. I have been watching your wood working videos and had no clue your an Aviator.
As always, your videos are thorough, well demonstrated, organized and easy enough for individuals like myself to follow. Your contributions to our great community is both timeless and obviously selfless. Thank you for your time and efforts, they sure aren't wasted on this individual. My sincerest gratitude ... Cheers!! dave
I just built this last night. Genius. I took a cabinet job never making doors before. I have all the equipment to do so just never did on a production scale. Well your jig just saved my rear end! Thank you for all of the fantastic content and making our woodworking lives a little easier! Keep the lessons coming! Thank you!
Love the simplicity and versatility of this design. I think the best part is that I could use it for a glue up and then move the whole piece to another location so I still had access to my work area for another project while the glue cures. Doing a large panel glue up causes me more dread in that I won't be able to use my work bench for several hours, rather than all the work of doing the actual glue up. Great jig Sir.
Thank you for your kind words. We have three of these (one big, two little), so we can do multiple glue-ups. We move these around constantly, our workbench remain clear, and we're always tripping over the glue-ups...;-)
@@WorkshopCompanion this makes perfect sense. It just reinforces the idea that the better you plan, the better your project will go. I will slowly start making some of these jigs, as it conveniently allows you to do more glue ups. Love it.
A brilliant, well thought out, simple jig. I could see this folded up against the wall and tilted down for glue ups if the space is adequate. Or slid underneath a large assembly table when it comes time to glue up the doors and drawers.
I've been building this jig for the last day or so. I still need to route the slots. I haven't built something for myself in a while, but this was fun, and practical. Plans were spot on.
this is a genius project! I have a side table that i build frequently. I clamp the top to the legs a certain way but i've been doing it using the edge of my actual work table, so then my work table is out of commission until the glue dries and I can remove the table. Also, the more i use my work table the more beat up it gets. When i built it, I trusted it was flat but i'd imagine that might not be the case now that i've used it for a few years. THIS assembly table project seems like exactly what i could use to do my glue-up, then move it out of the way so i can keep working on something on my old work table. Thanks for sharing, I'm gonna make one of these to try! 👍🏻
That's an elegant solution to an age old problem. Thanks Nick. It's on the "to build" list. That pipe clamp rack is a lovely addition. Sure beats chasing the rolly suckers around!
Nick, I built the Assembly table. Which I made a little larger than the smaller size. I have to say your design is well thought out and the table functions very well. I built the infinity clock as a Wedding present for my niece and the assembly table made that project go very well. Your plans are very well written and detailed. I now have a friend building his table after he saw mine and how well my glue ups went together. Thanks Marty
Great video. I bought your plans and have already built two small and one large assembly tables. These assembly tables make my simple build projects so fast and easy now. Problem is now I need more clamps. Not a bad problem to have. Thanks
Great video. I like that you started with the basics and kept adding on with all the different functions and that I didn't have to watch 5 separate videos. Thank you. Off to build my own.
After stumbling upon your page just a few weeks ago and binging some of your videos tonight, I became accustomed to the hammer slinging intro/outro. Let me tell you what, when you twirled that clamp at the end, I let out a pretty substantial laugh. M. Night Shyamalala comedic twist. LOVE this table, will definitely be making it. Thanks for the content!!
You're most welcome. My favorite twirl is the bench plane at the end of the Harbor Freight Bench Plane take-down ( ua-cam.com/video/QSnLgE7fWCQ/v-deo.html ). That took some intensive practice.
Wow NIck, this jig is super cool, portable and very practical. My small shop does not have room for a Paulk assembly workbench or a shop made version of an MFT table. Bought the plans for the jig and immediately went out for a sheet of melamine. Lost track of you after your sawdust sessions for ShopSmith. Built your drill press table many moons ago. Great to see and learn from you again. Best of success for your new website - looking forward to learning new skills and discovering new project from a master craftsman.
Wow. Right when I thought I was subscribed to every woodworking channel out here, I stumble on yours. I really enjoy your videos and learn a lot from them. I like this jig a lot and hope to make it soon.
I want to make the interior 3 inches. Drilling 1.5 inch holes in 2 inch plywood gives me the flutters. I bought the plans. This guy is woodworking UA-cam all star.
Timing is everything. I see this after my built in cabinet cabinet project for the bathroom, walk in closet and hall way. Oh well, there is always the kitchen. I'll get to work.😉
Great video. I’ve used my perfectly flat SawStop table saw as my glue-up table because it’s perfectly flat. Now that I bought the plans to this jig, it will free up my table saw! Thanks for the cool tip!
Great jigs. Very helpful video. I’m surprised that UA-cam did not take me to your channel before now with all the years that I’ve been watching it and glad that I finally got connected to your site.
Just found this today and will incorporate these features into my next assembly table build well thought out and executed should have them in every trade school
Great video, I had the opportunity to see your sheet of plywood video, from carrying to loading and cutting. Ordered the project plans. Easy down load. Thank you for sharing and your explanation of each project video.
I make quite a few cutting boards and have been trying to design my own gluing jig to ensure squareness and flatness. This is exactly what I've been trying to come up with. Thank you! I will be purchasing your plans immediately.
Perfect timing. I've been looking to build an assembly table for my VERY small workshop that I can store out of the way when not in use. Most of the videos out there are for workbenches that incorporate into the top, but I already have a very solid bench now. I just needed an assembly table I could use on occasion. I just ordered the detailed plans and am going to build the perfect size for me. Good Job and thank you for the great video. Subscribed for sure.
I watched the build a few times then I built one and plan to start using it next week when I build new kitchen cabinet doors and drawers with my Shopsmith Mark 7. I always enjoyed your sawdust sessions fro back in the day. This was a simple build but it still takes time but I know that I will find it very useful. I used up some melamine that I had and ended up with a 22 x 37 surface. Thanks for all you do!
Great job Nick! I came across your videos today and was instantly hooked. I binge watched about 10 and just subscribed so I can come back later. You sir are extremely talented. I’ve purchased a couple of your plans already. Thank you for your outstanding videos. I plan to stay tuned so don’t stop doing what you do! Cheers
This assembly table is so cool. I would probable make a couple of changes though. First I would increase the 3/4" plywood strips to be 2.5" tall to keep the 1.5" holes from tearing out when I drilled them (or maybe as a second option is to drill the 1.5" holes before I rip the plywood boards to the 2" height). The second thing I would do is not to make the scallop boards to hold the 3/4" pipe clamps for the panel glue up. You put calls under the panel so the pipes do not rest in the scallops anyway (or am I missing something). I would add a third hole pattern to the rear of the table. That way I could use the side fence as a rear fence for the panel glue up. Less parts not attached to the table when in storage. Thanks a lot for the video.
Most welcome. The difference between the frame (plywood strip) width dimension and the diameter of the holes is determined by the design of most clamps. The fixed jaw only extends 1/4" (or less) out from the clamp frame. If the strips are wider and you don't increase the size of the holes, the clamp frame will catch on the side of the hole before the fixed jaw reaches the underside of the melamine plate. The clamp will tilt and the movable jaw will want the drag the work sideways.
Practical invaluable content I like that you have shared your knowledge in such a straightforward way so thanks and I've liked and subscribed👍🏼👍🏼 Two thumbs up!
When I join two boards for a glue up, I run my hand plane a couple of more time in the middle part of the board edges to create a very shallow hollow in the middle. You can see the hollow when putting the edges together. I glue then clamp the boards starting with the middle and this pulls the boards together in essence making a built in clamp in the middle.
Just stumbled on your channel and like your clamping jig witch is something I've been looking for but didn't know it.😀 So since I like your personality and the format of your video, especially your dog, so I've subscribed. I have a successful Etsy shop where I make high end Dovetailed Keepsake boxes out of all prmium grade hardwood. One of the difficulties in making these boxes is keeping them perfectly square. I think your clamping jig will help. Now all I nee to do is find the time to mak 1 or 2! Thank you!


25 yeaes ago I was an exposed (finish) timber framer when I met my wife, who was terrified of me getting hurt. So I made a shift to working for a finish carpentry/bench carpentry contractor. Not having a clue about how to work with such little and fine pieces, I picked up a book, I think it was titled the "Finish Carpenter's Handook", by Nick Engler. I learned everything I needed to know to be a successful carpenter to this day. I am so delighted to find you here, online. I have the chance to say THANK YOU NICK! You are an inspiration, a teacher and a wizard. I am grateful for all that I have learned from you!
Most welcome.
I’ve watched a million woodworking videos and this one is up there with the best. Not for the idea, which is excellent, but for the way he presents his videos. No whacky stuff, no silly gimmicks, no ridiculous music (the speed up music is fine) and no filler. Everything to the point. Excellent. Subscribed.
Thanks and welcome. But -- full disclosure -- we get a little whacky on occasion.
@@WorkshopCompanion hahaha..
Einstein is the best out there, I agree 💯!!!... He has the best way of explaining himself!... If he was my teacher at school, I would never have gotten distracted (I suffer from ADD)... Most often he's too clever for me, therefore I watch all his videos at least 10 times!... Unfortunately I am able to like (👍) each video only once... I wish UA-cam would allow me to like and subscribe to this absolutely great channel a million times!!! 👍👍👍🏅🏆🖐️🍻
He definitely does wacky, corny jokes, but he’s cool as ice, so he pulls it off no problem.
@@frederikmare9002 If you give a thumbs up to comments, or reply to other comments it all adds up and increases the benefits to a channel.
I have been watching a lot of wood working videos, and it occurs to me that I want to go and listen to all of them. Thank you sir for being the first person on u-tube to make me want that.
Good luck! Come back to us in 10 or 12 lifetimes and tell us what you learned...;-)
This guy is the shop teacher I would have loved
Nick has a gift for explaining woodworking techniques. It is very useful to understand the different ways this jig can be used and modified. I love how he explains everything. I didn't understand why the slots were 6 3/4" apart versus 6".
The clamps I use most often -- bar clamps -- have a throat of 3 to 3-1/2 inches depending on the brand. So I don't let the distance between the slots extend beyond 7 inches. That way I can reach every square inch of the assembly table with the clamps I keep closest at hand. But if you want to space the slots at 6 inches -- or 5 or 4 or 3 -- you can. If all your most treasured clamps all have 5-inch throats, you can space them at 10 inches. Your call. In fact, I encourage readers to modify my jigs for their own needs. I present the jig designs on this channel as a jumping-off point.
I knew Nick was the Wizard of Wood! Seeing him magically make these tables appear just proved it😳
Look at the twinkle in his when he shows prying the panel off with the clamp. He’s so proud of that clever feature. Love this.
Twinkle in my...what? I love that you left that to the imagination.
I feel like you know this about yourself Nick. I feel like you're the type of guy who understands himself really well and is truly genuine. So it should come as no surprise to you that the way you spin your hammer in the intro (and the clamp in this video) is exceedingly charming.
If you don't current have any sons, I'd happy fill out an application to be one of yours.
Also, I'll be building this gluing jig.
It's late, I'm working my way through today's correspondence, and yours made me laugh. Thanks for that, and for the kind words.
Briliant idea, takes away the need for a true assembly table, saves a tonne of space!!
You need your own syndicated television show!
I sincerely appreciate your sentiment and compliment, but UA-cam, Facebook, and other streaming media are crushing syndicated television. I was once a successful how-to author, and that career was wiped out as social media replaced print media as a way to share how-to information. Can't afford to go that route again.
We're not worthy!!!!
Simply the best. Thank you
This more I watch you with the assembly table the more I learn!
I was drawn to watch this video as I'm at the planning stage of building my own aircraft (a Jodel D11.) I thought this jig would be ideal for setting up fuselage bulkheads and I suspect it will have a great many more uses too along the way. Thank you!
If my former life, I built replicas of historic wooden aircraft for museums, and we made many jigs like this for assembly.
I built a torsion box workbench/outfeed a few years ago. It's so nice to trust that it's deadly flat.
It's a great trick -- just used a torsion box design to make two huge doors for a barn. They came out dead flat too.
Whooooooaaaaa!!!!! your the director of the Wright Brothers Aeroplane Company??? How cool is that. I have been watching your wood working videos and had no clue your an Aviator.
As always, your videos are thorough, well demonstrated, organized and easy enough for individuals like myself to follow. Your contributions to our great community is both timeless and obviously selfless. Thank you for your time and efforts, they sure aren't wasted on this individual.
My sincerest gratitude ... Cheers!! dave
I just built this last night. Genius. I took a cabinet job never making doors before. I have all the equipment to do so just never did on a production scale. Well your jig just saved my rear end! Thank you for all of the fantastic content and making our woodworking lives a little easier! Keep the lessons coming! Thank you!
Most welcome. Glad to have been of some help.
I love this channel! So much useful information without the constant advertising of useless tools. Keep up the great work sir!
That's good to hear. Thanks.
This design is really great for a small shop. I've seen a lot of work bench videos but this modular design is truly unique.
Thanks for saying.
Love the simplicity and versatility of this design. I think the best part is that I could use it for a glue up and then move the whole piece to another location so I still had access to my work area for another project while the glue cures. Doing a large panel glue up causes me more dread in that I won't be able to use my work bench for several hours, rather than all the work of doing the actual glue up. Great jig Sir.
Thank you for your kind words. We have three of these (one big, two little), so we can do multiple glue-ups. We move these around constantly, our workbench remain clear, and we're always tripping over the glue-ups...;-)
@@WorkshopCompanion this makes perfect sense. It just reinforces the idea that the better you plan, the better your project will go. I will slowly start making some of these jigs, as it conveniently allows you to do more glue ups. Love it.
Excellent fixture. Just perfect for someone with a nice workbench that doesn't have many clamping opportunities in the design.
Thanks for saying. We have three of these in our shop, and they all stay busy.
Thank you! Newbie here needs a lot of small and big tricks like the ones you show in all your videos!
You're welcome!
Love the glue table. Keep up the good work. Have a blessed day.
Thanks. You too.
The jigg is great, but not only that you provide a handfull of useful tips on clamping and glueing.
Thanks 🤩
You're welcome.
I made one of these this weekend to help with some Door glue-ups, I will be making more of them they are a tremendous help
We have three of them in our shop and they are stay busy. Glad to have been of help.
A brilliant, well thought out, simple jig. I could see this folded up against the wall and tilted down for glue ups if the space is adequate. Or slid underneath a large assembly table when it comes time to glue up the doors and drawers.
Thanks for saying.
What a hoot. You made me smarter and I’m pretty sure you also lowered my blood pressure.
Nick, you’re awesome. Thanks for what you do.
Most welcome.
Has quickly become my favorite channel. The way projects and information are presented is truly easy to understand, even for beginners.
I've been building this jig for the last day or so. I still need to route the slots. I haven't built something for myself in a while, but this was fun, and practical. Plans were spot on.
Thanks for sharing.
@@WorkshopCompanion Holy Cow!!! Never routed particle board before. The mess was quite impressive.😅
@@MarioG2912 Try MDF. You'll need three shop vacs and a front-end loader to clean up afterwards.
Always a pleasure watching Mr Nick!
this is a genius project! I have a side table that i build frequently. I clamp the top to the legs a certain way but i've been doing it using the edge of my actual work table, so then my work table is out of commission until the glue dries and I can remove the table. Also, the more i use my work table the more beat up it gets. When i built it, I trusted it was flat but i'd imagine that might not be the case now that i've used it for a few years.
THIS assembly table project seems like exactly what i could use to do my glue-up, then move it out of the way so i can keep working on something on my old work table. Thanks for sharing, I'm gonna make one of these to try! 👍🏻
Good luck.
Very Nice Multi Functional Assembly Table. Perfect For Any Type Of Projects.
Yes, thanks
built it last year and it turned out to be best jig I have. Thanks much
Glad to have been of help.
That's an elegant solution to an age old problem. Thanks Nick. It's on the "to build" list. That pipe clamp rack is a lovely addition. Sure beats chasing the rolly suckers around!
Thanks for saying.
Nick, I built the Assembly table. Which I made a little larger than the smaller size. I have to say your design is well thought out and the table functions very well. I built the infinity clock as a Wedding present for my niece and the assembly table made that project go very well. Your plans are very well written and detailed. I now have a friend building his table after he saw mine and how well my glue ups went together. Thanks Marty
That's awesome. Thanks for the feedback.
You are the goat Mr. Gepetto.
Congrats!!
This is the best site on youtube if you really want to learn . I have purchased a couple plans and plan on more. Ty
Great video. I bought your plans and have already built two small and one large assembly tables. These assembly tables make my simple build projects so fast and easy now. Problem is now I need more clamps. Not a bad problem to have. Thanks
Most welcome.
Actually this is even better... thank you Nick for all you do
You're welcome. And thanks for your kind words.
I'm wanting to know where have you been all of my life. You do an awesome job on explaining things.
Thanks.
Can't get enough of this guy! Excellent instructional videos ..best on UA-cam !!! Thank you so much🙏
Most welcome.
Great video. I like that you started with the basics and kept adding on with all the different functions and that I didn't have to watch 5 separate videos. Thank you. Off to build my own.
Glad to be of help.
After stumbling upon your page just a few weeks ago and binging some of your videos tonight, I became accustomed to the hammer slinging intro/outro. Let me tell you what, when you twirled that clamp at the end, I let out a pretty substantial laugh. M. Night Shyamalala comedic twist. LOVE this table, will definitely be making it. Thanks for the content!!
You're most welcome. My favorite twirl is the bench plane at the end of the Harbor Freight Bench Plane take-down ( ua-cam.com/video/QSnLgE7fWCQ/v-deo.html ). That took some intensive practice.
Wow NIck, this jig is super cool, portable and very practical. My small shop does not have room for a Paulk assembly workbench or a shop made version of an MFT table. Bought the plans for the jig and immediately went out for a sheet of melamine. Lost track of you after your sawdust sessions for ShopSmith. Built your drill press table many moons ago. Great to see and learn from you again. Best of success for your new website - looking forward to learning new skills and discovering new project from a master craftsman.
Good of you top say, Tom.
Just what I was looking for! I ordered the plans.....which I might add are a great bargain at 3.99. Thank you!
Most welcome.
Wow. Right when I thought I was subscribed to every woodworking channel out here, I stumble on yours. I really enjoy your videos and learn a lot from them. I like this jig a lot and hope to make it soon.
Thanks for the kind words.
I want to make the interior 3 inches. Drilling 1.5 inch holes in 2 inch plywood gives me the flutters. I bought the plans. This guy is woodworking UA-cam all star.
Timing is everything. I see this after my built in cabinet cabinet project for the bathroom, walk in closet and hall way. Oh well, there is always the kitchen. I'll get to work.😉
You are 1 of a kind. A true teacher. Heck of a video
Thanks.
Great video. I’ve used my perfectly flat SawStop table saw as my glue-up table because it’s perfectly flat. Now that I bought the plans to this jig, it will free up my table saw! Thanks for the cool tip!
You're very welcome.
Thankyou, I benefitted from your presentation . . . Chris . . . Norwich, England
This guy is amazing! Very enjoyable to watch, why Disney didn’t cast him to play Maurice in the live-action Beauty and the Beast is beyond me
Great jigs. Very helpful video. I’m surprised that UA-cam did not take me to your channel before now with all the years that I’ve been watching it and glad that I finally got connected to your site.
Thanks for saying.
That probably was the best glue up table I've ever seen thanks. Now I I have to go buy alot of "C" clamps. Whew !
Just found this today and will incorporate these features into my next assembly table build well thought out and executed should have them in every trade school
Thank you. I originally made this for my own students.
I had been using a scrap plywood pallet for an assembly table. I guess I just figured out how to take it to the next level!
Interesting application for a pallet -- very clever.
Great video, I had the opportunity to see your sheet of plywood video, from carrying to loading and cutting. Ordered the project plans. Easy down load. Thank you for sharing and your explanation of each project video.
Most welcome.
I make quite a few cutting boards and have been trying to design my own gluing jig to ensure squareness and flatness. This is exactly what I've been trying to come up with. Thank you! I will be purchasing your plans immediately.
WE made the larger version when we did the cutting board video, but have since found it useful for almost everything we do.
But, but, I like using the dining room table to clamp on. Lol. You did a really good job. Now I need to build one. Thanks
You're welcome. Bon appetit!
Wow, I need to build that asap. This guy reminds me of a mad scientist. Awesome content!
I'd be quite pleased with myself for making the assembly table, never mind actually making nice stuff with it 😂
Great jig!
Thanks!
Subscribed because of this and the plywood handing vid. I enjoy the instruction presentation. Great video!
Thanks.
Made it. Love it. You deserve an award!!!
Glad to have been of help.
I have been thinking about a similar design for a specific purpose. Great to see a pro like you using the same theory!! Thank you for the video!
Most welcome.
Perfect timing. I've been looking to build an assembly table for my VERY small workshop that I can store out of the way when not in use. Most of the videos out there are for workbenches that incorporate into the top, but I already have a very solid bench now. I just needed an assembly table I could use on occasion.
I just ordered the detailed plans and am going to build the perfect size for me. Good Job and thank you for the great video. Subscribed for sure.
You're most welcome...and welcome!
I watched the build a few times then I built one and plan to start using it next week when I build new kitchen cabinet doors and drawers with my Shopsmith Mark 7. I always enjoyed your sawdust sessions fro back in the day. This was a simple build but it still takes time but I know that I will find it very useful. I used up some melamine that I had and ended up with a 22 x 37 surface. Thanks for all you do!
You're welcome -- and good luck with your new kitchen cabinet doors.
Ty so much Sr. for this incredible amount of woodworking knowledge!!!!
Most welcome.
Sir, you are very entertaining to watch. I shal enjoy watching my way through your catalogue of exceptional work.
Sir, you are very kind to say so. Enjoy.
THANX. FOUND YOU NOT LONG AGO AND I'M VERY HAPPY ABOUT THAT. I LIKE THE WAY YOU EXPLAIN STUFF AND YOUR JOYFULNESS DOING SO. AND THIS JIG IS A BEAUTY.
Thank you for saying so.
Enjoyed that and gave me a lot of ideas. Thanks. I don't usually write comments, but this was different and a great idea.
Thanks for saying.
Excellent video of a very useful jig. I purchased your books when they were first published and so was really happy to recently find your channel.
Thanks for watching -- and reading!
Great job Nick! I came across your videos today and was instantly hooked. I binge watched about 10 and just subscribed so I can come back later. You sir are extremely talented. I’ve purchased a couple of your plans already. Thank you for your outstanding videos. I plan to stay tuned so don’t stop doing what you do! Cheers
Thanks for the kind words; come back often.
Referred by Growth Rings (AKA Mr. ToolHunter). This stuff is Gold. Thanks!
Scott's a gem -- thanks for taking his advice.
I can’t thank you enough for sharing this! This is exactly what I’ve been needing!
You're very welcome.
GREAT Video, I will be making this Assembly TABLE soon, makes your work so much easier. THANKS
Most welcome.
glad I found you! what a great resource!
We're glad you found us too!
This is a fine example in how woodworking never gets old! Fine work indeed.
Oh, and love the music. =)
I first noticed this jig when you made the cube clock a few videos back -it looks very useful
More than useful. It's become almost essential for some on the things we do here.
This man is such a legend!!
Great idea. I am going to look for one of your books.
This might interest you: workshopcompanionstore.com/products/making-jigs-and-fixtures
This assembly table is so cool. I would probable make a couple of changes though. First I would increase the 3/4" plywood strips to be 2.5" tall to keep the 1.5" holes from tearing out when I drilled them (or maybe as a second option is to drill the 1.5" holes before I rip the plywood boards to the 2" height). The second thing I would do is not to make the scallop boards to hold the 3/4" pipe clamps for the panel glue up. You put calls under the panel so the pipes do not rest in the scallops anyway (or am I missing something). I would add a third hole pattern to the rear of the table. That way I could use the side fence as a rear fence for the panel glue up. Less parts not attached to the table when in storage. Thanks a lot for the video.
Most welcome. The difference between the frame (plywood strip) width dimension and the diameter of the holes is determined by the design of most clamps. The fixed jaw only extends 1/4" (or less) out from the clamp frame. If the strips are wider and you don't increase the size of the holes, the clamp frame will catch on the side of the hole before the fixed jaw reaches the underside of the melamine plate. The clamp will tilt and the movable jaw will want the drag the work sideways.
Excellent I have learnt a new way of working smarter
Great idea - very useful! You are an exceptional teacher sir!
Thanks for saying so.
Exuding passion for woodworking excellence. Bravo!
Thanks.
Awesome clamping table. It would solve a lot of problems great job
Thanks.
Viva el ingenio y la eficiencia. Gracias por los centimetros
¡Eres bienvenido!
This Guy HAS to be a retired wood shop teacher, if not he missed his calling lol
I never find one of those carpenter square really 90 degrees but that project is a great idea thanks 😊
Most welcome. And by the way, carpenter squares usually need to be "tuned" to make them truly square. We'll show how to do that in an upcoming vid.
Practical invaluable content I like that you have shared your knowledge in such a straightforward way so thanks and I've liked and subscribed👍🏼👍🏼 Two thumbs up!
Thanks...and welcome!
When I join two boards for a glue up, I run my hand plane a couple of more time in the middle part of the board edges to create a very shallow hollow in the middle. You can see the hollow when putting the edges together. I glue then clamp the boards starting with the middle and this pulls the boards together in essence making a built in clamp in the middle.
Brilliant Nick. Glad I found you :)
Thank you for your videos. God bless.
Great idea and your explanation was good
Just stumbled on your channel and like your clamping jig witch is something I've been looking for but didn't know it.😀 So since I like your personality and the format of your video, especially your dog, so I've subscribed. I have a successful Etsy shop where I make high end Dovetailed Keepsake boxes out of all prmium grade hardwood. One of the difficulties in making these boxes is keeping them perfectly square. I think your clamping jig will help. Now all I nee to do is find the time to mak 1 or 2! Thank you!
Awesome build.
Thanks.
Desde Argentina, mi sinceras felicitaciones. Voy a intentar armar esta mesa.
Desde Ohio, gracias y buena suerte.
Great design!!
I want one!
Great jig to have around!
This was an excellent presentation. Wonderfully organized. I'm glad I stumbled onto this.
Thanks. Stumble back often!
What a brilliant idea!