[DIY| Making a YouTube and Photo Studio Setup | Build a Wooden Backdrop

Вставка
- Опубліковано 9 бер 2019
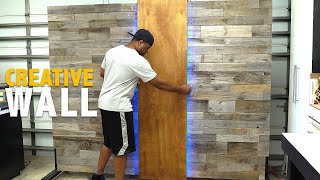
- This is a time-lapse DIY tutorial on how to build a wooden backdrop for your home studio, photo studio, or UA-cam studio.
We are going to use this as our main setup for our UA-cam videos, but will use it for a photography as well!
-------------------------------
Music by Engelwood▹ / engelwoodmusic
-------------------------------
OUR WOODWORKING ▹
www.etsy.com/shop/cbymcreative
-------------------------------
MATERIALS ▽
‣ 9x 2x4x8’
‣ 1x 2x4x10’
‣ 4x 1/4” plywood sheets
‣ 2.5” screws
‣ Impact driver
‣ Drill and bits
‣ Circular Saw
‣ 4x casters
‣ Paint
‣ Rollers
‣ Paint Pan
‣ Tack nails
‣ 16x 2.5”x1/4” bolts
‣ 32x 1/4” washers
‣ 16x 1/4” nuts
-------------------------------
CUT LIST ▽
Main Frame
‣ Top(1)= 7’-9”
‣ Bottom(1)= 8’-7”
‣ Sides(2)= 7’-5 1/2”
‣ Center support(1)= 7’-4”
Leg Supports
‣ Bottom “Foot?”(2)= 4’-9”
‣ Diagonal supports(8)= 32” with both ends cut at 45 degrees
-------------------------------
FOLLOW ME ▹
INSTAGRAM ‣ / captured.by.mary
INSTAGRAM ‣ / wearewillandmary
INSTAGRAM ‣ / cbymcreative
-------------------------------
▹ CINEMATOGRAPHY by Will Nitz and Mary Kim
▹ EDITING by Mary Kim
-------------------------------
PHOTOGRAPHY ▹
captured-by-mary.com/ - Навчання та стиль


The material list and the cut list are in the description!
Hopefully you'll be able to follow along with us and build your own set :)
Let us know if you add any new ideas to the backdrop!
You probably dont care but if you guys are stoned like me during the covid times you can stream all of the new movies on Instaflixxer. Have been binge watching with my gf for the last couple of months xD
@Zion Erick Definitely, I have been using InstaFlixxer for since december myself :D
Absolutely beautiful photo studio set up. Thank you for sharing. Have a wonderful weekend. 🥰
very beautiful couple is together!!
What a nice couple!!!
Bravo, bravo!!
Thank you so much for this tutorial, this is just what I need
Love it... Congrats guys!!!!
Beautiful set! Bravo! You two are so talented, I can’t wait for the next video!
Thank you so much for supporting our channel! It really encourages us knowing that someone is watching what we do. :) Our next video will be up soon! See you then :)
this is awesome to watch
Thank you so much! We have other projects in the works but it's just all so time consuming. Hopefully we get some new content out soon. :)
Such a good video. Major inspo!
Thank you so much for watching!! Let us know if you make your own :)
Thanks!
This is the cutest background I've ever seen!!!
Come over here and let's take some new photos!
Dope! i like your backdrop 👍
Thank you!!! I really like it too...but I already want to paint it another color 😆😆
wow you guys with this color grading !!! this is amazing quality video !!!!
Thank you so much! We honestly didn't expect anyone to find this video, so it's fun watching people find our page. :) We'll hurry up and make some new content!
Great work 👌
Thank you!!
man this is super good! amazing!
Thank you!! ☺️
@@WillandMaryyt cant tattach images but i made one like this, just 3m long and im super happy with it, inspired by your video
You guys are awesome
Wow! Thank you :)
What type of person can I hire to make one of these? A carpenter? A handyman? I'd appreciate your advice. Keep up the good work!
Love it! I plan to this.. but I have a question. If I could have different color backgrounds just paint over it or could It be easy to remove and have different wood boards
Hi guys!
Thank you for watching our video. :) We have plans for more DIY tutorials, but being in the middle of building a house makes it hard to make and film these videos.
Once we get a free moment, we'll update with more fun builds.
Thanks for your patience until then!
Will and Mary
hello, what color paint are you using for your background, thank you for your feedback
Loved this video! Any suggestions on how to make the feet removable ?
I don’t think there’s a good way to remove the feet. I feel like it would fall over? Not sure! Let us know if you figure something out. :)
Hello, is there a place where we can buy the plan of your photo background and what is the color of the paint please
Love it!! What exactly color paint do u use for this?
Oh no..I honestly can’t remember what paint color we used :(
I know it was a Sherwin Williams color available at Lowes...I’m sorry about that!!
What were your camera settings for the first 25 seconds or so? It looks so good. Was it a fast shutter speed and maybe the mild camera shake? I'm new to videography/photography.
Hi! So its just the settings.
It’s filmed in 120fps and slowed down, which gives it that super smooth slo-mo look. :)
If you look up tutorials on the best way to film in 120fps, you should get some ideas!
@@WillandMaryyt thank you so much 😊
I wish I could just pay someone to make me a wall like this.
Haha if only my wife paid me... :D
Question , what are the tack nails in the material list for?
I think its just the nail gun nails! :)
i’m curious why do you need to make a wall when you have a wall right behind the the backdrop wall you just made?
Hello, What kind of plywood did you get from Home Depot? (Sanded, hardwood or sheathing)
We got a sanded 1/4” veneer panel, but anything will work!
Ours was birch? So you don’t need to get hardwood! :)
Will and Mary Thank you!
What does the hyphen mean in the cut lists? I can't find it anywhere online
It was a way for me to try and clarify the dimensions. It should read 7 foot 9 inches and so on. :)
@@WillandMaryyt thank you so much for clarifying!!!
Of course! Sorry that was a little confusing. :)
What is the dimensions of it completed?
What if client don't wanna see standing spots in front
I'm not entirely sure what you mean by standing spots...
How much did this cost you approximately?
I can’t remember...it might’ve been around $100-$150? But I know wood prices have gone up since then. We had some of the materials already so we were able to save there. The materials are pretty readily available so you could price check at your local store!
I'm confused on the paint part, why was it painted?
Hi! Thank you for watching. :) We painted one side to have a moodier color for photoshoots, and then left the otherside natural so we can have two sides to choose from!
@@WillandMaryyt Well that makes sense, I thought maybe you hated it and decided to keep the natural lol. Cool :)
How much were all the materials?
I can’t remember...it might’ve been around $100-$150? We had some of the materials already. They’re pretty readily available materials so you could price check at your local store!