Whirlpool Dryer Make Noises - Rear Drum Seal may Need Replacing

Вставка
- Опубліковано 11 вер 2024
- Whirlpool Dryer Making Noises - See What Parts to check & replace to fix it
Replacement parts amzn.to/42ahu1v - paypal.me/Ange...
Warning: Use the information in this video at your own risk


Thank you for such a thorough and clear easy to understand instructions. This video is very informative and appreciated!
I've never seen the seal replaced like this. This is a much easier way of doing it. Thanks
Indeed it fall in place more easy
When I first saw this video, I'm like how is he going to do this without taking the drum out, then the thing with the wire, I thought was a waste of time. Finally, I'm saying to myself where was this guy 2 days ago, because there were only two videos with no close up of the seal. No wonder I messed up. But I watched this video, and now I'm thinking this guy is a genius, he did it all and never took out the drum, he even set the seal so that it was seated in the correct position and then glued it to the drum, never even made a mess with the glue. VERY GOOD VIDEO, NO BETTER.
He did take the drum out in order to get the new seal onto the drum. This is shown in the video. The rear edge of the drum fits into a FOLD on the seal. The top part of the fold is glued to the top rear edge of the drum. What about the bottom part of the fold? The video makes no mention of the bottom part of the fold and its positioning. Compare this video to the Repair Clinic video.
Correction: PartSelect video; not Repair Clinic. 😮
You make the best and most informative videos there are. I love your channel and have subscribed. Gonna fix my bearings, pulley, belt and this felt when they arrive thanks to you. My normal repair guy said it'll be about 3 weeks before he could. I can work on anything with a gasoline motor, but appliances always seemed too intimidating. Thank you so much again.
Thanks, Helped a lot. I liked your method of applying the glue once the drum was re-installed.
I am about as non-handy as you can get but this gentleman's explanation was perfect. I was able to do this task without burning the house down or totally ruining the dryer. Thank you so much.
This is the best way to install this seal that I've found first hand:
1. Stretch the seal around
the drum, as shown in
this video.
2. Carefully raise the seal,
so that the rear end of
drum fits properly
inside the seal fold.
This step isn't shown.
3. Follow the remaining
steps of this video to
install the seal properly.
Hope this helps.
Very good video. Thank you for keeping it simple.
Thanks for the technique i think this one is better you dont have to fight with it and make a mess with the glue !thanks!!salutation from Montreal,Québec!
Very good how to video
Great video! This ideas, don't come by themselves,but through years of repairs and experience. Thanks a lot! A big hug from Argentina, muchísimas gracias!!!
thx for the video about to order the seal and give it a try will let ya know how it goes
Best video on this subject. I removed the adhesive from the drum with Goof Off Pro Strength Remover and Scotch Brite Non-Scratch Scour Pads. And lots of elbow grease.
Thanks for your comment Your comment may help someone if they have the same problem with the dryer
Happy New Year
I used OOPS!. Similar product and just rubbed lightly with a paper towel and it came right off in about 10-15 min. Also, using sandpaper may take off the paint which will cause the drum to rust.
Thanks for the comment
Thanks - your video made the job go very easy.
Thank you very much! Your method worked perfect.
Thank You
Click on the link below to check my website
www.do-it-yourself-washing-machine-and-dryer-repair-help.com/
Angel theapplianceman
Thank You For Watching My Videos
Click on the link below to check my website
www.do-it-yourself-washing-machine-and-dryer-repair-help.com/
Angel theapplianceman
@@theapplianceman, one thing, i noticed, is you are in HTTP mode, to secure youre website, Switch it over to HTTPS "S"=Secure Mode....otherwise, Hackers can take advantage of peoples info....just heads up...
Thanks again buddy
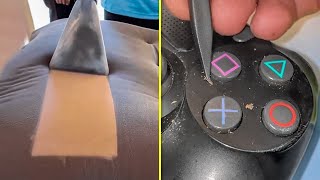
There is a fold at the outer edge of the seal (the side that is glued to the rear edge of the drum). The top of the fold is glued the drum. How is the bottom part of the fold accounted for, when gluing the top part to the drum? The video makes no mention of this.
very imp question sir- my drum when mounted is leaving almost 1/2 -1 inch gap. It mounted fine. The back rollers roll. The pulley is working fine. but don't know about - how to handle this gap.
I had a torn drum seal and it would cause my motor to hum, I would get by, by turning the drum by hand and hitting the start button and it would run ,finally it wouldn't and I had to buy the seal (very expensive) I placed the seal on the drum and it would not fit, the seal did not look like the original, it was not all black like the original it had two different color threading and a thin black edge, no instructions but I glued the threaded side onto the drum the seal was concaved by the time it was all glued down. I installed the drum put the belt into place and started the dryer and it started to hum, I believe I glued the wrong Side is this possible? I have made this repair several times before and I believe this time I made a mistake .
You have a bad motor
Mine has adhesive.
He shows how to apply the adhesive at the 6:45 mark. Make sure you watch the part where he positions the seal (at 5:40) to get it in the right position.