Awesome vid bro ! I’ve only done front pads and rotors on my 2011 si so I was worried about doing the rears , I watched your vid a couple times bc I was nervous about the e break and break lines but in reality it was bolts just holding the lines in place , did my pads a couple days ago just wish I did the rotors too ! I didn’t realize it was about the same amount of work ( other then taking the screws out the rotors ) anyway thanks again !!
During disassembly there is tons of pad left, why did you replace? and unless they are warped I would just do a pad swap on the back, the back last 3 times as long as the front, I would be surprised to see rear rotors below thickness spec even in 150,000 miles
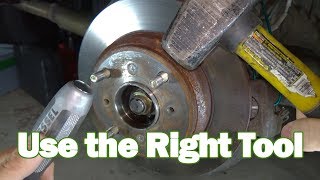
My other video shows how to take off the rotors using a bolt. The bolt size will work on both Hondas and Toyotas. ua-cam.com/video/wwku41OIUeA/v-deo.html you can start the video at around 3mins and 49 sec. Hope that helps.
Thank you bro I was inspired to work on my own car Thank you for the advice great video keep up the good work I did my rotors and brakes today took a little while because I have to drill out the bolts
You can't clean the inside of the rotor well if you screw them on like that. Better do that while it's on the ground or loose on the studs. If you use a paper towel to wipe it after spraying it with brake cleaner, you'll find oil on your paper towel, so just spaying them doesn't seem to be enough.
Thank you. I been trying to find out why theres round and flat sided guide pins and knew they had a purpose. Thank you for letting us know which pins goes where after i removed all of them to clean and re lubed them.
Thank you for the video. Just used your vids to change the front and rear pads and rotors on my 09 si. Are the torque specs on the rear the as as the front?


Glad I'm not the only one that vents the brake fluid reservoir, good video friend!!
Yeah, I was taught to remove the cap in my automotive class 20 years ago. I have been doing it and have not had any issues.
Best DIY video for 8th gen civic
At 9:25 the screws needed are M8 with a pitch of 1.25. Just about any length will do.
Thanks. I should have added that info.
I was looking for the bolt size for the longest time. Thanks.
Awesome vid bro ! I’ve only done front pads and rotors on my 2011 si so I was worried about doing the rears , I watched your vid a couple times bc I was nervous about the e break and break lines but in reality it was bolts just holding the lines in place , did my pads a couple days ago just wish I did the rotors too ! I didn’t realize it was about the same amount of work ( other then taking the screws out the rotors ) anyway thanks again !!
Great to see that my videos help.
just a note for people. If the rubber boots on your brake pins are torn or beat up, they are a cheap replacement on Ebay. like $2-4 a side.
Great detailed help man. I really appreciate it
During disassembly there is tons of pad left, why did you replace? and unless they are warped I would just do a pad swap on the back, the back last 3 times as long as the front, I would be surprised to see rear rotors below thickness spec even in 150,000 miles
Yeah, there was a lot of material left. I wanted to make a video.
Thanks buddy 👍 Just what we needed to work on my son’s 2008 Si.
My rotor is stuck/melted on ? Any suggestions?
My other video shows how to take off the rotors using a bolt. The bolt size will work on both Hondas and Toyotas. ua-cam.com/video/wwku41OIUeA/v-deo.html you can start the video at around 3mins and 49 sec. Hope that helps.
Good job , thanks!
Is this the same for 2014 civic si?
I believe the rear brake system for 8th gen (06-11) are similar to the 9th gen Si.
Travis Miles from Radio City
Not beating you up man but looked like you are changing good parts...what was the problem??
The parts were still good. Pads had plenty of life on them. I just wanted to make a video.
@@OEMEangg ok cool thank you be well!
Thank you bro I was inspired to work on my own car Thank you for the advice great video keep up the good work I did my rotors and brakes today took a little while because I have to drill out the bolts
Glad to hear everything worked out.
Sorry girl trying to do her own stuff here. How did you drill them out?
You will literally use a drill. Start with a small drill bit then use a bigger drill bit to drill out the screw. Good luck.
I heat them and they never need to be drilled, takes 30 seconds but u need heat :)
how many times did you have to spin the piston? does it lock in place when you've spun it enough times?
You will need to turn the piston clock wise and push it in at the same time. I would say 5-10 times for the piston to bottom out.
@@OEMEangg does it lock in place when you've spun it enough times?
@@charles3902 it's doesn't lock but it will stay in place. It should sit flush in the caliper like in the video at 16:39
Very helpful, thank You
What size drill bits did you use
I probably used 3 different bits sizes. I don't recall the exact sizes but you want to start with a small bit and continually go bigger.
You can't clean the inside of the rotor well if you screw them on like that. Better do that while it's on the ground or loose on the studs. If you use a paper towel to wipe it after spraying it with brake cleaner, you'll find oil on your paper towel, so just spaying them doesn't seem to be enough.
Thank you. I been trying to find out why theres round and flat sided guide pins and knew they had a purpose. Thank you for letting us know which pins goes where after i removed all of them to clean and re lubed them.
My e brake stopped working, it’s to easy to lift up what did I do wrong?
Thank you for the video. Just used your vids to change the front and rear pads and rotors on my 09 si. Are the torque specs on the rear the as as the front?
Uhhh...uhhh.. hmmm..uhhh..uhhh...
🤓