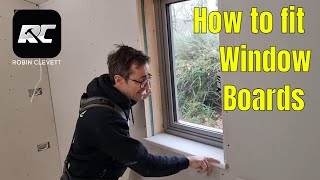
How to make and fit a windowsill

Вставка
- Опубліковано 28 січ 2021
- This is a step by step tutorial on how to make and fit a traditional windowsill / window board. Only basic tools are required for this project.
Boxing in a toilet
• Boxing in a toilet
How to fit door moulding / architrave
• How to fit door mouldi... - Навчання та стиль


Excellent video and just what I need to replace a rotting 90yr old sill! Cheers Sion!
I really appreciate your lovely comment. I hope you check out my channel and find other videos just as useful. Cheers Sion
Refreshing to not see any trims or caulking/silicone 😊
I’m very grateful that you noticed these details thank you. Please consider supporting if you haven’t already.
I agree with the spraying of unibond to seal out moisture, I have seen plasterers and other DIY videos on youtube use similar products to provide adhesion and weather sealing. I am looking to replace a windowsil which has come loose because the surrounding bricks are crumbling with some deep cracks, so i intend to repair the surrounding area with a patching mortar/cement, before fitting windowboard in.
Best of luck . Cheers Sion
Well done, that man!
Kind words and much appreciated. Cheers Sion
That was amazing! Great Job!!!
Lovely comment, you are most kind. I hope you find some more videos on my channel that you like.
Looks TOTALLY BEAUTIFUL.
Thanks for that lovely comment . It still looks as good as the day I installed it . Thanks for subscribing it means so much to me ..
That fill job was really impressive.
Thanks for the lovely comment. Please consider subscribing,if you haven’t already. I like filling neatly it save so much time on rubbing down .
welcome to my channel. If you enjoyed this video then please consider……… SUBSCRIBING…….. Included in my playlists is …BUILDING… and that shows me lay self levelling concrete floor in this room.
How clean. Bravo good sir. I aspire to be like you one day
Hi Jake , what a lovely thing to say . Check out my channel and I hope you find other videos you enjoy as much . Cheers Sion subscribe , like and enjoy
Thanks, I really enjoyed this, very instructive. I would ask that you increase the speaking volume though, I had trouble understanding sometimes!
Sorry it was just filmed with an IPhone, but glad you enjoyed the video. Happy Christmas. Cheers Sion
Great job. Sorry but I have to do this though -> I think its a window stool. The window sill is usually the part attached to the window and / or the exterior part on the outside. I think its a common misconception XD.
Hi Mark, if you read through the comments section to this video another viewer had made a similar comment pointing out the window sill is on the outside and inside is the window board . Despite my ignorance when it comes to the proper names i hope you enjoyed the video . cheers Sion
@@sionhughes5543 ah okay - haha sorry must be frustrating hearing it many a time. anyways good video.
No not at all its a much needed free education.
Brilliant, thank you. I was wondering how you were gong to fill those holes either side but it seemed to be the quickest part! I look forward to doing mine now.
Thanks for the lovely comment and I am so glad you enjoyed it . I have lots of other videos you might find useful. Please consider subscribing and help me grow this little channel
@@sionhughes5543 already done so, diolch!
Beautifully done :)
Thanks Maciej , You are most kind . I hope that you check out my channel and find some other videos that you enjoy. Cheers Sion
amazing, thanks very much, Sion
Cheers for the kind words Tony
Phenomenal work!
Thank you for such kind words and bless you for making all those comments and watching all those videos thank you so much
@@sionhughes5543 Just trying to get your ratings up. You deserve a lot more subscribers.
That’s such a lovely thing to say. I am hoping and praying that the channel grows slowly and organically. I’ve put so much effort in and so far it just doesn’t seem to be getting promoted by UA-cam.. I love making the videos anyway
@@sionhughes5543 Don't worry. Prayers, patience & perseverance! If you keep on making this level of quality vids something will happen - God willing. In the mean time i'm binge watching all your content. Really enjoying it
Great thanks I have to make a window sill for my loo so I will give it a go
Best of luck and enjoy.
Can you create a bullnose effect without owning a router such as using an orbital sander using 40 grit paper??
The simple answer is yes you could use a hand plane and just keep shaping the profile until it was round or 40 grit sandpaper as you suggested although as I’m sure you will imagine the uniformity of the bullnose will be directly proportional to the consistency of your sanding
Nice video but i dont have a router so how do i make the 2 grooves?
Use the table saw
looks beautiful
What a lovely comment. Please consider subscribing and help me grow this channel
Awesome
Cheers , glad you enjoyed it. Sion
i have to make a cill for my bathroom, ive got an oak hobby board to cut down. would that briwax be ok for the shelf as it will get some water splashes on it?
I would recommend varnish in that case . I found diamond glaze works really well and is dry in 24 hours and 3 coats makes it look like high gloss
Brilliant, well explained. Did you use just filler in the surrounding gaps or silicone too - couldn’t see in the time lapse. If I do this in my bathroom, should I use a bathroom sealant as well as filler?? Thank you
Just subscribed 👍
Only filler to bed in the sill then and on either sides . Really glad you enjoyed the video and thank you so much for subscribing.
@@sionhughes5543 awesome, thank you so much 👍
Great job on the window. Unfortunately mine are diagonal sills
Sorry to hear that
Mine too! I have a bay window board to make! 3 angles with a bullnose! Wish me luck!
@@jayjohal6892 Good Luck. I am still trying to sort my roof before I even get to windows . And I can't find scaffold strong enough or long enough for the height
Very informative, however you missed out the part where you explain how the windowsill fixes to the reveal. I normally use a construction adhesive but would be interested to know how you’ve done it here.
I had filler mixed with PVA underneath and then filler at both end . It’s solid . Glad you liked the video and hope you will consider subscribing.
CT1
It is actually known as a window stool.
In what country?
Really nice work. By the way, did you sand that floor?
Hi, thanks for the compliment. No I took it up as it was so un stuck and uneven . I made a video about it called ( Self levelling concrete) subscribe and check out the other videos on that room
Hi - what did you use to secure the board to the base? Most vids I've seen screw the board down but I'm reluctant to do this if there's another option as even plugged the screw holes may be noticeable on un-painted wood
Hi Josh , I simply stuck it in place with all the filler you saw me packing around it . Between the tongue on the back of the window sill and the receiving slot on the window frame its not going anywhere. I suppose if its a lot wider then it might bow up in the middle and require some fixings but for small ones like mine none are needed . If you have to use a fixing then consider putting some screws with wide heads on the bottom of your window board with wide heads then packing cement / construction adhesive underneath it . This will the bond something physical to grip on to . I hope this helps . I really appreciate you taking the time to comment would ask you to consider subscribing as it would really help this little channel grow . Cheers Sion
@@sionhughes5543 Hi Sion - thanks for your reply, it was a really big help - really appreciate it! Just subscribed :)
Thanks for the subscription Josh . cheers Sion
Superb. What is the different at 8:46 if we make a groove and then add a tongue!
Hi, the answer is none I suppose. I had made the window frame first and so I needed to make the tongue second . Thanks for the lovely compliment. Cheers Sion
What did you spray for moisture control?
Please let me know?
Hi Norma, I sprayed a really thick coat of PVA Adhesive ,sealer , primmer. It may well have another trade names in your part of the world such as UNI BOND etc etc . SO that and water was sprayed on the wall . This product is common throughout the build trade and is excellent for inhibiting moisture and acts as a great sealer on brickwork prior to plastering or over fresh plaster to seal the surface prior to painting . It stops the paint being sucked into the plaster and drying out to quickly . I used PVA on my concrete floor to seal it before I covered it in self levelling compound. If you watch my video ( SELF LEVELLING CONCRETE) you will see me quite literally flooding the floor with a thick coat between full fat milk and cream . A few days later it had dried completely clear which meant I could confidently cover the floor with self levelling compound knowing it wasn’t going to dry at different times depending on how porous the floor surface was because it had all been sealed . Hope than answers your question and helps with your projects.
Excelente
Thank you,most kind
this is a window board not a windowsill
God I never realised . Your quite right . Happily I think most people will think the inside and outside are called the same thing . Cheers for the heads up
@@sionhughes5543 I never realised until a window salesperson pointed it out to me 😅
@@weedfreer Thank god for that , I thought I was plonker when I investigated your comment. Oh well
Window sill is fine! We know what you meant 👍👍👍
@@yeltsinsirob3144 yes, I wouldn't dispute that in the slightest.
Factually though, it's a window board.