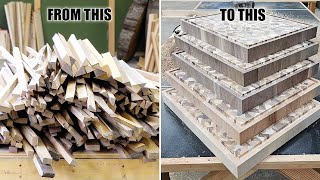
Althoff Woodshop - Making a Curved Cutting Board

Вставка
- Опубліковано 10 лис 2018
- Originally inspired by a video I came across on FineWoodworking of Scott Lewis making a similar board (and similar video style).
▼▼▼ READ MORE ▼▼▼
Since then, I have made a handful of these for various people. Some inevitably ask why they cost so much. I compressed about 8 hours of work, over several days, into an 8 minute video to help answer that question.
Links to some of the tools used:
Empire Rafter Square: amzn.to/2JVwgRy
DeWalt Planer: amzn.to/2JYVCOA
Laguna Bandsaw: amzn.to/2ODELBA
Laguna Resaw King Blade: amzn.to/2JUxegX
Glu-Bot: amzn.to/2JVrx2d
Jorgensen Clamps: amzn.to/2RIWcCo
Woodriver Bent Paring Chisel: amzn.to/2RIWMQA
Woodriver #80 Cabinet Scraper: amzn.to/2Dg8kag
Bosch Plunge Router: amzn.to/2DzmXq8
Router Bushing Set: amzn.to/2DffZ8B
Whiteside Compression Spiral Bit: amzn.to/2AYRefj
Bosch Random Orbit Sander: amzn.to/2T5yAd0
Abranet Premium Sandpaper: amzn.to/2FirLlk
Links to some of the camera equipment used:
Canon 80D: amzn.to/2PU1L3N
Canon 100mm Macro Lens: amzn.to/2RLW59p
Canon 50mm Lens: amzn.to/2T4crLV
Rode VideoMic Go: amzn.to/2JZzUKg
Sokani Video Light: amzn.to/2T4FTl9 (this was randomly used as a fill light, not the key light)
Neewer Tripod: amzn.to/2T2xX3H
Neewer Quick Shoe: amzn.to/2RPmrr3
* Amazon Links are affiliate links. Using them doesn't cost you any extra but helps support my humble channel.
Music from AudioBlocks.com
Nerd Shirts from 6dollarshirts.com - Навчання та стиль


![Lp. Последняя Реальность #107 РОДНОЙ ДОМ [Финал] • Майнкрафт](http://i.ytimg.com/vi/IK3QKzKUlHM/mqdefault.jpg)


Using the workpiece itself as the guide for the flush trim bit was mind-blowing to me. I have never seen that technique before. Thank you.
Really enjoyed this! So much time is spent doing these. Great piece! Thank you!
The perfection in your work is great
Outstanding craftsmanship, very creative work. Thanks for sharing it with us. 🙏🏼
Your work is brilliant. Your lighting is also spot on... fantastic everything!
Thank you very much!
Absolutely stunning work. The details and the time. The board looks fantastic. Great video and music to accompany it. Well done.
Thank you!
Wow, just wow! Beautiful board! I feel like you went for a similar "vibe" in making your video as I did with mine on my board. Excellent video my friend 👍👏👏👏👏
You did up your game with this video. I am going to make one of these over the weekend. I love the idea of using a router to make the curve, roughing cutting using a bandsaw, then follow up with a flush cut bit. I assume that makes a really smooth joint with the veneers. Also, another cool idea was your homemade outside guide for cutting veneers. Great use of a bearing.
Thanks Matt! Yea it made for a very good tight joint. The tricky part is the clamp up with it sliding around. Good luck on the build, I'd love to see how it turns out. If you're on Instagram, tag me @althoffwoodshop of it or reach out there if you have any questions (I'm better at responding on there).
What types of wood did you use in the making of this board?
WOW, gorgeous piece! One day I will have the right tools for this and I will definitely refer back to your video for instruction. BTW, I usually don't watch videos where the person isn't speaking but you have just the right music so thanks for that :-)
A lot of dedication, perfect work. Congratulations 👏👏 🇧🇷🇧🇷
Fantastic video, well done!
Great work!
That is beautiful. Thank you for sharing.
Thank you!
I just say, great!! Thanks for sharing it with us.
Thank you!
Awesome vid. thanks for sharing.
Nice build! Looks great. Subscribed.
nice movie! what a production! Great looking board too!
Thank you!
Great production! So nice!
Thank you!
Absolutely Awesome
Truly impressive and a work of art. Thanks for the inspiration!
Maravilhosa...........parabéns!!!!
Beatful work my friend .
Thank you!
Fantastic work 🙌🏻
Thank you!
GREAT board. I like it! !! !!!
Absolutely magnificent!
I loved the music in the video also.
Thank you!
That is a work of art. 😭 Thank you for sharing.
That bandsaw, though!
I love that bandsaw
C est fou ce que j aime ce travail du bois....beautiful...
*Stunning end result*
Thank you!
Great video thanks
Great work
Thank you!
Really Nice
Well done
That thin strip jig you're using on the band saw is terrific
Thanks!
Projeto perfeito lindíssimo
Obrigado! (Hopefully Google Translate got “Thank you” correct)
Beautiful......
Super-nice! What I don't understand is why people who work so hard to get such a beauty done, discount one side and install those rubber feet, deeming the whole work to be single-sided...
Don’t disagree. That’s what the customer wanted though.
I love the thought and planning that went into this project, and I have learnt a new trick - that being routing a shallow slot with the flush trim router to a template, then sawing and finishing with the flush trim router to the slot edge. That's clever and effective. Fisher's Shop just went through with the bandsaw free hand and sanded out the saw marks. Your method is going to be much nicer because you can sand the template edge whereas Fisher's Shop can only do minimal clean up to ensure both sides will match. He made the point of using inserts the same width as the saw kerf so that the slightly different radii (inside and outside of the curve) will be spot on. Did you do the same thing but working to the router bit diameter? It looked like that was the case, but I'd need to watch the video again to have a better idea. Anyway, very nice work, and very nicely done. BTW I thought the round over ends worked particularly well with the inlays. Pure class.
Thank you! Yes I matched the router bit size to the width of the strips, so a 1/4 and 3/8 bit.
@@Althoffwoodshop could you just route the wave shape and press the cut-to-size strip in with glue? The ends would obviously show the strip didn't go all the way through but from the top it would provide the same visual maybe?
That’s not a bad idea however you would need to have tight tolerances on the strips and the groove otherwise there would be inconsistent gaps. Even with my drum sander dialed in my strips vary about +/-0.1 mm over their length. Doesn’t seem like much but it’s harder to hide when you can’t press them together with big clamps. This method gives me wider tolerances and I don’t need to put the dial calipers down the length of every strip.
How much mm are you taking per pass on the jointer? Usually?
Superb
What kind of wood did you use for this amazing cutting board?
Great video! Thanks a lot for posting. I tried doing some curves and the first time the curve radius was too small, I could not bend the stripes. Later I got better results. What I am struggling now, and i LOVED your solution...when you glue up the boards the first time, you have a true surface (did you use a plastic cutting board? Where did you get that size?), even if I use pipe clamps it happens that I end up with some wobbling...I hate that, since I waste a lot of time at the planner to make it right, loosing significant thickness. I want to design something to ensure the boards are straight. Your solution looks great, where did you got that board?
Thanks! That plastic is a plastic cutting board from Walmart.
Beautiful board man! I'd be interested in seeing more on that pressure board (?) you have for your bandsaw at 5:55.
I dont recall where I first saw that but it let's me repeatedly cut thin strips without worrying about the blade touching the fence. Its just a board with a bearing held by a scrap dowel rod.
Nice!
Very cool
Thank you!
Truly stunning, both the woodcraft and the video! Question for ya! Why move to the bandsaw vs. routing with the straight bit all the way through? [Assuming the bit cut depth is long enough for the stock.] Thanks so much and keep up the incredible work.
My favourite bit here is where he answers the questions 😮😮😮
Beautiful! Just wondering why you didn’t cut the board using a router rather than bandsaw. Thanks!
I'm just guessing but since he didn't respond I'm thinking he didn't like the rough cut a bandsaw makes, so he starts with the router to make the path (that also provides the shoulder for the router bit to ride on), then cuts it apart so the flush trim bit doesn't have too much work to do. The flush trim with the router gives a nice finish that minimizes sanding. To use the router for the whole cut would take more time, and his bit may not have been tall enough to go through the whole thickness.
This is correct. I likely meant to respond originally and somehow got distracted (this happens more than I'd like to admit)
Fantastic! Will you upload new videos? Last one is 2 years old...
I plan to. Shop is in storage while we build a new house. Planning on new videos come April 2021
Is there any other way to cut those curves without guide bushings?
Beautiful work! Personally, I would prefer narration rather than a music video. Thanks
Love the video, not a bunch of trying to be funny. Thank you.
Thank you! I have no illusions of my comedic skill.
@@Althoffwoodshop I’ll watch more of your videos.
Epic
Why do you use the router to make the line of the curve instead of just cutting the line with the bandsaw?
Great video but I would love to see it without the music and just the sounds from your shop.
What are those rubber things on the bottom of the board called?
Circular rubber feet??
A "cutting board" means an orthogonal orientation, so a knife serves longer. You had to slice an initial board, rotate the slices by 90 deg, and glue together. The rest looks great.
💣
👍
Without using a sacrificial board with your planer- how do you manage snipe? I have the same Dewalt planet and struggle with snipe.
I have been very lucky with mine. One way to manage is lift up the opposite end slightly as it goes in and then again as it comes out. Hope this helps. If not I'll look later and see if those outfeed tables are adjustable at all.
The tables are adjustable and will have to try adjusting mine so they will lift more on the feed and out feed of the wood as you suggested. Thanks for your input
Happy to help!
What size did you cut those bended strips at for the design?
About 1/8" thick for each strip
@@Althoffwoodshopgreat, thank you
*What a masterpiece, would not use a knife on that!*
Thank you!
Is that Maple and did you cut 2 X 2 or 1 1/2 X 1 1/2 inch planks?
Yes, it was 1.5 inch maple
Yes, it was 1.5 inch maple
Hi how did you do the hot stamping of your logo
Branding iron from Branding Irons Unlimited. It was pricey but worth every penny in the end
👏🏻👏🏻👏🏻👏🏻
What is the glue roller called.
It's just a glue roller made of silicone. I got that one from Woodcraft
A plus xxxx
What thickness did you cut the strips?
About 1/8th"
@@Althoffwoodshop You do amazing work, thank you for the info, about to try my first board like this.
👍👍👍👍👍👍
What bandsaw blade is that?
Laguna Resaw King. Carbide teeth, its not cheap but worth every penny
Althoff Woodshop thank you!
How do you get brand on the wood?
With a branding iron. I opted to get an electric one, cost more up front but much more consistent I hear than the torch heated ones. I think I got mine from Branding Irons Unlimited (?)
@@Althoffwoodshop I have a quality electric branding iron also. Don’t seem to get you results. Do you handle the iron or press it on mechanical. Would be helpful if you did a video on it. WoodRicks
I just use the handle, press hard with a slight wiggle and count to 10. I always test on a piece of scrap of the same wood before hand. I like the video idea. Adding to my list, might be the next one since it should be easier to shoot than the other idea
I subscribed your channel great work. I’m not seeing new videos for last two years did you quit making videos? God bless.
Thanks. I took a break and went back for my masters degree and built a new house. Degree is done and now in new house with new shop. Hopefully more videos coming soon
That’s great I do a little wood work …can’t wait to see more but I will have to. Lol. God bless
I post a lot more on “Instagram stories”, doing stuff on the new shop build.
😤😤😤👍👍👍
This video is epic, and it's a beautiful board. but #FeetRuinCuttingBoards #TeamNoFeet
Why music? Just the natural sounds.
Maybe in the next one I’ll publish 2 versions, one with with music and one without? I know there are fans of the music ones but seems like more than I initially thought that just want to hear the shop sounds.
@@Althoffwoodshop your work is beautiful, thank you for considering the natural sounds.
very nice technique and work but I have to disagree with salz118. I would ease up on the music, it's a cutting board not a cure for cancer
Wasn't too bad to watch once I muted that awful music mess.
Next time, more cow bell.
@@Althoffwoodshop Classic response.
BTW, the music was great.
Tired of watching how to videos that teach you nothing
Without gay music please?
Nicely done!
Great video but I would love to see it without the music and just the sounds from your shop.