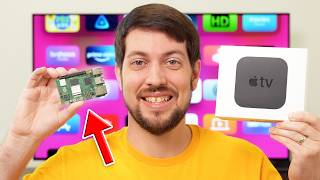
Geekworm Pi-KVM Kit Assembly And Review

Вставка
- Опубліковано 28 чер 2024
- In this video we review the Geekworm Pi-KVM-A3 Kit as a KVM over IP solution
This is based on the Pi-KVM v3 DIY kit, and at the time of recording, it is extremely difficult to source either the official fully built Pi-KVM v3 or the DIY kit
But Geekworm provide a DIY kit which is readily available on Amazon and is also cheaper than the official one
It even comes with parts to use a Raspberry Pi Zero W / Zero 2W instead
Whether it's the official DIY kit or this one, you do need to provide your own Raspberry Pi
So what's it like to assemble, what can you do with it and is it worth buying?
Hardware:
Geekworm KVM-A3 Kit
amzn.to/3K97flq
NOTE: I am part of the Amazon affiliate program and may earn commission through Amazon website links if used. However, there is no additional cost to the buyer
=============================
SUPPORT THE CHANNEL
Donate through Paypal:
paypal.me/DavidMcKone
Donate through Buy Me A Coffee:
buymeacoffee.com/dmckone
Become a monthly contributor on Patreon:
/ dmckone
Become a monthly contributor on UA-cam:
/ techtutorialsdavidmckone
==============================
=============================
MY RECORDING HARDWARE:
Blue Yeti USB Microphone
amzn.to/3IfL3qm
Blue Radius III Custom Shockmount for Yeti and Yeti Pro USB Microphones
amzn.to/3G3f89P
RØDE PSA1 Professional Studio Arm
amzn.to/3Z3lPBF
Aokeo Professional Microphone Pop Filter
amzn.to/3VuZl9H
Logitech StreamCam
amzn.to/3WyZTwl
Elgato Key Light Air - Professional 1400 lumens Desk Light
amzn.to/3G81OB9
Neewer 2 Packs Tabletop LED Video Light Kit
amzn.to/3CcuN5O
Elgato Green Screen
amzn.to/3CoJBOL
=============================
==============================
MEDIA LINKS:
Website - www.techtutorials.tv/
Twitter - / dsmckone1
Facebook - / dsmckone
Linkedin - / dmckone
Instagram - / david.mckone
==============================
Useful Links:
Pi-KVM Software
docs.pikvm.org/flashing_os/
Geekworm Installation Video
• How to DIY Your IP-KVM...
Heatsink Installation Video
• How to Install Heatsin...
Chapters
00:00 Intro
01:06 Hardware
02:14 Software
03:52 Assembly
09:57 ATX Power
11:00 Initial Thoughts
pi-kvm v3,pi-kvm setup,pikvm diy,pikvm v3 setup, pikvm install,pikvm review,pikvm setup,geekworm pikvm,geekworm pikvm-a3,geekworm pikvm-a3 kit,pikvm geekworm - Наука та технологія


It is worth noting that the Pi-KVM project uses WebRTC for video streaming. It streams the video feed to an Internet server and this might get blocked by your firewall
Although remote access over the Internet might sound useful, it is best to use the static server option and keep this traffic on the local network, using a VPN solution to then access it remotely
Hello; is better than TinyPilot, because this has ATX control, you can switch on the computer remotly. Good work, David.
Thank you for posting this video! Good tips too. And really usefull links in the video description.
Also, thanx for pointing out the part about the software needed (2:14), it was not posted on the GeekWorm video for PiKVM PCIe....
Thanks for the feedback
This has been a very useful KVM
At some point I need to expand it though so it can support more computers
Thanks for the end-to-end demo. I think I will try my hand in this!
There have been newer Pi computers that have since been released, but if all you need is a basic KVM, this is very useful
I compared to BliKVM models. They provide a far greater variety of hardware, has BliKVM software and is backwards compatible with PiKVM software. If price is a deciding factor, it's also cheaper.
Certainly looks interesting, especially as it's a Pi 4 with 1080p@50fps
Not seeing a UK reseller unfortunately though which would be good for myself
Price aside, the PCIE version looks great
Does the geekworm version can do audio streaming from host pc?
Not out of the box but the PiKVM website mentions a possible option
docs.pikvm.org/audio/
I have one spare cable that came with the X630 HDMI to CSI-2 Module...it fits in the audio slot (I2s audio in) and would connect to the video board. It isn't mentioned in the video, I assume it is incomplete instructions, right? Should I connect this small cable?
Thank you.
I covered all the cables necessary except for wiring up the Pi to control the PCs power supply
The kit I purchased came with an Ethernet cable to give the Pi network access
It also had a USB-A to USB-C OTG cable to provide USB connectivity to the PC
And then there was the FPC cable for the camera slot to X630 module
But I'm not aware of an audio cable
There's no mention of one on their website either which seems odd
Those audio cables are to support audio transfer on webrtc h.264 on pikvm
How about the CR1220 battery? The official video nor your video talks anything about this battery? The official video does not install it, either do you? Is it not neccesary?
I didn't notice one myself or add one
And It's been powered off several times since and still working fine
Looks like it is for the RTC, real time clock which this board seem to have. I have installed it now. It is under the Oled-display.
Hey,
Have you tried this on multiple machines yet?
No, I'm saving up for an ezcoo kvm switch
@@TechTutorialsDavidMcKone I have a star tech twin display port kvm switch so I’m hoping it will work with display port to hdmi converters