How to plan, shoot, and edit the Milky Way

Вставка
- Опубліковано 21 сер 2024
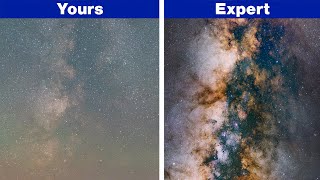
- Here to remove the mystery of how to capture the night sky, Roy shows you how to plan, shoot, and edit the Milky way in this video tutorial!
Links to tools used:
Dark Sky Finer: www.jshine.net/...
The Photographers Ephemeris: photoephemeris....
Stellarium: www.stellarium....
Adobe Lightroom CC: www.thefinerpho...
Check us out TheFinerPhoto.com for more tutorials, techniques, gear reviews, podcasts, workshops, and more!
Facebook: / thefinerphoto
Instagram: / thefinerphoto
Twitter: / thefinerphoto


looks like the dark sky site you recommend has suffered a melt down :(
try this one darksitefinder.com/
On the top menu, under maps, select Light Pollution map
The guy had to rebuild the site after a google change up. Darkskyfinder works great : ) Happy Hunting.
If you have live view on your camera, just zoom into a particularly bright star (with the zoom buttons, not the lens) and manual focus on it. Everything should be in focus. Saves you getting glue on your lens.
Many still camera zoom lenses do not retain accurate focus while zooming. They aren't even meant to accomplish that feat.
@@thomasmaughan4798 he meant digital zoom, not optical zoom
@@RSP13 Oh, zoom the *display* not the lens. Excellent idea!
Use self timing is probably the point not getting the stars blurry at 20sec shutter speed.
You can expose to any number of seconds via Bulb. You just need your watch to time you out. If your camera accepts a wired shutter or can shoot wireless that also eliminates shaking. An intervalometer is also a great gadget to do stacking. Cheers!
I went to watch like 3-5 mins of your video then watched the whole thing. Fantastic job.
Cami S u
Exactly what happened to me lol great video
You what? One of the best tutorials I've seen so far on how to shoot the milky way. Very clear and uncomplicated.On top of that you've managed to explain it even for the people who aren't able to go full frame and/or use expensive glass. Kudos to you my friend.
I found this so helpful and will refer back to it. I did some astrophotography back in the day using an OM1, focusing screen, piggybacked on a telescope. There wasn't much processing done and it was film, Fuji super HG 400. Now that I have aged myself, regarding exposure times, I was taught the "black card" method where a black card was held in front of the lens, shutter was tripped and the card pulled away for very close timing. The card was put back and the exposure ended. No wobble. I just purchased a Canon T6i amateur DLSR. I am not a pro and and I may use this technique. I found Roy's explanation of LR very helpful. I am struggling with what software to purchase and when people are demonstrating LR, I have a hard time following. But Roy made it clear enough on a basic level that I may choose LR. I can't say enough about how much this tutorial helped. thanks, Roy!!
Instagram follower here. This is so awesome! Thanks! Although I must admit, you lost me at 2:00 because I barely even qualify as an amateur photographer lol. I'm just a guy who loves space and would like to one day take a decent picture with my crappy camera. Even if I never get to take a bad ass shot, I very much appreciate this tutorial, very clear and concise, and I assume very easy to follow for actual photographers.
+JR Valencia - This is actually really great feedback, we're still trying to focus on who our target audience is and this helps a lot! We will definitely being doing much more basic tutorials as we move along. Glad it was helpful to a degree and it was great that we have an idea of who is watching and what they need help with. Thanks so much!
You only have to worry about this if you plan on using a crop-sensor camera. If you have a full frame camera (more expensive), you'll get an image with a wider frame and be able to get in more light. But a crop-sensor camera crops the image (Canon crops it down to 1.6 the size), so the focal length won't be the same. I have a Canon cropped camera, so all my lenses require simple math. If I have a 35mm lens, my focal length isn't REALLY 35mm bc it's cropped down. The image actually looks more like an image captured by a 50mm lens (35 × 1.6). So if I want to do a landscape photo that captures the widest angle at 16mm, I would need to buy an 11mm lens to compensate for the crop created by my camera's sensor. Make sense?
Best tutorial I’ve seen in years
Usually I avoid all the videos longer than 5-10 minutes, but this one I really enjoyed. Lots of details but not boring, real-world examples, and I also like that you made the end-to-end tutorial, starting before you even took your camera, and ending with the final product. Great job!
This is by far the best, fastest moving, information packed, clearly spoken and shown instructional video on not just photography, but Lightroom and other apps. Start to finish this is amazing!
WOW! Everything I was looking forward to learn, compacted in a single video! Great job!
Brilliant video! Will watch it again and again when I head to Maine this Summer to try it out.
As a Maine resident, I am sure you will take many great pictures.
Glad it shed some light on how to do it! ...No pun intended- have fun!
Jiawei Hsu Where in Maine will you be?
+Owen Byrne Thinking Acadia/Bar Harbor but open to any other areas suitable for Milky Way photography
Oh my, what a wonderful tutorial chock-full of amazing education about shooting the night sky!! He gave three great websites to prepare for your shoot so you know exactly when and where to point your camera. At the end of the tutorial the before and after is just wonderful to see. The is a perfect example of why shooting RAW in a situation where you NEED ALL of the embedded information so you can bring it out later. In this case, since he shot with RAW, later he was manually able to adjust the pixels that you can't see with the naked eye into something truly beautiful!! The Milky Way was there in the photo all along (tho you can't see it at first) but with adjustments to the pixels later (shown in the video) the MW comes into beautiful view!!
Again, this tutorial is great because he shows you how to do the MOST important part: PREPARE for a nighttime Milky Way shoot. Even if at 3 am, in the middle of the grand canyon, you cannot see the Milky Way very well... if you PREPARED as he shows, then you will know exactly where and when to point your camera and SHOOT! Your lens and the RAW format will pick up details that your eye cannot see at the time you shoot, so don't worry if you can't see the MW very well. Later you can use your own "photo lab" (Lightroom or Camera Raw or PS) to bring up the details that RAW captured for you. Amazing! Thank you for a great educational experience. This was time well spent as a photographer!! :)
Hands-down one of the best, most thorough start-to-finish tutorials on planning and executing a shoot that I've ever watched. Well done!
I agree! I have watched many but this one was the most thorough.
Nice work, guys. I'm headed out to the Painted Hills this weekend to try my hand at my first night sky shots. Thanks a ton for giving me a head start to figure this out.
Dude! We're so jealous- that is actually the darkest area in most of Oregon and the one spot we have a great plan to make a trip for. We'll be renting lenses for it and all. So excited for you- you on IG? Make sure to tag us, will definitely be watching out!
+The Finer Photo yes, I'm @jacobhinmon on there. I'll tag you for sure. Can't wait to see your photos when you take the trip!
The best tutorial i ever seen. Excellent use of language, very nice tone voice, instructive and liked a lot the editing part. love your work, well done.
+Evangelos Stampolis - That was super kind of you, really appreciate you taking the time to write that. Made my week! :) :) :)
Yes, very nice to listen to.
you have the most explanatory video of Astro Photography i have come across on UA-cam. for the longest time i could not get my settings right for my camera and you are the only one who goes through the settings in detail. great editing tutorial as well. you have earned yourself a subscriber!!
Thank you for this very informative video. Your ability to explain complicated things in plain English is a good trait. Take care and happy shooting:-)
amazing tutorial. I learned so much about Lightroom.
Thank you so much, I'm sure that it is going to help me a lot.
+Umut Sezer Koç - Thanks so much for the kind comment- glad we could help!
I want to buy a prime lens to my canon body, it doesnt have to be canon lens I mean it can be sigma, samyang whatever. I can only go up to 400$. What would you recommend to me? My camera is 60d by the way. Thanks again!
+Umut Sezer Koç - The 'nifty fifty' is what I recommend everyone's first prime is. The 50mm 1.8 version II that's out. That might be a bit zoomed in though on a crop sensor camera so if you want a little more wide, the 35mm 1.8 would be a good alternative. It's always good to have a fast lens starting out so you can play with Depth of Field. :)
+Umut Sezer Koç You could also try Sigma Art series lenses for that budget.
Used, I'd say... Art lenses run in the $700+ :/
I'm looking into getting into photography and I've always loved nightscape photos. I'm glad that you've shown us that you can get an amazing shot with just a standard kit lense.
Found the video a bit late but this goes of everything so well. Much better than the others I've watched
26:45 for my favourite tonality
Each to their own, buddy
@@stevenrobinsonpictures i guess that depends
A manual focus wide to ultra wide lens focused at infinity is also a perfect choice.
It s the better choise
Excellent tutorial. Some hints I had not thought of like switching off stabilisation. Thanks.
Hey, man....I can't say enough about how helpful this video was. My first attempt at shooting the Milky Way was based on a whole complicated set of misconceptions, which this effort has pretty much thoroughly cleared up for me. Most appreciated. Really.
If you want 17 seconds just put the shutter speed on 'bulb' and time it ;)
+DrummingSpain - For sure, just try to avoid the blur from any shake you might endure while holding the shutter button down. You'd be surprised at what even a breeze can do to a shot that long! Of course you can always get a cable release but this video was just to give the general photographer some tips for killer star shots!
+The Finer Photo If you have magic lantern for Canon you can set your bulb timer to as long as you want
+Jayan Varsani - Haha, yes indeed. I use magic Lantern a lot actually, but can't recommend it due to liability and it takes some knowledge and know how. Also, glad I haven't had it happen yet, but the day the 'pull the battery and pray' situation happens I light think twice... ;)
+The Finer Photo I only use the intervalometer and bulb setting anyway haha
+DrummingSpain I bought a cheap 2.4ghz remote and mine flashes in 1sec intervals 1 flash = 1 sec count flashes always works for me. bulb mode works best for me with this method. Unit cost £25.
amazing tutorial, gained a sub here, will be following your work, love it!
+Nicolas Orbell - Appreciate that, more videos soon! You rock- :)
Great information here. I have a photo shoot planned in the Big Bend area of Texas in January. This information was exactly what I needed for hopefully a successful shoot!
I have to say this is both one of the most comprehensive and one the the clearest MW video tutorials I've viewed. Given the number of videos out there that off tips on photographing the MW, to stand out as much as your video does from the crowd is a real achievement. I can't wait to try your tips out!
omg when i first started watching this video i was like oh man this is gonna sooo boring, but no this was soooooo useful although ik i won’t be shooting astrophotography anytime soon this was great 👌🏽
were you standing still for 20 seconds? or did you combine two different pictures?
Thank you. Im on a mission to learn about my new canon 5d mark iv camera in 2 days before my trip to milky way. This video saved my trip!!!!
Thank you for this video. AT LAST I know how to improve my astro snaps. The 'edit' portion of the video is MOST enlightening, no pun intended whatsoever. 10*
Very good information, timely as well since I'll be riding my motorcycle from Sacramento, Ca to Death Valley on Nov 28th and it was no coincidence I scheduled it for the new moon on the 29th. I decided to go ahead and buy a better suited lens for imaging the Milky Way, I couldn't resist the special B&H had on an ideal lens, being a Samyang 14mm f/2.8 ultra wide field. I know other lenses can be used and I was even considering either my kit lens 18-55mm (as you mentioned) or even my 24-107mm f/4L Canon. But the price on the Samyang was irresistable at only $269, it normally sells for around $329 and when you consider Canon's premium 14mm f/2.8L at over $2,000, I think the Samyang will do the job quite well, in fact it comes in with excellent reviews from reputable sources. Samyang makes under private label Rokinon and Bower versions, so price is the difference when comparing those three. Now I have great focal length and fast lens, pretty much spot on for imaging the galaxy arm. Too bad I can't haul my German Equatorial Mount, but I don't think that will work being about 80 lbs of metal on the back of a motorcycle. The tripod alone would be impossible because it's non collapsible and heavy, people would think I was hauling part of a bridge around.
I jumped from visual astronomy to astro imaging about 2.5 years ago and it's been a long and slow learning curve, notwithstanding mechanical gremlins affecting a couple mounts I own. I finally saved up and took the advice of seasoned imagers and bought a premier Astro Physics mount recently, now I'm broke again, lol. This trip will be my first to the valley, always wanted to go there on a motorcycle and since it has extremely dark skies the two nights we are there, it would have been a crime if I didn't try my hand at imaging the Milky Way under ideal conditions, well, as long as some unplanned clouds don't pay us a visit.
So far what I have seen of the lens I like, at f/2.8 the light gathering this thing can do is outstanding. I didn't pick up any distortions or wavy edges, these things happen sometimes, but the positive reviews of the lens far exceeds it's price point. If it's clear out I want to dial in a few things before setting up in the valley, that will save time and frustration. The lens is 100% manual, not a problem with the kind of shooting I'll be doing with it, how do you auto focus on a star? However, focusing through it's viewfinder presents a little challenge, it's difficult to discern whether the inner circle is in focus, as you mentioned, I'll likely pre focus it during the day time and good advice to tape up the lens afterwards. I think a good solution would be a Bahtinov focusing mask, very accurate means of deep sky focusing when using a imaging telescope, but I don't know if a template is made small enough for the 14mm lens and how would you mount it in front of the lens? Problem being the face of the lens is a wannabe fish eye, having a convex shape and not something you can attach the Bahtinov to. Oh well, I'll either do some day time focusing or simply mount it on a tripod and take a series of test shots pointing skyward.
One point you made I have a question about regarding focusing. You mentioned turning the focusing ring to infinity, but very often the infinity scale is inaccurate, in fact you can't depend on it in most cases. Some say turn the ring to infinity then back off a bit, but that's not a solution either if you don't want blurry stars. I would opt for a totally different method and the daytime suggestion is a good one. Since I don't use lenses for deep sky imaging, I can't offer a sure fire tip other than test shots, zoom in, check, and do it again until you have focus. Not a big deal at all and I'm sure this method will achieve accurate results, but I'm sure there are many other ideas on the web that one could source easy enough. I might even utilize an artificial star and try that for fun. It's basically a high powered LED flashlight with a number of measured holes drilled through the cap to simulate real stars. This nifty device works in lieu of a real star for the purpose of collimating your telescope, mainly Schmidt-Cassegrains or Ritchey Chretien designs. There are other variations, but they share in common the use of mirrors to reflect incoming star light and directing that light eventually to the focuser eyepiece or camera. Collimating is the process of adjusting several screws based on the image from a bright star or in this case, an artificial one. The goal is to have a shadow image inside a set of perfectly round circles. The beauty of the LED artificial star is the fact it stays put, unaffected by earth's rotation. Even though it's main function is the collimation process, I see no reason why it can't serve as an aid for focusing too, just as long as you have enough distance between the camera lens and the artificial star that is. I've heard 100' or more is about right.
I'm really looking forward to this adventure as long as we don't run into bad weather over the mountain passes. For this reason we have to take an alternate route, going over the mountains in the Southern Sierra Nevada range instead of I/80 up north, a freeway I live only 6 miles from, dang!
Thanks for your informative tutorial and I'm looking forward to any follow up videos.
John S How did the trip go? Good shots?
focusing... with Canon you have LiveView - just zoom in on the brightest star (or light in the distance) and you're good to go
no need to focus in daylight and then having to tape the lens for later in the evening
that's nonsense
So far the easiest step by step I have seen for this kind of editing. THANKS!!!!
We used Stellarium at my university for astronomy class. This is a way more informative video on how to use the program compared to my university.
I've always pronounced it Stel-lar-ium, like aquarium. Anyone know which is correct?
Same here. Was wondering myself.
Yes. Stel-larrrrrrr-ium.
I pronounce it the same way, like aquarium.
Me too. Sounds like planetarium.
Nice video content! Forgive me for chiming in, I would love your thoughts. Have you heard about - Riddleagan Made Masterpiece Remedy (probably on Google)? It is a great one off product for learning professional photo editing minus the headache. Ive heard some decent things about it and my cooworker got excellent results with it.
I use sky guide app on iOS, it's more simple then stellarium
Thanks for all the info! Just shot from Mt St Helens on July 14th. Popular place... there were lots of photographers out for the same shoot. Can't believe how much Portland, OR polluted the sky. For a first try of the milky way, I am BEYOND happy. Thank you so much. Now I need the tutorial on photo shopping in the foreground.
The best 30 minutes I've ever spent in any kind of tutorial. Nice work The Finer Photo guy!
+Delta Blues - Gaww, super kind... Thank you so much for the great comment!
Big like !!,Thank you very much
awesome video! best instructional i've seen on YT regarding shooting the milky way. can't wait to try this out.
I just bought a Canon SL3 for a trip under the stars. It doesn’t get here until the day before we leave, but I’m feeling confident because of this video I’ll be able to get at least one good shot. Thank you so much for it!
Great video! Going to Machu Picchu in a couple of weeks and try to take some pictures. Although I'm missing your follow up videos?!?! Are they coming or are you not planning on making them?
I am, for sure. It's been a busy couple of weeks. Will be producing some these weekend hopefully- thanks for the motivation!
Great! You're doing a good job! I would love to see it before I leave Sweden the 9th of July! The first one is one of the best tutorials I have seen on astrophotography! Keep them coming ;)
You're in Machu Picchu right now hahaaa.
10:28 There's one more thing you get in the dark areas of your map: Sasquatch.
By far the BEST video I have found on youtube for taking night sky photos. Thank you!!
I would say one of the best video on night sky photography for beginners.. Specially the planning and editing part! Thanks bro!
just focus manually in live view ;)
28.8 / 500 = 17.36 ?!
I was wondering the same thing! I'm pretty sure he meant to say 500 / 28.8. :)
I just looked this up and it looks like the equation is 500 / (your focal length in 35mm equivalent), OR 500 / (focal length x crop factor). This should give you a general rule around the max exposure time in seconds before you start to see star trail.
Haha that makes more sense
That made me think a lot😂
@@yancyzimmerman5835 totally, yes, is the opposite.. that's what he meant..
@@yancyzimmerman5835 Thank you!! I was wondering how he got that number.
I have watched a ton of these and yours is by far the best explanation on how to edit the milky way! (that was the piece I needed) thank thank thank
Great tutorial. Not just some camera / lens settings but the 80% planing before you leave the house. All the helpful prediction and navigation apps. Dude you covered it. I'd fly you out in to the out back anytime for some star shooting. ~ your neighbor
If you want to expose for 17s you just have to shoot in bulb mode:)
That's exactly right. Just like when I'm taking lightning shots. Just use bulb and a stopwatch, or,.... your phone. Maybe his camera doesn't have a bulb setting.
If it's in the budget, several cable or wireless remotes allow you to set shutter speed in conjunction with bulb mode.
only problem i have now is here in India there's no dark skies anymore 😂
Himalayas
Ashok Varadharajan Kumar Can't go 1000s of miles for photography
if it is your passion you always find a way pal ..
***** k angel eyez
Only true in cities(which is the case for most cities across the world). Drive down to the nearby village, as much away from the city as possible. Few kms off the NH should give you clear skies. No need to go to the Himalayas.
Excellent tutorial, and delivered in an easy to understand and follow manner. I want to have a go now!! Thank you.
Excellent guidance, particularly the use of Stellarium to precisely plan the shoot. Many thanks.
Sweet! Glad it helped and thanks for the nice comment- :)
love the photo with the person in it but with the long exposure how did you freeze him/yourself?
i think he just stood there, not moving, because the aperture wasn't that long. Maybe he also has frozen himself with flash, but i think for that the aperture was to short, so you would probably see his trials moving in and out of the picture...
Wayne Storz Is there any tutorial of that on UA-cam ? I can't seem to find one
its 2 different pictures that are overlayed ontop of each other. He talked about it early in the video. Take a photo of your foreground first and then take a picture of the milky way to add in as the background.
Is Canon 70d a good cam to do astrophotography?
You would be better off with a full frame camera, if you want to have good quality images. A FF and a good fast lens like a 2.8 would be a great match. I personally own a 70D and its a great camera but not for to high ISO's
ahh icic thank you! JimsTVEU
Recommend a Cannon 5d mark iii?
oh! thank you! :) James White
cheryl Lim I was asking him haha. Im thinking of buying it. amazing camera but the cost... might be able to get away with less...
Well thought out video - bookmark it! There's a lot of detail here and you should be sure to write some of the key factors down in your photo log book - don't have one, get one and use it religiously, as well as other issues with doing night photography. Things like turning off image stabilization, adj. exposure factors for non-full frame cameras (I use a sony a6000 - not full frame) and Lightroom tools where the video assumes good working knowledge of Lightroom can make or break a photograph. Remember as Ansel once said "You don't take a photograph, you make a photograph"
Well done. You know your stuff and you were able to bring that forward. Well spoken.
Why didn't you just use Bulb, and did a manual shoot? that way you can hold it down for 17 seconds, or better yet, buy a remote to help you do that?
There's a lot of things I could have done, but we all don't have the budget for that. Holding down the button would introduce a lot of camera movement and cause blur in the picture. And although it would be nice to have a remote, I know not all camera's have the option to have one like compact and bridge cameras. Just trying to help the masses. :) Of course I would do things differently outside the video suggestions.
+The Finer Photo i like your tutorial though
The Finer Photo oh you would do things differently? Really, what you do differently?
500 divided by 28.6 not 28.6 divided by 500. I guess that's obvious....but just in case anyone was confused....
I was thanks for that info 👍
Thank you for clarifying the math, to bad they did not!
Excellent and useful information for all photographers interested in best-practices to begin night sky photography.
Awesome tutorial, easy to follow and take notes! Thanks so much!
That guy stood there and not moving for 20s ?
+Joe Pow - Haha, basically don't breath- ;)
I regret to inform the people of Europe, your nearest dark sky without light pollution is in Africa
SexyToshi United Kingdom and Scandinavia?
Ireland has x2 gold teir dark sky reserves
I regret to dissapoint you, but there are plenty of places in Europe like
Westhavelland International Dark Sky Reserve which is just 100km from Berlin, also there are reserves like this in UK, Ireland, France even Italy...
Essex county in England switch off the street lighting at midnight every night.
Really clear presentation. It helps me a lot. If not done yet a tutorial about printing the pic would be good too.
Mate, this is the best astro photography tutorial I've watched. Details from start to finish. Thank you.
I will try to do this next week. I will be camping at the darkest area according to the map and Im so excited! Thank you
Fantastic tutorial! From start to finish one of the best I've seen. Prepping for my first Milky Way shoot and you unlocked all my questions. Thank you!
By far the best tutorial on shooting the Milky Way I've seen on here. Thanks for the Lightroom tips; they'll certainly come in handy.
Well done indeed!
The best tutorial I've seen to plan & shot the milkyway. Very helpful. Thanks!
+Nabil Abu Karam - Thanks for the kind feedback- glad it helped! :)
Sky safari is also an amazing app that will not only give you minute by minute star maps, but you can skip forward or backwards by location, date, and direction. Almost an all in one stop app for night photographers.
I've studied a lot of this in the last month and this vid covers it all and very well.
This is the best video of it's kind. I have been looking for a video which shows me everything I need to know thank you
This was an awesome video! Why doesn’t this channel have more subscribers? This is golden information right here. Awesome video, finer photo!
Thank u very much... i hv been searching for milky way shoot video done with crop sensor....n finally u made it happen..u can't imagine how much happy i m...it would b great help with this information ...Thanks!!
What a nice job. I appreciate how you have incorporated so many different tips & tools needed to shoot the milky way.
Thanks for lightroom tips! great video!
in Stellarium, you can set it to use decimal degrees in the Config Settings - press F2, then Tools tab (wrench icon), then tick "Use Decimal Degrees" on the right column of options
Such comprehensive video!! Good work!
Tip: You can just paste the coordinates from google without having to search again to get the coordinates in the DMS (Decimal, Minutes, Seconds) format. If you paste the DD format (Decimal degrees) from google into stellarium it will convert for you.
GREAT great info. All the tools to do the homework. I am now setup to try my shot on July 14, 2018. Can not wait to get into editing it. :)
BTW... I hope this helps.. Lat and Long... the increments of degrees are broken up into minutes and seconds. Like time... hours are broken up into minutes (60 per hour) and seconds ( 60 per minute ). The same is true for Lat and Long. So, 34.5 degrees is the same as 34 deg, 30 minutes. So, multiply your decimal degrees to 60 and you will have the total minutes. Take the decimal of the minutes and multiply that by 60 and you will have the seconds.
Thank you. You are a good instructor.
It's now 2020 and for keeping a lens at infinity focus, there's a couple of tricks you can apply with some newer lenses (depending on the lens, and on the camera settings).
When you have a mirrorless camera with one of those new-fangled "focus by wire" lenses, the focus does not change when turning the focus-ring unless you're in manual focus mode. So when the camera is off, you do not need to have any worry about that ring turning and you loosing your proper focus.
Now if you also set up your camera for "back button focussing", so that auto-focus is not triggered by the shutter button but only by one of the buttons on the rear, you will not ever have to lose the proper focus of your camera in auto focus mode.
You just pre-focus once with the back button, take a picture to verify proper focus, and don't touch the focus button again.
There's also now a manual focus lens that has a special focus-lock ring: the IRIX Blackstone and Firefly lenses. The 15mm version has a 2.4 aperture which is still quite useful for astrophotography. Focus lock ring means you don't have to tape your lens focus ring down, and you still don't have to worry about losing focus. It also has a focus-ring-dedent at infinity but for that to work properly you may have to calibrate the lens a little bit.
Solid! Thanks for showing us your workflow!
thanks for showing and explaining why you do everything the way that you do! taught me a bunch! :)
Long exposure noise reduction is actually not reducing our noise (quite the contrary - its adding noise a little bit, but that goes to far physics for this). The camera takes a black image after your exposure is complete with the same exposure time and ISO but with closed shutter. That black image is (dependend on exposure time, ISO and camera) not complete dark, but contains some glow, mostly at the sides and corners of the image. This glow is because of heating during the exposure.
With long exposure noise reduction you get rid of this glow and also of some sensor errors called Hot-Pixel (those get more visible with higher ISO and longer exposures).
Great tutorial, away to try it tonight in Scotland.....i've never even seen the milky way, never mind photograph it! Thank you for this help - deeply appreciated!
Awesome explanatory video. I loved the way you have explained the smallest details for a beginner like me. thanks a lot
A little advice.... for taking shots for shutter time like 16 or 18 or 23, try using a remote clicker and a watch with a timer.... and shoot using bulb mode... will make everything whole lot easier....
The site that showed where the "dark skies" were was depressing. I grew up in a rural area southeast of Memphis, TN in the 1950's. While you could see the glow of Memphis in the northwest, the rest if the sky was pitch black when the Moon was not in the sky. The Milky Way stood out clearly in the summertime. Even as recent as the 1980s If I drove to Hughes, Arkansas or about 40 miles into North Mississippi, the skies were great. I now live in Florida on the south central east coast. When I moved here in 1991 you could see the milky way even in the winter which is dimmer than the summer milky way. Now, on most "clear" nights, I can barely make out 2nd magnitude stars. Yeah, like the "Big Dipper" stars. It used to be just the street lights and commercial lighting, but now a huge number of houses have super bright lights on their property, ruining the night sky. Sadly, if only all of these lights had proper shielding to keep the light from going directly up toward the sky, not only would the sky be darker, but their lighting would be more efficient and require fewer fixtures. The ground in general only reflects 10% of the light into the sky, while bare bulbs of course light the sky with ease.
This is going to help me a lot! I just started getting into it and wanted to see the settings for it and best way to edit to make the milky way stand out! Definitely going to come back to this video to reference!
You blew my mind with all this information. Excellent video. I can't wait to go out and start taking pictures at night. THANK YOU!!!!
I just found myself a new hobby. Thank you, sir.
Great tutorial thanks for sharing!
This pollution map is pretty easy to use too.
Complete information.
Thanks for sharing such a nice video packed with information.
That is awesome feedback- thanks for the kind words! :)
one thing i didn't hear you mention is to lock the mirror up to help reduce camera shake, I use a wired remote control and tripod, I lock my mirror up so I don't have to have the 2 sec delay to take my image. ;) Great tutorial!
The most complex and complete tutorial! Thank you for this!!
in stellarium, you can just type in a decimal coordinate and it will convert it, just select everything in the box first.