When I was a kid I remember my uncle crawling under my dads old truck in the middle of nowhere replacing a u-joint. My dad always carried an extra in his glove compartment. I was amazed at how quickly he was able to do it with hardly any tools. Ingenuity from years of working in the bush. This looks much easier. Thanks for sharing.
Finally a youtuber that knows how to do the job right, and respect the fact that cleaning and prep is the key to all good maintenance actions. Patients during disassembly will save you tons of headaches in the future.
He got a few things wrong and left some info out and that is kind of disappointing in the slightest and can wreak havoc in parts at the most-est (lol).
"Just keep everything all greased and oiled up" is what my dad taught me from a very young age. Its no big secret in getting these things to last a very long time, its just down to simple lubrication. Our old 1969 Ford D Series truck (the first brand new truck my father ever purchased) is still running on its original UJ's, they get a pump of grease every week. It never ceases to amaze me that most vehicle manufacturers now routinely fit non-greasable UJ's, its like they are just setting you up for an early failure and a reqular and expensive trip to one of their dealerships. David in the UK.
yes and no........I totally understand what you mean, but the u joints in this truck were non greasable and they were ORIGINAL and had 250k miles on them. What I've always been told is the non greasable joints have much better seals and last a long time........the greasable ones have seals that are meant to let grease push by them when you grease them.....so if you have greasable joints you need to keep them greased.
@@cheapwheels9828 Keeping things greased is a real passion with me, I find it theraputic pushing old grease out and replacing it with new. My grease gun is older that our oldest Ford truck, heck, its probably older than me. 250,000 miles on a set of sealed UJs sounds good, but our old Ford has done more than ten times that and still on the originals. But, having said all that, if people dont grease there grease points, its all going to go sour very quickly. Dont forget to grease your new UJs often, I send you a reminder now and then. Lol. Keep up the great work on all your channels Dave, lm an avid follower of them all. David in the UK.
One other comment- the caps are actually supposed to be a tight fit. They are designed like that. They should NOT just slide in with a push from your fingers. That indicates worn bores or (less likely) mis sized U-joint caps. If caps slide in by hand, you should think about replacing that driveshaft yoke. You should need to lightly tap them in with a hammer, at least. I've been turning wrenches since the 1980's and I can assure you that Spicer designs their yokes this way.
Thank you ! This should be be repeated. You SHOULD NOT be able to press the caps in with your fingers. The caps are an interference fit. If you want to know how to fit UJ's CORRECTLY watch some of the excellent tutorials on UJ's on UA-cam by Weber University. ua-cam.com/video/v0RZVQQVMZs/v-deo.htmlsi=NbwCikeWxKp5OHOg
You right i been turning wrenches sents 74 and seen lots o bad u joints jobs go bad cause of that and get joints with grease fitting and lub every 6 months and your never do it again
@@MontanaWelldigger yea, if they are that easy to press in then the yoke is junk. Ever lose a drive-shaft? On top of that, using a vise or c-clamp without properly supporting the ears will bend them, if the press fit is proper... Then you'll get lots of practice changing them, lol.. The wrong way anyhow...
Yeah, not just Spicer, but all u-joints and yokes are designed to have a pressed fit so the bearing caps don't spin. The only exception I know of is heavy duty, class 8 semi trucks... the u-joint caps are supposed to slide in by hand on those, but they use cap screws to hold the caps in place. I always use a file to clean out the rust, but I've NEVER greased the cap bores like this guy did.
Thanks for the Video. Takes me back. 40 years ago I did a ton of these. I was lucky. I had a vise. Made it even easier. Constant velocity U-joints on full size RWD GM's were a little more challenging though. Makes me feel good to see a young guy willing to work and to do it right. You are a good man Dave.
Thanks for the "break" from the snow removal job :) This info should come in handy when refurbishing my van before my next trip out to Rapid City. Thanks, Dave! God Bless ... see you down the road
Thanks for the great video. I once replaced a set of U joints but it was a bear since I did not think to oil and clean the yoke thoroughly. I had one of those hydraulic jack presses from Harbor Freight Tools but it was still a bear in that I didn't not oil the old joint to get it out easier and like I said before did not clean the yoke. Lesson learned right here----thanks. Many machine shops that did this kind of work have closed in the last 20 years or so so this is great to be able to do it yourself.
The way you give knowledge and advice is really a joy to listen to. Thanks for letting us know about this channel. It really complements your other channel. If you’re gonna live off grid, maintaining your transport yourself, is essential. Subscribed
Great footage, and narration here Mr. Dave. I think I remember helping my late older Brother do a UV on a 57 Chevy (circa 1968). I was the one holding the flashlight at 9:00 pm on a school night. Dam, was I having fun. Bless
your tip about cleaning out and polishing everything before inserting the new u joints was helpful. stupid, but nobody ever suggested this to me and I had a lot of trouble pressing in new joints. after doing what you did mine slid right in with my hands. 10x easier!
Dave, I've been watching Bushradical for years. I had no idea you had another channel. It made my day when this video started and I saw that you would be helping learn to change my u joints. I haven't even watched the video yet, I just had to leave you a comment first.
Good video! I have changed a few on my F150 SuperCab. Fords were hard on joints. I had a few 1976, 1977. I agree with cleaning that stuff up quite a bit. Makes a world of difference. Nice job on the video! Job well Done!
Cleaning burrs and nicks on drive shaft where u joint is installed is definitely crucial. Great job covering this important procedure. Makes the difference in a smooth u joint.
I have been doing repair work for almost 60 years and this is the best training video I have seen, 😅I was taught long ago the correct way to do it, and like you say clean, patience, and some lube goes a long way way with a cool head!!
Maaaan....this is exactly what I have to do to my 1974 Oldsmobile Cutlass Supreme and my 1978 Oldsmobile Delta 88 Royale Brougham coupe. This is a very informative video. Thank You.
Very concise. I was really amazed the first time I changed out U joints at how easy it actually is to do but like anything else it's really hard until you know how. I got lucky in that a good friend of mine knew what he was doing and was more than willing, for the low low price of a six pack (which we shared), to show me the first time I ever needed to do it. Thanks for a great video that brought me back some good memories at the same time.
I did not know you had this channel…….LOVE IT!!!!! I have the same truck, only in a crew cab, and always try to do my own work. Looking forward to watching the older videos.
Some absolutely great tips! I'm a farmer and I've grown to HATE universal joints, but even after 30 years of doing them - you've given me some help! Thanks CW, Lee
When I take driveshafts out of any car to do u-joints, I always mark exactly the way they were before I took them out, for some reason had vibration on like vettes and other cars, so good idea or tip, good vid btw..
Very good tutorial. The first time I did it was at least 40 years before I had a computer. I used a big c clamp. It was for my 67 G10 van. Still have it.
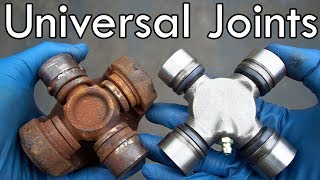
Great video. I used to replace one of my three u joints on my van drive shaft every 4 to 6 months. One of the joints was just as your video presented one worn out cup. I was talking with an old truck mechanic and he said run a ground strap to my differential. He said it had to do with electrolysis’ (static electricity being generated by things in motion). So as sceptical as I am, I did put a big ground wire from my differential to the fame..A I never replace a burned out u joint again. You be the judge of this Thanks. Mike
Nice video. I always use a bench vise to press cups out and in. I realize lots of people do not have access to a vise, and so the hammer is only option. But, everything else in your video including the cleaning and polishing up the bores, etc. is spot on. Makes everything go together smoothly. A shame that Ford doesn't have grease zerks from the factory. Otherwise, you likely wouldn't have needed to change them out, lol....
Should have marked yoke so to install in the same as it was disassembled.I liked your install until you used c clamp. After 30 years in a drive line shop ,these were the biggest problems with customer install u joints.
@@cheapwheels9828 Thanks, I need it. My front right hydraulic brake line from the abs module blew out. I'll tell you what, it was an interesting drive the rest of the way home.
I did that job once myself years ago 1981 to a 1972 Dodge Dart,great car just bought it,i knew the u joints had to be replaced,wasnt to bad i remember using a Vice on my dads workbench,ran so much better,used to do so much work myself,now i get spasms on my back,sore shoulder ball joint[whatever its called],my PVC is hard to reach the whole intake has to be removed,soon going to change gaskets on VLV cover.I used to have a lift on the base,made a lot of work much easyer.At 70,dont care to much anymore,that was a good video,i like how so much is there to learn,i used to go to book stores and sit and read and take notes.
Got here way of your wife's channel ...by way of the Bush radical channel...by way of the guitar 🎸 page and now here 😂 enjoy all of them. Enjoy your guitar playing . I have been playing country guitar for 25 years and have many many guitars.. but just wanted to say thanks and God Bless... P.s. your wife putting the shocks on her cabin and having the rope still knotted.. Had me and my wife rolling ..😂😂 .. ( I'm laughing because we have done some blonde stuff like that before..) we have learned some great tips and hints .. thanks again ...sorry it was so long ..
Great tutorial!!! I remember replacing the driveshaft u-joints on my truck. It was my first time doing it and it was a nightmare. All the tips you gave, I didn't have or know. So needless to say after removing, installing and test driving.....the driveshaft fell off. Keep up the good work!
We were driving out some large rusted press fit bolts at the cement plant. After lubing it and getting it to move,we hit it back the other way a bit to spread the lube around before driving it out .It seemed counterproductive to drive it back in the wrong direction that little bit,but they came out faster that way. Love your videos, Dave.Just good common sense solutions
Wow ! This is a nice and very instructive video. Very well explained and very well narrated. Also the camera positions are absolutely brilliants.Thank you.
Great video right to the point, also a great opportunity to service the slip joint, it will dry up, seize and play havoc on the pinion, transfer case or transmission bearings.
This is an EXCELLENT video. I happen to be in the middle of battling a yoke with bent ears from my rotary mower. The part is obsolete and unavailable. Joy. I do have a plan for some heat and bending action on those ears. Nice one, Dave.
One of the main parts that may be overlooked as we use oil change places and/or we get in hurry when we change our own oil. A loose U-joint, especially the front one is very dangerous as the front of the shaft can fall out, catch on the ground or slide around and get caught under a rear tire. There is enough tension and force from vehicle to flip it over if caught under the tire. Very good video. Wish we had these videos when I was much younger. Had 80 year old friend was trying to change his and I didn't remember how to change it. Thanks.
Brother. Looked up many “How to” videos but never commented. Great job on the video. I’m sure I would have figured it out but wanted some reassurance. Thanks
Great Job to show is weekend warriors how to do this right. I have an '87 Ford 250 and it's my proud and joy and I made my living out of it after I retired from The Bell System and always lubed and oiled it myself and she could use these new U-Joints so you made it seem so easy so the new joints are on their way~!! liked and subscribed.
If the joint you are replacing has a grease fitting be SURE that the fitting points to the Centre of the Driveshaft for future lubrication. Caps should fit *Tightly* in Yokes.
Awesome video! I have changed a few on pickups and farm equipment. And I have a funny story about our 91 GMC. My wife bought the truck brand new with her first husband, then it went through two boys in high school and one through college until it settled in with us. Well, something was making a clunking noise. When I checked the drive shaft, I didn't put the transmission in neutral. I left it in park. I am used to everything being already free like equipment or manual transmission left in neutral. So the u joint was tight...Nope!! A week or so later the drive shaft flew out while my wife was heading to work. I tow the truck home and put in a new u joint. The next day it flys out again. This time, it gets damaged. I called a machine shop and explained what happened. He says to bring the rear end yoke along with the drive shaft. He sets the yoke flat on the counter and points to the twist. Then asks if anyone has been doing brake stands. I said it went through two boys in high school. He repaired the drive shaft and ordered a new yoke. It has been in for about 10 years with no trouble.
Good stuff Dave! The retaining clips have a sharp 90 degree on one side and a curved edge on the other. Place the sharp 90 degree to the outside of the joint for better retention. Seat the clips into the groove with a punch or screwdriver to insure they bottom out into the groove. Make sure the zerk grease fitting is located in the correct position. If it is placed towards the differential on the rear joint you may not be able to get a grease gun on the fitting. I prefer to hammer out the old joints while supporting the opposite ears on the jaws of a open vise. This helps to support the ears of the yoke so they do not spread apart or twist causing alignment problems. I also put a little heavy grease into the cups to make sure the needle bearings do not fall out of place while pressing or hammering in the new cups. It’s always the little things that get you but if your aware of them you wonder what all the fuss is about. Speaking of little things, how’s Moose doing. Is he herding you around the yard yet?
Awesome dave, clean wins.! I've done a couple of these. I have one to replace on a an old brush hog that blew apart yesterday. I don't know why I've never cleaned the bore..i definitely will from now on..thanks man.
Can't tell ya how many u joints I've changed in my life, but I still wanted to watch the video and leave a thumbs up and a comment, because I believe in what Dave is trying to do here. Thank you Dave. Your effort is noticed.
Same in a sense, but I do it all and all so emery cloth. I don't grease the yolks though because I will never be changing them again. My present f150 has 356,000 km on the originals. 1) always change all u-joint on a driveline at the same time including steady bearing. 2) wrap some electrical tape around the u-joints body to hold the two opposing caps in place so they don't accidentally fall off into the dirt. 3) try to understand why the u-joint went out in the first place, a) just wore out, b) a dent or bent in shaft, c) a weight got knocked off. And seeing as there has been some vibration going on check the transmission seal and pinion seal for any leakage. I know it's a pain to change the seals but it will save a big expense later on.
Nice fix Dave, 👊 looks like that's been bad for a while. Endless repairs here in Michigan ,mud, salt , pot holes take there tol on our vehicles.You made that fix look easy!👍
Sheeeit...my old ones were so seized up on there, it took a butane torch, some medieval black smith hammering and a frikkin cutting wheel. Your prep work for the new ones will come in handy...thanks!
Bustin' knuckles since the 70's here. I'll add a handy tip. When you're re-installing the caps, fill them 1/2 way with grease. As you press them back in you are back greasing them. You will see grease come out of the zerk hole, all that's left is install the zerk fitting and viola' all greased.
Hi friend ; that is a basic to change Universal joints at home, I done that a long time ago, but now they have hydraulic press C clamp tools it work faster, thank you for share to the new generation, but now the new generation they depending on the shop to do for them , old generation like me I save money like you done on this v d o and I trust my self more than the shop , thank Cheap Wheels👍👍 .
Excellent tutorial on u-joint removal and proper replacement! Not that hard to do with a few hand tools and a good C-clamp. Thanks for the cool video, Dave!
Right off I was like yeah, yeah, yeah done this a hundred times. But after shutting my mouth and listening to your tutorial I learned a ton. I realize my past errors and they will not reoccur. Thanks man!!! AA+++
I’ve replaced quite a few U joints. Never had bearing cups slide in like that! Guess I just cleaned the bores , not sanded out. In fact, I used press .
It's a good practice to drive the first cup in deeper than it will end up. That way the trunion will reach further and allow the rollers in the other cup to ride on the trunion earlier, keeping them in place while pressing that cup into it's proper location, which will drive the first cup back against it.s snap ring. Not doing this procedure allows the rollers to fall out of place too easily.
@cumminsscout. That is my worry too. That is why I drive the first cup in farther than it will be later on as the trunion will be projecting out so the second cups rollers will reach their trunion shaft first, before the cup touches the yoke. That insures no rollers will be dislodged as you are only guiding them on without interference from the cup starting in it's hole. The whole works will drive in as a unit, pushing the first cup against it's snap ring. This works good on constant velocity joints too, where you have an increased complex assembly to maintain roller placement.
I just r & r my u-joint on my 2003 Dodge Diesel last weekend. They are a press fit. I cleaned the bores and used a u-joint press to install. It is press fit because you don’t want the caps spinning in the bore. If they slide in by hand you have a worn yoke. I have changed my own u-joints in Toyota’s, Fords and everything I have owned. They all are a press fit except the ones that have straps and bolts to hold the caps. Gooday.
Excellent video, thank you! I'm the same as you: whenever I'm reassembling something I want everything cleaned up to perfection. One thing I'd have done differently is kept the Torx bolts, unless the hex-head ones were top quality (hardened or stainless). To access those tricky Torx heads, how about just fitting the Torx bit into a small ring spanner? I've got a 1978 Land Rover and will keep all these tips in mind for when I next change its UJs.
Great work, don't forget to make sure the joints are in phase,or both half of shafts are put together in the same position.If not you might have a vibration you didn't have before.
⚠️ Ding ding ding! Lots of things are glossed over, left out or wrong in this video and he didn't phase the joints! Good ol' UA-cam, this video is worth exactly what I paid for it (absolutely nothing!) BEST BET: watch a collection of videos on the subject or even better yet, crack open a technical repair manual. Those things are edited, proofread and packed full of information--they have to be good to get into print, or there'll be errors across every print edition and that's a no-no. Reputations are at stake. ⚠️
@@Hjerte_Verke It's not like you're putting chains, tensioners or gears in a Triton engine,and to be fair,to somebody who hasn't installed a u-joint before it can be helpful information.Granted it won't get you thru a C V joint,or balance a driveshaft,but it can be helpful. Sorry it wasn't a section of a 50 year old Pontiac fullsize service manual on extensive coverage of propeller shafts.


I have never had any caps slide in that easy in all my 50 years of wrenching.And l did the prep work.I always pressed mine in.
When I was a kid I remember my uncle crawling under my dads old truck in the middle of nowhere replacing a u-joint. My dad always carried an extra in his glove compartment. I was amazed at how quickly he was able to do it with hardly any tools. Ingenuity from years of working in the bush. This looks much easier. Thanks for sharing.
Thanks
Finally a youtuber that knows how to do the job right, and respect the fact that cleaning and prep is the key to all good maintenance actions. Patients during disassembly will save you tons of headaches in the future.
Patients from a hospital? You would need PATIENCE for that!
Thank you for the correction. I appreciate that. @@grahameroberts8109
He got a few things wrong and left some info out and that is kind of disappointing in the slightest and can wreak havoc in parts at the most-est (lol).
Kind of an unspecific post. What was left out, and what was wrong? @@Hjerte_Verke
Dude this is the best video. Thorough but not boring. Let me buy this dude a beer!
"Just keep everything all greased and oiled up" is what my dad taught me from a very young age. Its no big secret in getting these things to last a very long time, its just down to simple lubrication. Our old 1969 Ford D Series truck (the first brand new truck my father ever purchased) is still running on its original UJ's, they get a pump of grease every week. It never ceases to amaze me that most vehicle manufacturers now routinely fit non-greasable UJ's, its like they are just setting you up for an early failure and a reqular and expensive trip to one of their dealerships.
David in the UK.
stealership
@@ufartface Absolutly spot on there.
yes and no........I totally understand what you mean, but the u joints in this truck were non greasable and they were ORIGINAL and had 250k miles on them.
What I've always been told is the non greasable joints have much better seals and last a long time........the greasable ones have seals that are meant to let grease push by them when you grease them.....so if you have greasable joints you need to keep them greased.
@@cheapwheels9828 Keeping things greased is a real passion with me, I find it theraputic pushing old grease out and replacing it with new. My grease gun is older that our oldest Ford truck, heck, its probably older than me. 250,000 miles on a set of sealed UJs sounds good, but our old Ford has done more than ten times that and still on the originals. But, having said all that, if people dont grease there grease points, its all going to go sour very quickly.
Dont forget to grease your new UJs often, I send you a reminder now and then. Lol.
Keep up the great work on all your channels Dave, lm an avid follower of them all.
David in the UK.
Didn't see the pins inside be careful are they start falling out of new u joint,
One other comment- the caps are actually supposed to be a tight fit. They are designed like that. They should NOT just slide in with a push from your fingers. That indicates worn bores or (less likely) mis sized U-joint caps. If caps slide in by hand, you should think about replacing that driveshaft yoke. You should need to lightly tap them in with a hammer, at least. I've been turning wrenches since the 1980's and I can assure you that Spicer designs their yokes this way.
Thank you ! This should be be repeated. You SHOULD NOT be able to press the caps in with your fingers. The caps are an interference fit. If you want to know how to fit UJ's CORRECTLY watch some of the excellent tutorials on UJ's on UA-cam by Weber University. ua-cam.com/video/v0RZVQQVMZs/v-deo.htmlsi=NbwCikeWxKp5OHOg
You right i been turning wrenches sents 74 and seen lots o bad u joints jobs go bad cause of that and get joints with grease fitting and lub every 6 months and your never do it again
I don't think you should be able to set the caps with your fingers, sounds worn out or enlarged by excessive sanding. JMHO
@@MontanaWelldigger yea, if they are that easy to press in then the yoke is junk. Ever lose a drive-shaft? On top of that, using a vise or c-clamp without properly supporting the ears will bend them, if the press fit is proper... Then you'll get lots of practice changing them, lol.. The wrong way anyhow...
Yeah, not just Spicer, but all u-joints and yokes are designed to have a pressed fit so the bearing caps don't spin. The only exception I know of is heavy duty, class 8 semi trucks... the u-joint caps are supposed to slide in by hand on those, but they use cap screws to hold the caps in place. I always use a file to clean out the rust, but I've NEVER greased the cap bores like this guy did.
Thanks for the Video. Takes me back. 40 years ago I did a ton of these. I was lucky. I had a vise. Made it even easier. Constant velocity U-joints on full size RWD GM's were a little more challenging though. Makes me feel good to see a young guy willing to work and to do it right. You are a good man Dave.
I remember doing the CV joint on with my dad on his 66 Riviera. Yeah those things could be a bit tricky.
What a class act! (at 67yrs old I picked up some pointers I was never taught thru the years) You presented it very well, I wish you well, my friend!!
Amazing sir I've learned so much and how to do it probably thanks again
Thanks for the "break" from the snow removal job :) This info should come in handy when refurbishing my van before my next trip out to Rapid City. Thanks, Dave! God Bless ... see you down the road
Thanks Dave.
Thanks for the great video. I once replaced a set of U joints but it was a bear since I did not think to oil and clean the yoke thoroughly. I had one of those hydraulic jack presses from Harbor Freight Tools but it was still a bear in that I didn't not oil the old joint to get it out easier and like I said before did not clean the yoke. Lesson learned right here----thanks.
Many machine shops that did this kind of work have closed in the last 20 years or so so this is great to be able to do it yourself.
The way you give knowledge and advice is really a joy to listen to. Thanks for letting us know about this channel. It really complements your other channel. If you’re gonna live off grid, maintaining your transport yourself, is essential.
Subscribed
Thanks
Great footage, and narration here Mr. Dave. I think I remember helping my late older Brother do a UV on a 57 Chevy (circa 1968). I was the one holding the flashlight at 9:00 pm on a school night. Dam, was I having fun. Bless
Very cool!
I wonder how of these 'joints i have replaced over the years,..and yet Dave here has sown me a couple more useful tips.
Thanks Dave.
your tip about cleaning out and polishing everything before inserting the new u joints was helpful. stupid, but nobody ever suggested this to me and I had a lot of trouble pressing in new joints. after doing what you did mine slid right in with my hands. 10x easier!
Dave, I've been watching Bushradical for years. I had no idea you had another channel. It made my day when this video started and I saw that you would be helping learn to change my u joints. I haven't even watched the video yet, I just had to leave you a comment first.
Good video! I have changed a few on my F150 SuperCab. Fords were hard on joints. I had a few 1976, 1977. I agree with cleaning that stuff up quite a bit. Makes a world of difference. Nice job on the video! Job well Done!
Cleaning burrs and nicks on drive shaft where u joint is installed is definitely crucial. Great job covering this important procedure. Makes the difference in a smooth u joint.
Thanks
I have been doing repair work for almost 60 years and this is the best training video I have seen, 😅I was taught long ago the correct way to do it, and like you say clean, patience, and some lube goes a long way way with a cool head!!
Maaaan....this is exactly what I have to do to my 1974 Oldsmobile Cutlass Supreme and my 1978 Oldsmobile Delta 88 Royale Brougham coupe. This is a very informative video. Thank You.
Sir, excellent video. Thanks for sharing your knowledge. Im certain it will help many people.
Very concise. I was really amazed the first time I changed out U joints at how easy it actually is to do but like anything else it's really hard until you know how. I got lucky in that a good friend of mine knew what he was doing and was more than willing, for the low low price of a six pack (which we shared), to show me the first time I ever needed to do it. Thanks for a great video that brought me back some good memories at the same time.
Thanks
I did not know you had this channel…….LOVE IT!!!!! I have the same truck, only in a crew cab, and always try to do my own work. Looking forward to watching the older videos.
Thanks !
Some absolutely great tips! I'm a farmer and I've grown to HATE universal joints, but even after 30 years of doing them - you've given me some help! Thanks CW, Lee
When I take driveshafts out of any car to do u-joints, I always mark exactly the way they were before I took them out, for some reason had vibration on like vettes and other cars, so good idea or tip, good vid btw..
Very good tutorial. The first time I did it was at least 40 years before I had a computer. I used a big c clamp. It was for my 67 G10 van. Still have it.
Dave these video's are AWESOME.. Plus the way you talk on them is very professional.. Thank you Frank from montana...
thanks Frank
Great video. I used to replace one of my three u joints on my van drive shaft every 4 to 6 months. One of the joints was just as your video presented one worn out cup. I was talking with an old truck mechanic and he said run a ground strap to my differential. He said it had to do with electrolysis’ (static electricity being generated by things in motion). So as sceptical as I am, I did put a big ground wire from my differential to the fame..A I never replace a burned out u joint again. You be the judge of this Thanks. Mike
i use to do to do all my own work too but now i'm too old but i enjoyed watching you do it. good show.
>>>DITTO
Nice work.....First U-joint I replaced was on my 89 jeep XJ.....was how I got into watching youtube, LOL. Hope you and Brooke are well. Best wishes
Thanks
Nice video. I always use a bench vise to press cups out and in. I realize lots of people do not have access to a vise, and so the hammer is only option. But, everything else in your video including the cleaning and polishing up the bores, etc. is spot on. Makes everything go together smoothly. A shame that Ford doesn't have grease zerks from the factory. Otherwise, you likely wouldn't have needed to change them out, lol....
Ford has synthetic grease ones
The are permanent, the best
The cross-drilled holes for the Grease zerks actually take strength from the U joint. I prefer Zerks myself but that is for lower torque applications.
Should have marked yoke so to install in the same as it was disassembled.I liked your install until you used c clamp. After 30 years in a drive line shop ,these were the biggest problems with customer install u joints.
This was very educational and you are a good teacher, I have managed to change my universal joint with the help of your video.
Glad it helped
Excellent video Dave; good camera angles; clear , concise narration; well done.
Solid! You brought me back to my childhood when I first started this mechanic journey of mine. My uncle Mario used to do the same thing you did
Ok, this reminds me that I have work to do on the old f350. Thanks Dave for all the useful information you put out.
good luck
@@cheapwheels9828 Thanks, I need it. My front right hydraulic brake line from the abs module blew out. I'll tell you what, it was an interesting drive the rest of the way home.
I did that job once myself years ago 1981 to a 1972 Dodge Dart,great car just bought it,i knew the u joints had to be replaced,wasnt to bad i remember using a Vice on my dads workbench,ran so much better,used to do so much work myself,now i get spasms on my back,sore shoulder ball joint[whatever its called],my PVC is hard to reach the whole intake has to be removed,soon going to change gaskets on VLV cover.I used to have a lift on the base,made a lot of work much easyer.At 70,dont care to much anymore,that was a good video,i like how so much is there to learn,i used to go to book stores and sit and read and take notes.
Got here way of your wife's channel ...by way of the Bush radical channel...by way of the guitar 🎸 page and now here 😂 enjoy all of them.
Enjoy your guitar playing . I have been playing country guitar for 25 years and have many many guitars.. but just wanted to say thanks and God Bless...
P.s. your wife putting the shocks on her cabin and having the rope still knotted..
Had me and my wife rolling ..😂😂 .. ( I'm laughing because we have done some blonde stuff like that before..) we have learned some great tips and hints .. thanks again ...sorry it was so long ..
LOL
Great tutorial!!! I remember replacing the driveshaft u-joints on my truck. It was my first time doing it and it was a nightmare. All the tips you gave, I didn't have or know. So needless to say after removing, installing and test driving.....the driveshaft fell off. Keep up the good work!
I used to press out U joints but this way has worked a lot better for me
Good video Dave. Never have had to change a U-joint but nice to know I could if needed. Thanks.
No problem 👍
We were driving out some large rusted press fit bolts at the cement plant. After lubing it and getting it to move,we hit it back the other way a bit to spread the lube around before driving it out .It seemed counterproductive to drive it back in the wrong direction that little bit,but they came out faster that way.
Love your videos, Dave.Just good common sense solutions
Thanks Tim
Good video! You covered everything that I needed to know. Thanks.
Clear voice, right speed and very informative.
Wow ! This is a nice and very instructive video. Very well explained and very well narrated. Also the camera positions are absolutely brilliants.Thank you.
Great video right to the point, also a great opportunity to service the slip joint, it will dry up, seize and play havoc on the pinion, transfer case or transmission bearings.
Great tip!
Heck, your videos are so enjoyable I'd watch one of you changing channels with a TV remote!!
Wow LOL, thanks!
This is a good thorough video. More detail than Chrisfix. Much appreciated.
This is an EXCELLENT video. I happen to be in the middle of battling a yoke with bent ears from my rotary mower. The part is obsolete and unavailable. Joy. I do have a plan for some heat and bending action on those ears. Nice one, Dave.
Very cool. Never had to replace these but will do so if I have to in the future! Saving money is where it’s at
right on
One of the main parts that may be overlooked as we use oil change places and/or we get in hurry when we change our own oil. A loose U-joint, especially the front one is very dangerous as the front of the shaft can fall out, catch on the ground or slide around and get caught under a rear tire. There is enough tension and force from vehicle to flip it over if caught under the tire. Very good video. Wish we had these videos when I was much younger. Had 80 year old friend was trying to change his and I didn't remember how to change it. Thanks.
Brother. Looked up many “How to” videos but never commented.
Great job on the video. I’m sure I would have figured it out but wanted some reassurance. Thanks
Way ta be Dave well doneYou and UA-cam go together like a hand and a glove. cheers
And chearsssss again!!!!#!#
Great Job to show is weekend warriors how to do this right. I have an '87 Ford 250 and it's my proud and joy and I made my living out of it after I retired from The Bell System and always lubed and oiled it myself and she could use these new U-Joints so you made it seem so easy so the new joints are on their way~!! liked and subscribed.
One of the best UJ tutorials on UA-cam, thank you👍🇬🇧🇺🇸
Great video Dave!
Thanks
Good video. Lots of good information. Thank you.
If the joint you are replacing has a grease fitting be SURE that the fitting points to the Centre of the Driveshaft for future lubrication. Caps should fit *Tightly* in Yokes.
Awesome video! I have changed a few on pickups and farm equipment. And I have a funny story about our 91 GMC. My wife bought the truck brand new with her first husband, then it went through two boys in high school and one through college until it settled in with us. Well, something was making a clunking noise. When I checked the drive shaft, I didn't put the transmission in neutral. I left it in park. I am used to everything being already free like equipment or manual transmission left in neutral. So the u joint was tight...Nope!! A week or so later the drive shaft flew out while my wife was heading to work. I tow the truck home and put in a new u joint. The next day it flys out again. This time, it gets damaged. I called a machine shop and explained what happened. He says to bring the rear end yoke along with the drive shaft. He sets the yoke flat on the counter and points to the twist. Then asks if anyone has been doing brake stands. I said it went through two boys in high school. He repaired the drive shaft and ordered a new yoke. It has been in for about 10 years with no trouble.
Good stuff Dave! The retaining clips have a sharp 90 degree on one side and a curved edge on the other. Place the sharp 90 degree to the outside of the joint for better retention. Seat the clips into the groove with a punch or screwdriver to insure they bottom out into the groove. Make sure the zerk grease fitting is located in the correct position. If it is placed towards the differential on the rear joint you may not be able to get a grease gun on the fitting. I prefer to hammer out the old joints while supporting the opposite ears on the jaws of a open vise. This helps to support the ears of the yoke so they do not spread apart or twist causing alignment problems. I also put a little heavy grease into the cups to make sure the needle bearings do not fall out of place while pressing or hammering in the new cups. It’s always the little things that get you but if your aware of them you wonder what all the fuss is about. Speaking of little things, how’s Moose doing. Is he herding you around the yard yet?
Thanks for the tips! Moose is growing like a weed.
Awesome dave, clean wins.! I've done a couple of these. I have one to replace on a an old brush hog that blew apart yesterday. I don't know why I've never cleaned the bore..i definitely will from now on..thanks man.
Great video with the best advice for home mechanics. Just subscribed!
what are the odds i look up a u joint video and have the pleasure of being hosted by my favorite cabin builder, be radical buddy.
Very good instructions i enjoyed the video. Thanks for the great advice.
DAVE THANK-YOU ,....YOU THE MAN !!
Can't tell ya how many u joints I've changed in my life, but I still wanted to watch the video and leave a thumbs up and a comment, because I believe in what Dave is trying to do here. Thank you Dave. Your effort is noticed.
thanks John
Same in a sense, but I do it all and all so emery cloth. I don't grease the yolks though because I will never be changing them again.
My present f150 has 356,000 km on the originals.
1) always change all u-joint on a driveline at the same time including steady bearing.
2) wrap some electrical tape around the u-joints body to hold the two opposing caps in place so they don't accidentally fall off into the dirt.
3) try to understand why the u-joint went out in the first place, a) just wore out, b) a dent or bent in shaft, c) a weight got knocked off.
And seeing as there has been some vibration going on check the transmission seal and pinion seal for any leakage. I know it's a pain to change the seals but it will save a big expense later on.
Good job showing telling,keep up the good work see ya next time see ya bye.
Nice fix Dave, 👊 looks like that's been bad for a while. Endless repairs here in Michigan ,mud, salt , pot holes take there tol on our vehicles.You made that fix look easy!👍
no joke. These were stock. 250k on them
Sheeeit...my old ones were so seized up on there, it took a butane torch, some medieval black smith hammering and a frikkin cutting wheel. Your prep work for the new ones will come in handy...thanks!
Great video. I really liked the presentation and the close up views
Bustin' knuckles since the 70's here. I'll add a handy tip. When you're re-installing the caps, fill them 1/2 way with grease. As you press them back in you are back greasing them. You will see grease come out of the zerk hole, all that's left is install the zerk fitting and viola' all greased.
Hi friend ; that is a basic to change Universal joints at home, I done that a long time ago, but now they have hydraulic press C clamp tools it work faster, thank you for share to the new generation, but now the new generation they depending on the shop to do for them , old generation like me I save money like you done on this v d o and I trust my self more than the shop , thank Cheap Wheels👍👍 .
As a professional mecanic,I found your technic as good as mine,with less expensive tool 😉.Very well explain!
Thanks Pat! I appreciate that
The best I've seen, about u joints, in a decade. But, I agree with everyone else about the fit of the caps.
15,000 miles later they are running along great.
brings back so many memories
Thanks for the very informative video and great tips on replacing universal joints. 👍🏽👍🏽👍🏽👍🏽👍🏽👍🏽
you bet
Excellent tutorial on u-joint removal and proper replacement! Not that hard to do with a few hand tools and a good C-clamp.
Thanks for the cool video, Dave!
Thanks
Right off I was like yeah, yeah, yeah done this a hundred times. But after shutting my mouth and listening to your tutorial I learned a ton. I realize my past errors and they will not reoccur. Thanks man!!! AA+++
Great video Dave. Good tips throughout!
Very good demo. Thanks
Good information and well explained.
Like anything else cleaning and prep make the project go easier.
well said
Thank you for your knowledge and videos USA 🇺🇸 USA 🇺🇸
I’ve replaced quite a few U joints. Never had bearing cups slide in like that! Guess I just cleaned the bores , not sanded out. In fact, I used press .
Nice and simple. Looking forward to the next job . Thx
Thanks
Wow 💥 what a "great" video !!! Well done gentlemen!!! 🛠🔨
It's a good practice to drive the first cup in deeper than it will end up. That way the trunion will reach further and allow the rollers in the other cup to ride on the trunion earlier, keeping them in place while pressing that cup into it's proper location, which will drive the first cup back against it.s snap ring. Not doing this procedure allows the rollers to fall out of place too easily.
Or one or two rollers flipping flat - always my worry!
@cumminsscout. That is my worry too. That is why I drive the first cup in farther than it will be later on as the trunion will be projecting out so the second cups rollers will reach their trunion shaft first, before the cup touches the yoke. That insures no rollers will be dislodged as you are only guiding them on without interference from the cup starting in it's hole. The whole works will drive in as a unit, pushing the first cup against it's snap ring. This works good on constant velocity joints too, where you have an increased complex assembly to maintain roller placement.
Correct.
Great video. Thank you I have several small flex hones in my tool box and I use those and a bit of blaster or brake clean ,cleans the bores right up
That would be awesome.
Keep up the good work.
Take care David
Thanks, you too!
Good job ! Dave !
Very well done! Good side tips as well.
As a gynaecologist,I approve of this video.
No experience but I’ll take a look at it for you.
I just r & r my u-joint on my 2003 Dodge Diesel last weekend. They are a press fit. I cleaned the bores and used a u-joint press to install. It is press fit because you don’t want the caps spinning in the bore. If they slide in by hand you have a worn yoke. I have changed my own u-joints in Toyota’s, Fords and everything I have owned. They all are a press fit except the ones that have straps and bolts to hold the caps. Gooday.
Excellent video, thank you! I'm the same as you: whenever I'm reassembling something I want everything cleaned up to perfection.
One thing I'd have done differently is kept the Torx bolts, unless the hex-head ones were top quality (hardened or stainless). To access those tricky Torx heads, how about just fitting the Torx bit into a small ring spanner?
I've got a 1978 Land Rover and will keep all these tips in mind for when I next change its UJs.
Very good and informative video! Had to subscribe.
You did amazing on this video super good detail and information 👌🏼
Thank you so much!!
What a nice video. Thank You for sharing all that important information.
Thanks
Very well explained thank you this is a great video
Great work, don't forget to make sure the joints are in phase,or both half of shafts are put together in the same position.If not you might have a vibration you didn't have before.
Great tip! Always mark the driveshaft before removing. Staying in phase is the key to no vibration.
⚠️ Ding ding ding! Lots of things are glossed over, left out or wrong in this video and he didn't phase the joints! Good ol' UA-cam, this video is worth exactly what I paid for it (absolutely nothing!) BEST BET: watch a collection of videos on the subject or even better yet, crack open a technical repair manual. Those things are edited, proofread and packed full of information--they have to be good to get into print, or there'll be errors across every print edition and that's a no-no. Reputations are at stake. ⚠️
@@Hjerte_Verke It's not like you're putting chains, tensioners or gears in a Triton engine,and to be fair,to somebody who hasn't installed a u-joint before it can be helpful information.Granted it won't get you thru a C V joint,or balance a driveshaft,but it can be helpful.
Sorry it wasn't a section of a 50 year old Pontiac fullsize service manual on extensive coverage of propeller shafts.
Huh? They will remain in phase unless you slide the drive shaft apart trigger? Doesn’t seem to matter to me anyway but who knows.
Thanks Dave, i dont have presses and what not so good to know i can still get this done.
Awesome to the Point. Outstanding presentation.
WD 40 also helps.
Hey Dave from bushradical sent me over here. Informative video.
never heard of him
Well done Davs
Thanks looks simpler than what I do I like to see clamp trick I will remember