EASY PRO HOME STUDIO STANDING ACOUSTIC PANELS! DIY GOBO!

Вставка
- Опубліковано 26 лис 2023
- www.soundheadquarters.com
INSTA-sound.headquarters.inc
🔊 Welcome to SHQ! 🎶 In today's video, we'll guide you through the step-by-step process of building your own standing acoustic panels to elevate the acoustics of your space and achieve that perfect sound quality. Whether you're a music enthusiast, a content creator, or simply want to enhance your home audio experience, this DIY project is for you!
🛠️ Materials Needed:
Acoustic fabric
Rockwool or fiberglass insulation
Wooden frames
Staple gun
Saw
Nail gun
Measuring tape
Sandpaper
Drill
📐 Step-by-Step Guide:
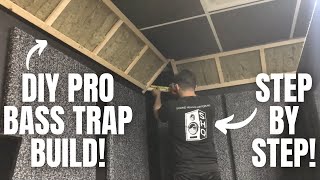
Measure and Cut: Begin by measuring the dimensions of your acoustic panel boards. Using a saw, carefully cut the boards to your desired size.
Build the Frames: Construct wooden frames that match the dimensions of your acoustic panels. Sand the edges for a smooth finish.
Attach the Insulation: Place the Rockwool or fiberglass insulation inside the wooden frames. Ensure a snug fit to maximize sound absorption.
Wrap in Acoustic Fabric: Lay your acoustic fabric flat and position the panel face-down on it. Pull the fabric taut and use a staple gun to secure it to the back of the panel.
Trim Excess Fabric: Trim any excess fabric, leaving a clean and professional-looking finish.
Assemble the floor stands, and screw panels into place. Add felt sliders to the feet to make them easy to move around the room.
Arrange in Your Space: Strategically place your standing acoustic panels in your room, considering areas with the most sound reflection or unwanted noise.
Enjoy Improved Acoustics: Experience the immediate difference in sound quality as your new DIY acoustic panels absorb unwanted echoes and enhance the overall acoustics of your space.
🎉 Congratulations! You've just created your very own standing acoustic panels, tailored to your space and style. Hit that like button if you found this tutorial helpful, and don't forget to subscribe for more DIY projects and audio-enhancing tips. If you have any questions or want to share your own acoustic panel creations, leave a comment below. Happy building and happy listening! 🎧✨ #DIYAcousticPanels #SoundQuality #AudioEnhancement #DIYProjects - Навчання та стиль


dude i've watched SO many of your videos and they're so inspiring and helpful. thanks so much for making these!
I really appreciate that thank you! Thanks for watching!
Fantastic tutorial and workmanship. Keep up the good work!
I appreciate it thank you!
I've been looking for a solution like this one! Thanks!!
Glad it helped thanks for watching!
Hello SHQ I see you have a chop/mitresaw could you do video on how to Reduce the Db levels coming from the Saw ?Thanks
what is that adjustable bench/ sawhorse/ vice thing that you have??? I need one!!!
They look great man, what are the cost to make them your aelf per gobo? Thx in advance
It’s tough to say since material cost is different depending on your location, and since the insulation only comes in packs not by single pieces. There are of course more budget materials and fabrics/lumber you can use. The cost goes down the more of them you build. Thanks for watching!
Loving your channel dude! Aside from the thickness difference - is there a reason you went with the Safe'n'Sound for this build instead of the Comfortboard like many of your other builds?
This was mainly a budget decision from the clients end, personally I would build these with the rigid comfortboard or equivalent. Thanks for watching!
@@soundheadquarters sorry if I’m getting annoying - just curious if there’s anything aside from cost that would lead you to choose the rigid comfort board for these instead of the safe’n’sound?
They both have slightly different frequency ranges of absorption, you can check for the charts from the manufacturers website to see what best suits your build. Personally I prefer the rigid for the standing panels since you can build them with the small air gap in between which helps lower end absorption. I also prefer the movable panels to be rigid to the touch since they are handled regularly, they feel more professional and durable when the fabric faces are rigid rather than squishy. Hope that helps!
@@soundheadquarters this makes total sense to me. Really appreciate the perspective!