Lathe Duplicator - Copying a Chess Piece

Вставка
- Опубліковано 8 лют 2025
- Plans, products and more at my official website bennetthandmad...
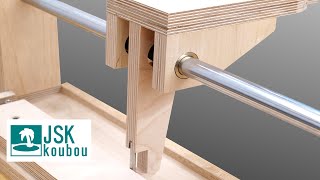
I wanted to copy a chess set on the lathe, and developed a method which uses carbide cutting tools set in blocks. In this video I take you through the key components of this duplication method, and copy a chess bishop as an example.
Products featured:
God help you if you purchase this cheap lathe from Canadian Tire:
www.canadianti...
WEN chuck
www.amazon.ca/...
Carbide Lathe Cutter - 12mm round
www.amazon.ca/...
Carbide Lathe Cutter - Diamond Tip
www.amazon.ca/...

![TORNO COPIADOR para MADERA CASERO [MUY FÁCIL de HACER] HERRAMIENTAS de CARPINTERIA](http://i.ytimg.com/vi/2O_j8yleyEg/mqdefault.jpg)


I belong to a Men's Shed in South Australia and we have just finished turning 216 spindles for 36 ships wheels. This copier would have made it much easier for us and reduced the risk of the spindles being slightly different. I can't wait to make one of your gadgets for future projects. Well done and well presented.
Hiii friend
Men’s Shed is an awesome organisation 👍🏼👍🏼 Hi from Brisbane mate 👋🏼
@@youtukang G'Day to you YouTukang.
@@VLXVNDR I couldn't agree with you more. It is one up for Australia as we created the Men's Shed concept back in the 90's. Now it is worldwide.
Well done, an easy, quick and cheap solution for component duplication. Very well explained.
Greetings to my fellow sheders from Mansfield Men's Shed in Victorian high country.
You are just trying to make me feel better about my less than perfect lathe life. And you are doing a splendid job! Thank you for the humanity you don't edit out of your video.
Peace!
I asked my dad about this one time when I got a copy tool for the lathe and I was excited about it and he said to me that they dont have to be exactly the same and its good for it to look human made like there was some skill involved and even some minor flaws to give each piece its own personality.
@@مهدیقربانی-ن4وю
Only a hobbyist can do it.
Yeah you're right - if not for the human element, we would all just be 3d printers. The variations are important. I want to work my way up to that ideal
to each his own
correct!
This was awesome to watch. The pieces came out amazing and your method is no doubt easier than trying to freehand an entire set.
Really nice comment, thank you!
The trick to getting the replica of the same size is to adjust the lade cutter a little back from the guide following the template, this will leave sufficient material should you choose to sand the piece for a smoother finish
Great work and thanks for an informative post
Simple, elegant and effective. As you stated, with a little tweaking or, "add other levels of perfection" this is a great tool. You have made a great contribution to the world of woodworking. Stay safe be blessed.
'Stay safe' ?
@@simonlevett4776 : Considering he lives in the communist republic of Canada wishing him safety is good thing.
Try t-track in your table to stop tipping and if you have a tool like a dremel you could use a small dremel router bit to carve out the bishop maybe... Just an idea... this is one of the coolest things I have seen... Remember the slight imperfections are what make your pieces unique thus more valuable... One of a kind...
A credit to you - as well as a big thank you! This hopefully will expand my ideas of copying small objects on the lathe. It is always said that the simple ideas and notations are the best.
PLEASE! Stop sweating and worrying, because I do not need you to be in a mental institution. This is amazing/beautiful. Stop second guessing your self! What a wonderful video. I don't even have a UA-cam Channel yet. Working on it thou. You just keep providing positive content. Turbo
Just purchased the same lathe yesterday. Nice to know what that little beast is capable of doing. Of course a good sportsman doesn't blame their equipment. So many projects rattling around in my head. I haven't used a lathe in over 50 years but anxious to do so. Great video.
Yes I noticed they were on sale at CT (hoping you got it for the sale price) - enjoy!
@@acanadianwoodworker Yes I did. Too good a deal to pass up.
Great video. I think it's a good thing that there are slight differences in each piece. It says that they are still made by a human. As a formal CNC machinist, turned woodworker. It took me a while to let go of making everything perfect, and learn to appreciate the unique nature of literally every piece of wood you work with, as well as the 'hand-made' vs CNC aesthetic.
Looks great! If it's easy to put the melamine table in the same spot each time, it might be good to draw a centerline on the melamine to line up the piece you are copying.
I think that piece came out really well despite it not being identical. It certainly looks nicer in wood than plastic. You could also drill magnets into the base as long as you have your chess squares mounted on a sheet of steel or steel plate in the chess board. Nicely done looks really good.
Your piece blows the original away!!! This is amazingly skillful
My family has an old chess set. Some pieces are missing. In my childhood I often watched my father, and mother playing with it. My father passed away last year. I want to copy the set for me and my two brothers as a gift. But I did not know how to do it. You just showed me the solution. Than you!
I am truly glad I could be of help to you! Thank you for posting your touching story, and I'm sure the set you turn is going to be incredible!
Set your tracing stylus in further that your cutter. After you turn your item down until it stops cutting take a measurement. Setting the cutting and tracing stylus even with each other can cause it not to turn true to the template. I've been using a handheld duplicator since the early 90's and this is how I get an exact copy of the template. You've designed a fine duplicator and thanks for sharing the video.
Scathingly workable. You have set me forward six or seven years. Thank you.
Hi. Interesting video. I had done something similar in the past in duplication lathe work. I have the reason and the solution as to why your piece did not copy exactly. It is simply that the copying pin at the bottom is not as a sharp point as the cutter. The pin you had there was too thick and rounded to go into the tight gaps of the piece you are copying. If you sharpen the copy pin to a sharp point you will have much better copy. Hope this helps. All the best and kind regards. 😎👍
If you want to produce exact copies, you'll need to build a pantograph. Even then, you'll need two versions of every cutting tool: one with a left cutting edge and one with a right cutting edge that are mirrors of each other. This is because every cutting tool is by design prismatic so the edges at an angle to the cutting edge prevent it from cutting a curve that is tighter than said angle, in the direction of cutting. The last statement doesn't make a lot of sense unless you see it: it's easier to draw than to describe in words.
You can achieve the same results as with a pantograph by modifying your existing cutting tool holders to make them attached to a base similar to the second tool's that you made for severing the piece (provided you make that base a little sturdier so it won't come flying off if the cutting tool snags somewhere). Then you'll be able to always maintain a constant angle between the cutting edge and the lathe's axle (e.g. 90 degrees). In essence you'll be making a platform (similar to a CNC machine's) that will allow you to move the cutting tool back and forth and left and right but without ever being able to rotate it.
The final requirement is that you need cutting tools that are small enough to be able to cut the details desired e.g. if you wan to cut a crevice that is 1mm wide and 5mm deep, you'll obviously won't be able to do that with a cutting tool that is 5mm thick and 5mm wide.
I sorta imported your ideas on the base build and the using of carbide cutter heads onto my lower grade wood lathe, and things seem to be working wonderfully. The next step I would do is to upgrade my spindle head for my lathe. I greatly appreciate your sharing sir!
I'm really happy the video helped! That's honestly the main reason I do the videos, to try to add to the overall knowledge pool. Thanks for the comment & for watching!
I’m currently working on a hand turned chess set. I’d consider myself quite proficient on the lathe so I decided to do them all without using a duplicator or template, I’ve done 8 pawns so far and they aren’t all the exact same but I think that kind of adds to the hand made aspect of it. It’s also my first time trying it so as I go through them they get better and better. I like the duplicator method though.
Really nice Jig and I can see using it for the chess set I want to make.! Made one by hand but it was a great deal of difficulty getting consistent looks for the pieces! My suggestion for the bishop is either leave out the notch or just make an angled guide for cutting them with a handsaw. Also using small 1/4 inch washers gave them a nice bit of weight and then I glued the washers in with Epoxy to the bottom recess I drilled and , at the same time, added the felt bottoms and the Epoxy held them quite nicely.
Muy bueno, excelente el dispositivo copiador. Ahora esperamos el video de la fabricación de los caballos. Gracias por compartir, todo conocimiento que se comparte, no ser pierde.
Excelente trabajo Estimado MAESTRO. Admiro su habilidad y destreza. Gracias por participarme y hacerme conocer este bello arte.
Felicitaciones.
I think I can sum it all up with one word: Awesome. One idea would be to hollow out with your drill press the base of the pieces a little bit and just pour in steel shot from a container of BB's from a sports store. Fill in with epoxy and you're all set. I was really interested to see how you would make the knight because that obviously has to be done differently. I suppose making a mold from which it could be made from epoxy. Regarding the slant in the bishops hat, that could be done probably with a band saw. I have a lathe that is still in the box, and though my thoughts of grandeur had me all over the map of what to do with that, you've given me ideas that working with smaller pieces like this is probably where my niche lies. Thank you very much for the excellent tutorial!
For the cut in the top if you haven't already done it you can make a small mitre box jig, drill a hole in the bottom for it to rest in
Hello, I am a teacher in Mexico, I loved your idea. We make chess pieces with homemade lathes, and what you have done in your video will help us a lot to improve the pieces, greetings and thank you for your video, I hope you can upload the way you made the piece that holds the burin.
Thanks for your kind comment! I had to look up the word 'burin' - do you mean chisel or cutter ? Its pretty simple - you can figure it out if you study the close-ups at 4:40. Remember - you have to make it so the cutter ends up at the centre line of the spindle, that way it will follow the template precisely. That's why I used carbide tools, because theyre designed for cutting at the center. Basically just make a simple wood block that can slide on the surface. Then attach the cutter / burin to it however you can. For instance I clamped it on with another piece of wood and some bolts. For the follower that follows the template, it should be at the same height where your template or chess piece will eventually be. For instance, I made my follower from a nut washer that happened to be the same size. I made mine adjustable in/out but it can also be fixed, just make sure it's in-line with the cutter head.
Love all of the gigs and templates you made! Thanks for sharing
Love your improvisation. Nice explanation, was very informative. Thanks.
*ASSALAMU ALAIKUM*
You've done a very good job. I think that your slight variations between pieces adds to the value. they are hand made pieces the variations just prove that they are not a product of CNC or similar. They are great be proud
Its quite helpful for those who really wish to learn Lathe jobs.Thanks for the nice upload, watching from Pakistan.
I have just CAD designed something very similar to this, to copy about 20 stair baluster spindles.
So, it's nice to see how much my projected design corresponds with your proven design.
[My one difference, so far, is that I've extended the block holding the cutter, and made a handle, like a saw handle in it.]
Thanks.😊
.
This is similar to a product produced by an Australian guy to freehand turn metal objects. It is called the "Turnado". I think you could pick up a few fine tuning ideas from his design. That said, I think your execution of the idea is excellent. Well done, sir!
Amazing, I'm going to look that up. Thank you!
i was thinking the same thing. The Turnado is very well thought out
It’s a total ripoff of the turnado system!
This is really a cool thing to have for replicating a lot of pieces. For the notch in the bishop, id get a set of needle files or dremel with the small diamond heads. Nice work.
Respect to anyone who can make a chess piece, not to mention a chess set!
The small benchtop Wen lathe is doing ua-cam.com/users/postUgkxKGVtPhqZBB5AQXXFlU2kdd4mQhO6wlhl just what it was desighed to do, turn small pieces. This product is workig very well in wood and plastics, I wouldn't recommend any metal turning on it though. Overall from an old tool guy, I highly recommend this lathe as long as you realize that this is for small turning only. I bought this a few weeks ago and have noticed the price has gone from $174. to $249. Might want to get one sooner than later.
Ok a good idea. I have some suggestions to maybe help you. Sorry if they have already been said but I'm looking from an engineers perspective.
To get a true copy your cutting tool shape must match the form follower exactly.
you mention the rotation dragging/snatching the cutting tool. How about elevating the copy platform, this allows you you extent the toolholder base (the edge under the follower) forward to counter the forces. you could also set the copy platform further back. As long as the same offset is used on the follower to tool edge as machine centre to form centre it should not matter. It will also give it a bit more weight allowing more control.
Lastly to combat the waste and dust problems connect the vacuum cleaner hose to the tool post, you have quite a solid block of wood. stick a hole in it and add a nozzle directly under the cutting tool. I might not catch it all but should help.
good job, the same technique of copying keys works in here as well..
Great ideas... I think the diamond shaped blade needs also a diamond shaped follower. Maybe even a very fine cutter for the details as a third step...
You can drill a hole in the bottom of the blank to get the hole for the weight. Makes parting off easier as well.
I prefer the copy, much more beautiful !
Thx for tips i will do the same
Greatings from France
I used to feel the same way as you, then I changed my opinion and now feel that making each piece individual and unique makes a hand made set that much more appealing and something worth cherishing. Nevertheless, this is an interesting technique and jig.
😊👍
I noticed during your turning process that you were swinging or sort of sweeping the cutter which affects the angle of depth whereas I feel the cutter tool needs to be completely perpendicular to the piece being cut and followed. Just my $.02. Great instructional video. Thanks!
Agree
Looks like your jig is slightly off. But man that's a dang good idea. That's really impressive. I'm a machinist by trade and I love seeing ppl come up with ideas like that to duplicate their work. Really nice job
Well thought out. I am impressed. This solves many problems.
I think your design is very logical, good job!
Of course it is. He stole the idea from a machine that's been used for decades to copy.
Great!
I shall go on this for a trail, it seems great for small pieces. Thanks for the time devoted to explain the pros and cons of this.
Great!!!
You have a very good diction. We understand every word you say.
Really nice, careful work. Possibly keeping the tool shaft perpendicular to the rotation axis at all times would improve the accuracy. Admittedly this is darned difficult to do but maybe you could use your set square to maintain the perpendicular - and having an assistant to oversee this might help. But it's a pleasure to watch you at work - and thank you for an excellent video.
Very clever. Just like what a key cutter uses to duplicate keys.
Lining it up (especially repeatedly) can be made a lot easier by drawing lines on the table and on either side of the model jig.
For the table, you can get the centre with a (plumb bob, spirit level or a) large square and use a square to continue the line.
For the model jig, you can mark a squared line and use it to drill the holes by which the model is centred.
Taking it further, you can make sure that each model is lined up and centred at the same distance from the inside edge of the jig and with everything in place, put a fence on the table, so that lining it up is as easy as pulling it into the fence.
Love your "home shop" engineering.
Came across your video and I must say that I'm very impressed by what you have done with your POS lathe, by the way I have the same lathe and was thinking of making some sort of a platform to reproduce a way to repeat / duplicate the same item over and over - you have solved the problem for anyone that has a mini lathe. I also have a big floor model wood lathe that I do a lot of turning of table legs and as small as chess players.
Haha you're absolutely right, it is a POS. I've broken almost every part on it, the headstock collapsed and I had to rebuild it, the live center is completely destroyed, etc. But its 150.00 CAD so I can't really complain. Its funny I've never even seen a better lathe in person, let alone used one. I'm sure a proper professional lathe is a revelation as far as quality and solid-ness.
We had a lathe in the woodshoop class when I was in High school. It had a duplicator. Now I wish I had spent time using it so I knew the basics of how it worked and could do it on my lathe now.
Nice. Well done. I often thought about sculpturing a complete set of chess pieces and always set the idea aside not sure if casting or turning was a method of choice. I do have a lathe now. It's a bit big by being a Shopsmith but you demonstrated its doable. I'd probably leave the slot in the Bishops hat off my piece. It's a difficult operation to achieve once turned and it needs not be identical. The Knight will take a bit of hand carving. Good thing there are but four.
Put a magnet in the base. Then you could have a metal sheet under the top layer of the chess board. And if the chessboard has drawers for the pieces, you can have a metal strip to hold them in place while they are in the drawer.
Another thought....steel bars from the original piece base into the vase of your moving tools. Fixed on the original side. Wide slots on the tool side. Solely to hold the tool down. Maybe a piec that captures the rods and and wraps around the foundation to also help the piece stay flat. Got another idea but I can’t think how to describe it. Roughly tool and original are on guide bars that slide toward each other. Big spring(s) push(es) them apart. Tool is riding a sliding dovetail left and right. Keeps the tools 90* to the work. Allows left/right motion. Should help with keeping the tool from lifting in the middle. The piece the tool is riding on can be clamped to the back the table. Keeps it from lifting in the back. I’ve got a picture in my head. Wish I could click “share....”
An ingenious solution, thanks for the idea!
Самый простой способ копирования! Беру на вооружение. Привет из Санкт-Петербурга! 💛💙
To make the notch you may be able to add a jig that holds a dremel tool with a cutting disc and cut the slot while it is still mounted on the lathe.
Excellent work. Could the reason it came out a bit thinner be that you were turning slightly sideways with the slider. When sideways it tends to cut closer to centre. Wonderful to watch.
sensational work, wonderful technique, I am fascinated with the game of chess I made my first chess by hand, with a broom handle, and I always wanted to know how they do it on the lathe, thank you
Ingenious! I’m about to start making chess pieces and was thinking through how to replicate the sculptures. Thank for sharing your insights. Blessings!
I'd love to see how you made the knight! Beautiful set-up. thanks for sharing.
Just what I was looking for! Thanks, it will help me greatly
As it is hand made, why not make the pieces individual. As one set is black and the other white, pawns could be different colours or from different woods to make them individual. The copy attachment has merit and needs some work so the tools don’t bend forward. This could be simple blocks on the side that attach under the base.
you can also use this same method to enlarge or shrink the final size, moving the follower further out than the cutter will enlarge it, closer in than the cutter will shrink it.
Yes I did that the other day - made a really 'fat' King by moving the template piece
Very clever and useful jigs and techniques - I think the reason you didn't get the full profile is that your follower is too thick to follow the narrow indentations. Really nice. BTW the fact the pieces are not exact copies actually adds that je ne sais quoi of hand made and not machine assembly line exactens.
I've been trying to design a copy system in my head, but I might try to duplicate yours. Maybe can add some kind of rail system with a screw or two to keep things at an exact depth. I don't know, but I'll try what you have so far.
I'm sure by now you've sorted this all out but when looking at your rig to cut the base off, the part that rests against the side of the whole base rig, I'd make it an upside down L-shape to keep it flush with the top and the side at the same time. Also for the cutting of the bishop notch, have you ever seen a Fractal clamp? They are bonkers cool and can clamp just about anything regardless of shape. The you can just cut into it with a had saw or similar. Other option would be to build a holder for the piece that is the inverse shape of the piece that would allow you to cut with a band saw or something. Just ideas that I'm guessing you might have sorted by now but wanted to share.
I just HAD to google that fractal clamp, never heard of one but having seen the images , , WOW . I've learned something new. Thanks.
You did just great love the simplicity ❤
I see that you have 9.99K subscribers. I hope I'll be the 10,000th... Great channel and interesting posts and tips. Thank you!
Very clever and simple copying implementation. Something I need to try :-)
For the rougher you could have it offset behind the follower by .2mm for example, leaving only .2mm of material for the finishing tool.
At 14:12, the tool must be kept perpendicular to the work (if you want the model to be duplicated properly!)
I thoroughly enjoyed your video, thank you for sharing your know how!
Maybe the plastic joint makes the thickness different?? The timber piece doesn’t have that joint as it’s one piece.
Great work!! 👍🏼👍🏼
You have a fantastic idea there and I fully intend to copy what you are doing and try it for myself, So Thanks. I suggest You mark a grid on your board or perhaps a slidding square so you keep the profile follower and tool at as close to 90' to the job as possible and I (Think) you will get a better copy. Or maybe if the follower and the tool are the exact same width and shape?
Also you/we could try putting the original on a small bridge to allow the cutter holder to have an extended fore foot that slides under the original and makes it impossible for the tool to bite and tip forward.
Great video. Concerning the slit, you could first cut it into the stock itself before shaping it. Of course chip out and splitting now becomes a major concern. Alternatively, you can make a clamping jig that lets you run the shaped form along the table saw. It could be as simple as splitting the 12 mm stock in half, carving out the appropriate recesses for holding the top and bottom of the bishop, clamping it all together, laying it on its side, setting the blade angle, adjusting the fence, and making a pass... _et voila._ Just a thought 🤔
Awesome and creative idea - love it!
Wow works great and very simple design.
The way you did it is a lot faster than measuring and having a steady hand over and over...I'd have done the same thing.
A simple ring clamp attached to the base on the vertical plane to the right could probably hold a vacuum tube and make clean up a breeze.
I saw a similar setup in an old router handbook a long time ago. The idea there was using a drill to turn the workpiece and using the router as the cutting tool. I've thrown one together just to turn custom dowels occasionally and it works great.
Very cool. Thanks for sharing. Just thinking about it. You could try to drill the hole first on the lathe using the tail stock, then reverse it on the Chuck. That way your hole is dead nuts center.
My thought exactly. I tried a copying this same idea from a magazine suggestion about four years ago. This is a great improvement. Thanks Teacher. From a Montana woodworker
That Genius 👏🏽👏🏽👏🏽,, it’s same the idea of copy keys ,, I think if you don’t want miss the small details you must make the down Head so thin so you can make good copy
Brilliant! A 'duplicarver' for the lathe.
Good name for the system!
works like key cutter, nice
Your follower/stylus needs to be the exact same shape as your tool or you end up cutting away more or less whenever you angle the entire jig as you traverse the piece.
This allows you to get the correct cuts as you angle into corners etc.
Excellent system. Thanks for sharing your ideas.
Excellent. I have an upcoming use for a system like this - I need to make handles for a set of 8 chisel irons.
all you need for the notch in the bishop is a small nick with a scroll saw or even a junior hacksaw, maybe even a small dremmel type saw blade. for the knight etc , maybe some very careful whittling.
Genius!! Can’t wait to try this
Thanks
Awesome you really answered a lot of questions for me thanks
Great video and such a simple idea thanks, might try something like this on my metal lathe
Good work man, and very, very clean workshop. Mine is like a cave :)
In the new era of chess sets, especially about Staunton! Two things may be the future chess sets: 4 queens in each chess set (2 queens in each colour) and the old marking of a rook and a knight in each colour to recognize between queenside and kingside.
Awesome work my friend 💯
Мне очень понравилось.Отличная работа.Вам Здоровья.Спасибо.
nice workshop, clean and tidy