Lightsaber Effect in Photoshop Tutorial

Вставка
- Опубліковано 20 жов 2024
- Download assets for this tutorial here: www.nucly.com/...
BONUS: The download assets includes the layered PSD of the composite (something I usually do not include).
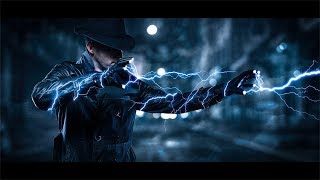
In celebration of Star Wars Day, here is a short tutorial on how to create a lightsaber effect in Photoshop. This is actually one of the first tricks I was taught in Photoshop and despite a whole lot of new features and upgrades in Photoshop over the last 15 years, this is still my preferred method for creating a lightsaber!
I used a flare in this composite from my Lens Flare pack, which you can check out here: www.nucly.com/...
I also used two light leaks. You can see the full pack here: www.nucly.com/...
If you’re diving into the world of Photoshop Compositing or editing, check out my Photoshop Starter Kit! It includes more than 175 FREE assets, including flares, overlays, camera RAW files and more: www.nucly.com/...
-
Don’t forget to SUBSCRIBE and turn on notifications! And likes and shares help a lot too!
Check out my full professional Photoshop training courses here: www.nucly.com/...
And all my asset packs here: www.nucly.com/...
-
Follow me:
Blog - zevendesign.com/
Facebook - / zevendesign
Instagram - / nuclylearn
500px - 500px.com/rika...


love how thorough you are cause most poeple just say do that but never how to do it which leads me having to rewind 20 times and trying to figure it out
Great tutorial enjoyed doing this thank you.
Thank you for making this! Very helpful
Thank you so much this is so good I have Great Grandsons and I am going to use this to see what I can come up with. so glad I found you Melody
I like this technique, thank you for sharing it!
Hi Rikard, thanks for another awesome tutorial. Could you please do a tutorial on how to do the jet booster effect from a spaceship like an X wing? Thank you
Legend 🙌🏼
Hi Rikard Rodin Love, your Photoshop work.
Awesome. Cheers m8
Thx this was very helpful
thanks dude
I just applied this technique via your "orb" tutorial & I really love the look. (Even made a shortcut key for the gaussian blur, like you recommended). Thanks for sharing this technique!
Nice. You can also turn the whole thing into an action so that it requires a single button click.
@@nuclylearn How would I be able to create an action that would allow me the flexibility to change the glow's color?
@@richardmendoza4389 add a dialog box to the hue/saturation step of the action. Then, when you run the action, it will wait for your input before continuing. Alternately, in the action, apply the hue/saturation as an adjustment layer, clipped to your glow. Then you'll be able to adjust it after the fact.
@@nuclylearn Great advice. Will try it out to see how I do. Thanks again!
@@nuclylearn one-click action: mission accomplished! (may still need a little tweaking, but, for the most part, one [click] & done!)
Starts at 1:15
Top Job! Thank you!
when i do this i get kind of a “boxy” glow around my lightsaber, like you can see a straight line when the glow stops, do you know how to fix it?
If it's banding, changing your image to 16-bit and adding a little bit of noise to your background should solve it.
Awsome!
Darth Vaders lightsaber gone jedi
nice technique
Your site is down. 502 Bad Gateway
Thanks for the heads up. The site is up now.
what about the bit at the bottom
That's a light leak put on the screen blending mode. You can check out my set here: www.nucly.com/Bokeh-and-Light-Leaks-Brushes-and-Overlays