15" inch Late 2013 Retina MacBook Pro A1398 Screen LCD Display Assembly Replacement Repair

Вставка
- Опубліковано 6 жов 2024
- If my videos helped you save money, please consider helping me continue to make these videos by sending me a little appreciation, even $1 would be greatly appreciated. Thanks! :)
Venmo:
"@BinhVu" Last 4 Digits if it Asks Are 6734
Zelle or PayPal (friends and family from a bank account so they don't charge any fees):
itsbinhrepaired@gmail.com
Patreon:
/ binhrepaired
Feel free to mail me your old electronics or parts you replaced during an upgrade.
Mail:
It's Binh Repaired
1288 N Hillview Dr.
Milpitas, CA 95035
Tesla referral link: www.tesla.com/...


Cảm ơn Binh, saw your video here and saved me a lot of money of just replacing the screen then buying a whole new laptop. Also learn something new too.
Glad it helped. If you haven't already, please like and subscribe so others can find my videos. Thanks!
Very detailed! I'm not replacing it but removing it with an external screen. You saved my day!!
Glad it helped. If you haven't already, please like and subscribe so others can find my videos. Thanks!
great vid, had a bit of trouble with the alignment but just tightened the screws in a different order and got it pretty close. With a working screen, I feel whole again.
Awesome, glad it helped!
Thank you so much, it helped me a lot! I've been waiting for the screen the last 6 years and I finally replaced today.
Glad it helped. If you haven't already, please like and subscribe so others can find my videos. Thanks!
Thank you for this video, now my good old mac is saved
Awesome, glad it helped. If you haven't already, please like and subscribe so others can find my videos and possibly consider watching a few others to get the algorithm to recommend my channel. Thanks!
Great instructor!! Thank you sooo much!!!
Thanks! If you haven't already, please like and subscribe so others can find my videos and possibly consider watching a few others and commenting to get the algorithm to recommend my channel.
I wanted to let you know that I successfully replaced my computer screen without problems. I really appreciate it.
@@xiomseg awesome!
2:59 thank you so much for this.
Glad it helped. If you haven't already, please like and subscribe so others can find my videos. Thanks!
Thanks for the video! It was very helpful!
Glad it helped. If you haven't already, don't forget to like and subscribe so others can find my videos. Thanks!
great video and camera equipment to record every step.
Thanks!
Great video..The cable you had trouble with slide out. It does not lift up.
Hm?
thanks so much!
Glad it helped. If you haven't already, please like and subscribe so others can find my videos. :)
Hi, great video, I had two Macs and had to swap the screens over. The first worked like a dream, the second won't turn on. The keyboard lights come on but nothing else. I've checked the battery has been connected properly and it looks secure.. Any ideas gratefully received :)
Hmmm you're certain the replacement screen is good?
Great Video. Where did you source the replacement screen please?
Not worth repairing anymore :( amzn.to/3ST5hbF
@@ItsBinhRepaired why not?
@@estebansolano the screens are so expensive. It's really up to you though.
What are those last resets for?
@Victor458i Google pram and smc reset. It's too much to type here.
Where is your T8 screw driver from?
amzn.to/39ErN6L
Does someone know if i can replace it with an older or newer model screen from an other MacBook pro maybe i cant find the answer
Answer is, if they don't set it's compatible, assume it isn't.
12:14 pause
Why?
Is MBP 15” 2013 L screen suitable for MBP 15” 2015?
Ask the seller. I doubt it
@@ItsBinhRepaired I asked it can be suitable but a few obstacles that’ s why we should don’ t use 2013L/2014 with 2015
Am still not see noting on my screen. Can u help.
Either dead screen, dead backlight circuit, or dead logicboard. Needs to be sent for repair.
@@ItsBinhRepaired a new screen I bought online.
@@306onthetrack6 did you do the battery drain before removing the screen? If not, you fried the backlight circuit.
@@ItsBinhRepaired. The battery not good. I mean.
@@306onthetrack6?
You didn't replace the screen. You removed it. Needed a video on replacing the screen.
So instead of putting back the old one, put back a new one?
@@ItsBinhRepaired yeah, I'm having to actually take off a broken LCD. Like removing it from the case.
You'll end up breaking it.
@@ItsBinhRepaired what do you mean? I replaced the screen. But now it keeps twitching on and off
@@dddduu300 sounds like a faulty screen or something else is faulty
Great I was able to replace my 2013 late 15” just fine.
Thanks
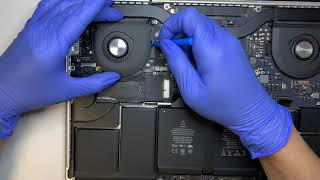
BE SURE TO clean your fans and the fins of the dust bunnies using compressed air and a brush.
Because they need it often and you can without taking anything apart once the bottom cover is off anyways!
-
Also on my 15’ late 2013 MacBook, I also was able to fix for free the swollen battery 6 pack, causing poor track pad clicks and a swollen bottom cover, using this method:
ua-cam.com/video/hoOIb6pZ6vo/v-deo.html
I used scotch tape with a tape tab handle in the middle by pressing a middle fold together, to keep lifted the top center of a pack. Then pierced through with a needle, one hole through-by the tape tab. Just enough to make a hole in the top skin of a pouch. So I didn't go deeper with the needle and touch the needle to the inside battery material at all. You know as soon as you are through the cover, the needle resistance is gone.
Then there was a slight odor, like a fart, the small amount of trapped gas causing the bulge escaped. I removed the tape w/lift tab.
Then I used a vacuum to suck on the hole which got the pouch totally deflated. At the same time I took the vacuum nozzle away, I placed a scotch tape over the hole. So resealing the pouch. I did this to all 6 pouches. I added a second piece of tape for good measure over the holes.
Now my track pad clicks like new and the bottom cover fits over the battery pack like new.
Some of the reviews on replacement batteries are bad and I think my batteries will meet my limited needs for some time now.
Take care
@JimTMcDaniels1 uhhhh The fumes you release from that are very toxic. I hope you did it outside at least. Also, letting oxygen into the battery can cause it to burst into flames. Be very careful with that.
@@ItsBinhRepairedit was a fairly vague odor which went away quickly.
Metal Cell lithium batteries have a one way vent. I don’t believe it’s so dangerous to let the gas out once if done like I did. It needs it. In fact seems safer to get it out. I didn’t pump air into the pack. I vacuumed it out and then taped over it.
Water getting in seems would be the real concern and the tape over it plus my MacBook doesn’t go in water.
The hole I made was so very small. Just a needle tip.
Take care
@JimTMcDaniels1 there's no vent in the batteries. That's why they don't deflate. The smell means you inhaled it. :( make sure to at least do it outside if you do it again.
@@ItsBinhRepairedthe vent I referred to is the metal cell lithium batteries. Seems the pouches should have one too but don’t because of size and expense.
I’ve had much more hazardous farts in my face when sitting behind people.
Other people have done what I have with great success.
I got out of living in mind thoughts fear when I got out of the Catholic cult.
Take care
@@JimTMcDaniels1 lol OK