Multi-Dimensional Stains & Paints in 1 night! Stenciling with gel stains and acrylic paint.

Вставка
- Опубліковано 8 лют 2025
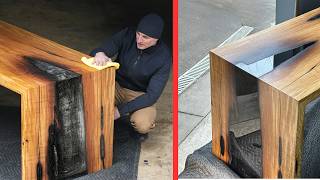
- Poly-Over and Mask-over techniques for stenciling gel stains and paints for an awesome look. Here's a start to finish look at how to get the designs you want with products you'll love. They may not be
cornhole boards but the techniques are the same.
Check out some of our other videos for application techniques to save time and get a clean unique design. Use the product links below to save yourself some time shopping.
Products I use:
Vinyl Cutter with Software
amzn.to/3jz6JyO
Oracal 631 Vinyl:
amzn.to/3iILPwK
Transfer Tape for Vinyl
amzn.to/2Cafr5U
Rubber Roller:
amzn.to/38RBnyv
Verathane Water Based Poly Spray
amzn.to/2WmjlPY
Gel Stain Java
amzn.to/308nng2
Gel Stain Black
amzn.to/2Zsnh3B
Gel Stain Georgian Cherry
amzn.to/3j1NaPA
Gel Stain Gray
amzn.to/2CAKG9U
Acrylic Paints
amzn.to/2CvVshY
Brushes
amzn.to/3gQOYsO


Wow! That came out great. Guess I need a vinyl cutter now. Every week a new tool
Go for it! There's a learning curve for sure but you'll love it. Also, endless supply of window decals!
@@cornholecollective7116 awesome!! Fan of you work. Wanted to ask you , why use the gel stain opposed to the liquid? Is it because of the bleeding? Thinking of trying this at home.
@@bigjesskennelz Thanks! Yeah, Gel stains are thick like Jell-O and don't soak into the wood much. 1000x better for stenciling designs than liquid stain.
@@cornholecollective7116 thanks for taking the time to respond. Again, awesome work!!👍
Amazing work
Thanks for watching Alex!
Just the video I needed. Will be trying this soon. Thanks!
Great timing! Good luck, add comments if you have questions.
I've learned a lot watching your videos. You've been an inspiration.
Thanks so much! It’s fun sharing our hobby and knowing it has lots of applications for builders and artists.
Thank you so much for this video! I'm making some really nice cornhole boards. I wanted to replicate some designs I saw but couldn't figure out how they stained the graphics. This video was incredibly helpful!
That’s great to hear!! We’ve got two videos on preventing stain bleed and four different methods for touching colors that may also help. Good luck 🤙 and thank you for watching!!
Wow this turned out really cool! The mountains especially look incredible! We make stenciling tutorials and love checking out fellow crafters for Inspo!
Thanks! I’ll check out your vids.
Awesome video!! So many questions answered regarding how you go about doing the mountains with one piece of vinyl? Specifically, you stained the Java, then peeled off more vinyl to stain the next two colors. I'm impressed! I had to watch several parts over to figure out how and what you were doing. How do you keep track of which parts need to be weeded out for each step? Thanks for the great content!
Thanks! I think of it as paint by numbers and start darkest toy lightest spraying each area after it’s stained. Only works with brown shades
So with the cutter you had each layer cut in one vinyl and the just removed what you wanted for each layer?
Scott I’m loving the videos. I aspire to be at your level some day and if I get there it will be in part due to you and @burleybags willingness to share your knowledge with other aspiring sawdust makers. I’ve got a couple of questions. When you seal the stain in with the poly that section of the wood will no longer except stain correct? Assuming that is a yes answer, then you weren’t using stains for the colors on the Toyota off-road logo. Those were acrylic paints?
You're right Sean, the Toyota Logo was acrylic paint and there's no "poly over" technique for paint so I did the mask over technique instead. In fact, you can see where the yellow paint blurred the black stain a bit. I wasn't too careful with this one, wasn't enjoying the 107 degrees after a couple hours. Tag us in any posts you make on your projects! Cheers
Great video! I've learned quite a bit from your videos. You do some amazing work. Question for you: do you cut all of the layers together and only weed when you're ready for that layer? Do you start with the darkest color and work your way down to the lightest color?
Thank you Mike and yes to all of your questions.
Excellent video, thanks for sharing these tips. A couple questions I had was how long do you let the stain dry before applying the poly spray, and then how long do you let the poly dry before staining again? Also, does this work if you are putting lighter colors like white paint up against a black stain border, or does the white cloud over the black border? If that makes sense..something like the KC chiefs main logo with a black border and white arrowhead on the inside
Great questions, this particular technique is only for gel stains over gel stains. Paints will always cover other colors so you’ll have to carefully mask the edges you don’t want to paint over. For this project, i didn’t let the stain dry much because I was doing the whole design in a couple hours or so. I let the poly dry for 20-30 min before applying the next lighter shade.
Great Work and Detail. Thanks for all the videos. Ready to stain my first boards (just making a couple of sets for birthdays). We (my daughters are helping) are using painters’ tape as the stencil. In any case, after you stain, do you spray the Poly immediately? After spraying Poly, how long before can lay something (painters’ tape) on it? I was planning to wait a few days, but time is becoming precious. Thx
You can mask over the poly spray after 5-10 minutes. Keep in mind that any stain applied over poly'd stain areas will discolor it a little bit so you may want to leave the poly'd stain fully uncovered so it's uniform. I didn't do that in this video because it's not for a client and I don't really care if the dark areas were a little uneven. Welcome to The Collective!
Really nice work! I don't make cornhole boards, but I'm very interested to know how you drew the vectors to to get that effect in the mountains for my own sign making and art. I use Vectric Aspire for my hobby CNC work, if that makes any difference. Any help would be appreciated. Cheers!
I wish i had better graphic design skills. I find images that vectorize well. High res, digital images, no shading, clean edges, then let my software do the work. I manipulate them as I apply the stencils. I made the Toyota logo for my local off road club, and my logo but those are pretty basic.
I am a complete novice when it comes to vinyl and I was just curious if you have any suggestions too vinyl cutters and material, or can share what equipment/programs you use, thank you!
Hey Stephen! Thanks for watching. I’d suggest checking out CornholeCollective.com/supplies we have links to everything but the wood. You’ll need a vinyl cutter, vinyl, and transfer tape. A wide squeegee, roller, and weeding tool make it a little easier.
How long did let the stain dry before putting on a layer of verathane to apply the paints?
We’ve found that spraying varathane for the “poly over method” can be done immediately after stain is applied. You’ll want to let it dry to the touch before layering the next stain. For brushing a varathane over the stain, you’ll want to let the stain fully dry which requires at least 24 hours (48+ for black), and even longer on more humid regions.
@@cornholecollective7116 Thank you for the info. The videos are great!
You’re very welcome! We’re so happy you’re enjoying them
When you weed the mountains are you just randomly selecting different parts to pull to put down a different color?
I followed the shades from the original image. The darkest shades hot GF Java, medium shades of blue got GF Georgian Cherry, lightest got Verathane Cherrywood.
Scott fantastic work and love the stencil cutter but since I'm making cornhole boards for friends and family, can't justify a cutter. I have stencil materials so do you know a good reference cutting stencils manually to be able to use your staining techniques? Thanks, Dave
Hi Dave! Welcome to the collective! I cut “stencils” manually for years before I learned about a vinyl cutter. There are three methods I know of... i should make a video to torture myself some day. 1. Lay frog tape across your board first and make sure it’s pressed down well, use a projector and a laptop to project, trace, and later cut with an exacto knife. 2. There’s some type of paper you can print images on and then press it on to the tape. Then Cut. 3. This is a weird one but effective, You can use rolls of White drawer liner as your masking vinyl, display the image you want on your TV by using it as a monitor or some web-enabled device. Trace the image from your TV on to the drawer liner. Apply it to your board and xacto cut the areas you wish to stain or paint. Are you sorry you asked? Lol.
@@cornholecollective7116 Hi Scott, great minds, LOL. I started to do the trace using cast to big screen and trace on masking paper but ended up hand painting. Since then I found a masking fluid I'm going to try. I do art work (watercolor painting) too and have some experience with liquid masking. The product is Peel-Tek Crafters Edition Masking Fluid (4oz). Thought I would try it for organic shapes though I would give it a try. You ever try liquid masking? There are lot's of demos out there but here is one more applicable to CH boards ua-cam.com/video/NxLxW-Rz8tc/v-deo.html
Awesome work! Very inspiring. I'm about to build a set a Cornholes boards and have a simple design for each. I was wondering what type of lighter color do you like to use. It would be in contrast with the birch plywood color. You use Java a lot but I don't know if that would look good when using only one color. Thanks and keep up the good work!
Thanks Gregory! It really depends on what look you're going for. I've done some wedding boards that were majority Java masking the design, hole, and border. Those turned out REALLY nice. If you're going for majority natural grain with something simple in single "medium" shade, mahogany is nice.
@@cornholecollective7116 awesome thanks so much for the advice
Anytime, message me on Instagram and I’ll share some single color stained wedding sets to give you examples. @MossBoards
Awesome video Scott! When you were aligning the mountain stencil over the MOSS you already did were you eyeballing it or did you have registration marks? Also what was the clear transfer tape you used? I've only seen the white. Sorry last question. What vinyl software you use and was it hard to learn?
Howdy! You can find clear reusable transfer tape at hobby lobbybor Michaels. I don't live how high-tack it is hutbit helps to align intricate stencils. This particular design was all one stencil. i use VinylMaster software, it came with my UsCutter machine.
@@cornholecollective7116 did you just eyeball the alignment then or have registration marks? Thanks for all the info!
How do you know which pieces to weed out for each particular color? Do you just have a map that you refer to?
Yeah, just keep an image of the reference and weed dark to light. Easy to get mixed up.
This looks fantastic! Dumb question...are there not any technologies to allow for printing on wood? Like a screening process? Or does it not work on wood or just crazy expensive?
It’s cost preventative with flat bed printers costing well over $8k. Also, the finish isn’t as rich and doesn’t bring out the natural wood grain. It covers it.
How did you remove the large decal without pulling up the other two layers? Amazing work!!!!
Thanks! By the end, the large stencil was only covering the natural wood areas. the trick is revealing one color section at at time and going darkest to lightest, spraying each one so the lighter shades don't smear the darker shades.
Cornhole Collective thank you so much for taking the time to reply😊
On the mountains did you use 2 stencils or just one? I didn’t See that you applied another stencil for the 2nd color.
All a single stencil! Cool right? Gel stains in brown shades can be layered and if you use poly between coats they don’t smear. Darkest to lightest always.
@@cornholecollective7116 awesome! Just learning as I go here. I like this method a lot better than applying decals
So off of the one piece of vinyl, you're able to do your entire layout? There isn't any bleed through the cut lines of the next layers? I haven't tried it yet, because I didn't want to be the guinea pig! lol
Well Josh, YES One stencil to rule them all. Other than painting, I don't remask any more. You do need to be a little careful not to load up the gel stain much, that's why I wipe it off on the transfer paper wax side. works great. You can get a very fine line of stain coming through the cut lines if you're not careful. With practices and a fairly dry application, you can minimixe it. If it's bad, gel stains sand off nicely too.
I’m looking at using this method to apply stenciled designs to a raw guitar body, solid mahogany. Do you have any thoughts about using this method on mahogany? From what I’ve gathered gel stains are the key to avoid bleeding in general, though I see some people unafraid of rubbing it in (such as yourself) and others who are pretty precious about that to avoid bleeding. Thoughts on that piece? Love the channel man!
I don’t see why it wouldn’t work but you always want to test scraps first for color and stainability. Every wood is a little different ugh how it’ll take stain. I don’t know the first thing about staining mahogany except I’d keep the stains minimal on a beautiful, expensive hardwood.
I also use vinyl stencils on Cornhole boards. How do you avoid lifting wood fibers up with the transfer tape/vinyl? Is it the type of taper/vinyl you are using, because I have the hardest time not getting a bunch of tear out.
Hey Travis, it’s either the vinyl, the plywood, the prep, or the method. What I find works best is Domestic birch ply sanded with 320, dust removed thoroughly, Oracal 631, pull at a sharp angle. Almost no fibers come off. Baltic I use the same approach but fibers do come up a bit more. Heat gun can help reduce fibers pulling up.
Cornhole Collective i use Baltic birch because its really the only good plywood sold in my area, and I don’t use oracal vinyl. Looks like ill be needing to make some new purchases. Thanks for the reply.
When you peeled the first layer how do you selectively peel and leave the second layer ?
So, basically it’s color by numbers. The vinyl is transferred with the darkest color already ready to stain. I know ahead of time which areas will be stained medium, light, and bare wood. Spray before each new color and you’re good to go, no smearing.
@@cornholecollective7116 understood and thanks for the response great tutorial man going to give it a shot
Awesome! If you want to join our Facebook, we can give you pointers on layering stains there.