CO2 Laser Alignment and How to Clean Laser Lens and Mirrors / Beginner Series Ep. 5

Вставка
- Опубліковано 15 лип 2024
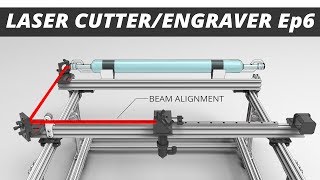
- This week, we're going to be looking at Laser Mirror Alignment on a 50 watt laser engraver I recently purchased. We'll also look at how to clean the lens and mirrors. Proper mirror alignment is an important part of your laser engraving machines maintenance. This laser cutting machine is similar to the popular k40 laser cutter and other Chinese laser engravers, so the setup process should be similar on most of them.
This video is the fifth in a series of videos I'm doing on co2 laser engravers.
*****Check out other videos in this series*****
Chinese CO2 Laser Engraver / 50w Laser Cutter Guide Ep. 1: • Chinese CO2 Laser Engr...
CO2 Laser Engraver Air Assist & Exhaust. Beginner Series Ep. 2 : • CO2 Laser Engraver Air...
CO2 Laser Engraver Water Cooling & Laser Chillers. Beginner Series Ep. 3: • CO2 Laser Engraver Wat...
CO2 Laser Software / K40 Whisperer & Inkscape / Beginner Series Ep. 4: • CO2 Laser Software / K...
CO2 Laser Focus / Focusing Laser Lens - Laser Engraver Beginner Series Ep. 6: • CO2 Laser Focus / Focu...
*********************
#mirroraligment #lasermirroralignment #laseralignment
* Official Website maketechcreate.com/
* Follow on Instagram - / maketechcreate


Better Engraving: Stock CO2 Laser Lens Vs. Cloudray Compound Lens ua-cam.com/video/UtMzDDbiT2g/v-deo.html
your vids make me realize that my laser lens, have been upside down this whole time. everything cuts faster now!! Thanks!!
best video for alignment i've seen. you cover everything. esp with the locking nuts and size wrench you need, and also including use of mirror for checking things. also you show how to use the focus screws. PERFECTION. THANK YOU
That's what I'm calling a good video ...
Thanks man!
Appreciate it.
Best video I've seen thus far on cleaning/aligning mirrors. Thanks for that. I actually used a pair of hemostats instead of needle nose pliers.
You're welcome and thanks for watching!
good idea if you can get them, i just used an angle grinder and ground down a small piece of brass plate about 3 mm thick so i can use use it like a screwdriver, it has two lugs at the bottom that go into the mirror holes then use masking tape to lift out the mirror, a lot safeer and does not scratch your nice shiny anodising which is clearly does in this video...
Wow thankyou that has made things much clearer great explanation
It was very important video for me. Thank you very much.
Looking forward to next weeks vid
Thanks for watching, Colin!
Such clear instructions , thank you
You're welcome. Thanks for watching!
Awesome explaination
Fantastic video for a new CO2 user! Which is me! 🙂. Many thanks.
Glad you liked it! Thanks for watching!
Very good video. Just one tip. When using mask tape for targeting I noticed the adhesive burned makes mirrors get dirty. So now only I use paper and double layer adhesive only on the frame. Slower but cleaner.
great detailed video!
Thanks for watching!
Thank you for this great vid
Glad you enjoyed it!
Awesome. Thank you sir
Thank you so much. That was so helpful. The written instructions for my laser were too complicated.
I'm glad they video helped. Thanks for watching!
Thanks so much! So helpful!
You're welcome!
Thank you for these videos. It made my life so much easier yesterday. My engraver seems to be better than new now!
I'm glad they helped!
Thanks for watching!
Thanks brothers..
You're a lifesaver!
Thank You
On point!👌
Thank you!
Thank you Sir.
You: 12 minutes including filming and explaining and mirrors are aligned. Me: 2 hours of moving mirrors and it's still not perfect.
It take a bit your fisrt time! ;)
Thank you very much :) :)
That was a good video to watch
Thank you!
Thank you sir
Welcome!
Thank you for video.Very helpful.Can you tell me how exactly to adjust my laser light to be in the middle of the laser path..now is shifted few mm
Great video thank you, can i ask a question please, these appear to be cloud ray mirror supports, what is the set of 3 nickel plated screws used for on the mirror support, I know the brass ones are for adjusting but not the screws with the spring??
Secondly a little tip, I use masking tape to remove the mirrors from the holder, just apply some to the rear of the mirror and it comes out perfectly, do same for reinstalling. I only ever use glass ones and i'm always afraid i might drop one so i came up with this to stop that happening.
for those that make money with their lasers you never know when a mirror or lens will break or burn ojut, I always keep a spare set, even if its a cheap set it still means you can use your laser and not wait a couple of weeks with down time for your laser.
I had this very problem with my laser head mirror on my K40, its has no adjustment on it and the beam was bouncing off the side of the air assist chamber and burnt out the lens. Since replaced the lens and mirror support to an adjustable one!!
Great Video But I have a question, I've seen one person cleaning the end of the laser tube , where the laser comes out in that joke is that necessary? Or is unnecessary?
Super helpful video. Thanks. I couldn't help but notice you machine bed is not a mesh screen but sheet punctuated with circular holes. I love this. Would you happen to know where I purchase a screen like this. I think maintaining and cleaning it would be so much easier than the honeycomb mesh! Thanks so much.
It actually came with the machine. I use a honeycomb mesh on top of it for cutting, but it does catch most of the pieces that fall through the mesh. Hope that helps!
Do you have any maintenance videos man?
great video. while opening the focus lens ring with plier i slightly scratch it. now no laser beam is coming out of lens whenever i cut anything. lens alignment is great but no laser coming out of focus lens.
If you scratched the lens, you should replace it. Get them on Amazon for cheap. Make sure you reinstalled the lens with the flat side down.
I think you mean "back off the adjustment screw an eighth of a turn" not an eighth of an inch.
If the alignment is not ok the reflectors become hot ? Or it is usual
Hi, what type of tape (green) do you use to test the passage of the laser through the mirrors?
Thanks for your videos, they help me a lot. 🤗
Most types of masking tape should work fine. I've found the thinner stuff sometimes catches fire, so try to us a thicker masking tape. Thanks for watching!
Can you post links to the materials you use to do this with please?
Nice share .. need some help
how do you adjust the focal length of the lens? thx
You either raise or lower your laser bed ... or you can change to a different lens type.
May I ask is are the mirrors have a certain side I need to use or I can use both sides? After I cleaned and aligned all my mirrors, I noticed that the power of my 150w CO2 laser dropped a lot. Now I am speed 5, power 100 to cut through 6mm acrylic for 2 passes. I have replaced a new co2 tube but the power is still weak. Thank you so much for the clear demonstration by the way.
The mirrors should only be reflective on one side. Also check that everything is aligned and the lens is pointed in the right direction.
I'm sure you're method of cleaning works fine, but when I do this, I wear nitrile gloves, use a blower or a gentle brush to remove any fine particulates before rubbing with a cloth and alcohol. I also pull out the mirror with a piece of masking tape, but that's just me.
Thanks for the tips and thanks for watching!
Hey dude.. what if the head itselft is not perfectly square to the table? The last test you did after you remove the lens could still be wrong even if the mark is at the center of the circle right?
I'm asking cuz i bought a new machine and i've been experiencing an annoying bevel on thick materials, like 10mm balsa.
Did you mechanically aligned your head to be square to the table?
Mine was level when I picked it up. I'm not sure what machine you have, but many have a bed that can be adjusted.
Thanks for watching!
CO2 Laser Alignment and How to Clean Laser Lens and Mirrors / Beginner Series
Hey, judging by the buckets in your videos you are in Canada too :) Where did your source you laser here ?
lol ... Yup, I'm in BC.
I bought it used, but the guy I bought it from here: ca.asc365.com/
Thanks for watching!
Hello brother our co2 machine is working but it doesn't cut. If I test the fire button it does nothing. Any troubleshooting will help 🙏 .
Use a volt meter to check for power to the bulb and also check the fuse.
Hi I am having trouble in laser 50w machine its all of sudden goes out of engraving or cutting area or get vary distance while engraving or cutting and also the water pump is not pumping enough water when its was new kindly help me , I have videos shoots of errors so if you allow I can share them with you, regards and thanks
Are your belts tight?
Make sure your water lines are all clear. If they are, you might need a new water pump.
Hey, did I miss something, did you say what power level to be testing at?
For safety reasons, I keep my power low when testing/aligning at 10%.
@@MakeTechCreate Thanks! I set my controller to 10ms pulse then started raising the power up to 95% & it didn't seem to make much difference from 40-95%.
@@Lpzn-us8iq 1% max is all you need really at 6 milliamps in lightburn, I sometimes go to 2% but never higher for a alignment test or the burn area is too large to tell where it starts from. It takes a little longer to start off but it does a better job and the risk of burning your hand in the beam is less....
Make sure you check out the complete playlist on this series here: ua-cam.com/play/PLePAC40zF5-38RbOYzfzgc-55Q6hCsM07.html
I heard that you want to test-fire the laser with the mirror set furthest away first. Is this true?
I've never done that way, but there could be a reason I'm not aware of.
It's always going to be "closest so alignment" the closer you are to the mirror/tube. So doing it further out just lets you see exactly how bad it's misaligned. Could potentially save a step.
Dots are comming up and down of each other
Sorry, I don't know what you're asking.
Alignment was fine, but that is NOT how you clean lenses and mirrors unless you want to scratch them.
lol ... That lens is still working fine after years of use and cleaning.
But, by all means, show us how it done!