*I totally agree with you : "Try, and try and try again still you reach your goal(s)!", that's a nice advise for our hobby (and for real life too!). Very nice fighter! 🤩👍👏👏👏*
I can imagine how sore your hand must have been after painting that camo. My toughest camo so far was on the Ki-44. Like you I experimented a lot with thinning ratio and pressures as well as trying to simulate the spray pattern in scale. Plane turned out great, thanks for the Japanese content!
Nicely done! Agree with your advice on self censuring yourself when you see a modeler you admire. Its too easy to get discouraged by it, but its a good attitude to nurture that 'everyone started somewhere...'
The Toryu Ki-45 when I was a kid. I never tried the Italian planes. They were the challenges. I also remember thinking about painting the beautiful hexagonal lozenge pattern on German WW1 aircraft and the the spiral on the prop of a scale Bf-109. Good luck with those hurdles.
Beautiful build and video. The camouflage is very well done and I know how demanding paintwork is. I use enamels for the spots over a glossy, acrylic surface. They're forgiving, a mistake can be wiped off and try again. The hardest paint work I've ever done was a tricolour SM 82, spots of brown and green over a camo yellow. Even the wellenmuster camouflage is very difficult. I never tried smoke rings but it will be my next challenge soon.
HAHA...I do the same thing with toothpicks for landing gear when I build so I don't damage the gear! Good stuff. Hardest camo for me was the 1/48 Kinetic SU-33. Just took forever to use the blue-tak to get the soft edge, make everything else, then the next color blue-tak & mask. Then you of course get ghosting so you have to go touch it up (3-colors)....just took forever. Regarding practice, I agree 100%. To those who are new, don't buy expensive kits to practice on. Both the Tamiya 1/48 Mustang and Revell Bf-109G (the 1990's tool) are very inexpensive and build into very nice kits. Lots of old 1/72 Hasegawa are easy, quick to build kits. You don't need a $50 kit to start with, nor do you need photo etch and resin. Just build out of the box and work on the painting and finishing stages. You can put $100 of aftermarket into any kit, but if the finish looks bad, no one will notice.
Great video, just right length, no stupid all music video here. Great narration, great build. This kit showed Tamiya they faced very serious competition from Hasegawa. My hardest camo I've done was my Otaki 1/48 KI-44 "Tojo" Fighter.
Agreed, practice, and try, try, try, then one day...it will all come together. but the main thing is...have fun doin it. Nice techniques shown in here, valuable to helping me step up my game. Thank you.
Nice work as usual. Just something I would like to see. It would be nice if, in the description of each video, you could list equipment used, like paints, kit, airbrush, micro drill, etc. I find it helps me look for tools I don’t have without having to rewind the video. I’ve seen other content creators list the computer equipment used, cameras, and mic as well. Keep up the great work.
Nice job on the camo. The inconsistent color saturation looks good and natural. Im building a Kawasaki Hien (again) and working to find the right mix of thinner/pressure on my paint mule.
Your camouflage scheme reminds me of the toughest one I've ever attempted, the desert scheme used by the Italians in North Africa. It's a patchwork of rough circles, each different. I made my own masks and a year later, someone came out with decals. Nice Frank, BTW. I had this kit but sold it for some reason. Your work makes me wish I'd kept it.
I just finished all 105 smoke ring decals for the Italeri MC205. I’m glad they were included because they went on really well and look great, much better than what I could freehand
Simply excellent! Only thing I noticed is that I think this particular aircraft had the symbols of three shooting stars painted on the engine cowl on both sides. But I'm not sure I'll have to check it.
Superb Model - I had the same aircraft and used the full Eduard etch and landing flap etch , plus the VECTOR resin engine kit replacement - great result for you , however
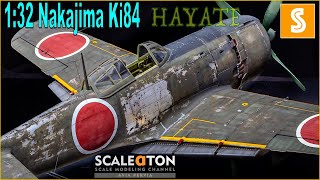
I love WW2 Japanese aircraft and the Ki-84 is up there.Excellent video and build.Your commentary of the subject and build as well as encouragement is great.👍
The toughest and most challenging camouflage pattern I have painted goes back many years, somewhere around 2003. The old Nichimo 1/48 Ki-45 "Nick" tein engine heavy fighter. I painted mine like the box art and it took many sessions of painting to get it right. It was painted with my trusty Paasche H single action airbrush. I now have a double action airbrush however, most of my current collection was painted with the Paasche. And I must say they look very good.
I haven't airbrushed a thing yet and have a Ki 84 and Ki 100 sitting on the shelf in their boxes laughing at me. Both 1/48 and Hasegawa. So I bought a little Agptek airbrush kit and the Japanese army color set in Acrylic.I believe for the Ki 84 I'll go with the decals in the box for the 22nd Sentai and I'm guessing they were green in China then grey when they transferred to the home Islands. For the Ki100 I bought decals including Major Hinoki of the 111th Sentai at the Akeno flight school where he was an instructor after losing a leg to .50 cal. He got most of his 12 claimed kills in an Oscar with the 64th out of Indochina and Chaing Mai Thailand, some against the AVG. He claimed one probable in the Ki 100 (Our records show 1 MIA and 2 returning with severe damage that day) I'll be picking up as much as I can from your videos so thanks for posting.
Realy nice build. Nice to see someone else has the issue of paint lifting after masking. That natural metal no matter whos product it is and how much one destickies the tape or frisket it peels somewhere, leading to feathering out the problem as best you can. The process of painting the color first then the metal can be difficult too.
Great job! Practice does make perfect. I've been lucky 1 or 2 times but metal finishes are definately a chalange and the Japanese mottling seems to be the hardest. There are a few German Eastern front squiggly and splotch schemes that can chalange too.
Very nice detail, that you added rivets!!! Many little helpful Tipps here and there, definitely have to watch it several times and of course to admire the Camo-Work you did. My hardest camo was perhaps a 3-tone-modern-camo on a tank :D Great work and Video!!! Thx for sharing!!!
Landing flaps as installed would defeat the purpose of Fowler flaps (widely used on Nakajima fighters) i.e. CURVE down to help increase lift. Also on the natural metal Franks the wing hinomarus would not have white outlines.
Wow I’m learning so much from the community of models builders on this platform. Amazing work. I’m building my 2nd real attempt at model building with a tamiya 1/48 mustang no going to bad. Going to try alcad II Lacquers
Excellent job with the camouflage and totally agree with your suggestion....practice, practice, practice.....even if a mediocre modeller (like me!). Really enjoy watching and listening to your builds so will be checking out what you have next on the bench. The hardest and possibly the most frustrating camo was a tricolour on an Italian Fiat G50. It turned out ok in the end but it took many hours of painting, touching up and repainting. Does anyone have any tips for any future attempts at the same scheme??
Very nice build/paintwork👍 I made it through with a similar paintwork like yours, om a ki61 1/72 svale. Maby it became a little rough but ok, also spots in german aircrafts is a tuff one. Good to se and hear how you do it, and you do it very well👍
This is elite modeling at a level I can only imagine. The attention to detail is truly mind-boggling. I fully enjoy watching you build, and get a vicarious thrill. Very inspiring.
Nice looking kit,the detailing of the cockpit is excellent for \48,mr metal colour is good for 'toothpick chipping' under acrylics too.Im building a \32 'Nick' and need some inspiration for camo scheme,cheers for vid.
fantastick camo work.. my most challanging one was for ICM B-26 in 48th scale.. I wanted to match worn olive drab from the box art and do chipping effect.. it wasn't easy, but I loved the effect at the end.. I need to think about other subject, that would require similar treatment
Im building a Ki 84 Tamiya kit from the 70s fit is not great and u used a photo etch kit for the interior. Im at the painting phase now and not sure what finish I will go with. My versus build will be the Hobby Boss F8F -2 Bearcat. I think i got lucky on the decals as they are still in good shape. Superb build sir!!
Once again .. amazing work and execution of detail. Really enjoyed the video. Thankyou for sharing your talent with us. Hope you have a great new year.
pretty camo work - the hardest camos for me are the italian ones (green "smoke rings" on light brown surface) and the silver/greeen combination with colorful stripes on Ki-61
Loved the build, and now really jazzed to start mine. I think my hardest scheme was a Hungarian Bf.109 - the combination of mackerel , hard and soft edges, painted insignia and tricolor fin flashes and winter whitewash meant I spent more time painting it than any project before it since. Also, an FYI, the Ki in the designation is romanized katakana キ and should be read as a word, like “key”
Freehanding for German aircraft has been my hardest so far, but my next paint job is gone be the Ki-61 and I’m really not sure how well I’m gonna do with my patience and the limits of my setup
Definitely patience and practice, that's for sure. I spent a few nights on a Tojo as a paint mule before going to the Hayate. If you put a lacquer gloss coat down and use acrylics, you have a safety net to remove the paint with water.
Great video and nice subject. My hardest paint job was a heavy conversion of a 1932 Ford coupe into a hot rod and painting flames that had to be the same both sides of the car. Yellow with sunburst red edges and then a white trim line around each flame. Nightmare!!
Great work! I really like the camouflage. The hardest camouflage/paint scheme I’ve ever done is an Eduard weekend edition fw-190 I had a lot of problems with getting the paint to thinner ratio right
The hardest camouflage for me, was paint brushing a splinter camo on a Stridsvagn 103 and the airbrushed Berlin camo one on my Chieftain Mk.10 (both 1/35).... But I will soon do a splinter camo with the airbrush on a 1/72 SAAB Viggen, so that will be a challenge xD
I find the tamiya basic one holds a lot better and sands nicer. The Vallejo one is water based which makes it easy to remove. So each works in its own place.
Great Job, I used an OLFA compass cutter and a punch set for roundels currently, no silhouette machine as yet. Hardest camo... spitfire with dark green and dark grey, black based, mottled over, thanks Doog, as that's the only camo I've painted thus far, ended up respraying it because I spilled IPA all over the wing, ooops! What do you recommend for masking alternatives, apart from Tamiya tape or low tac masking tapes? Srayed decals look quite good, its a bit more effort I agree, but its good.
Thanks for your quick response. I grew up in the 60's and am now getting back into building models. Mostly 1/72 WW 2 planes. I have a question about your airbrush. Do you dedicate one airbrush for your detail work, like you did on the KI 84 or use one airbrush and just change the needles as needed. Thanks again.
I'll take a look for that kit. The Hasegawa Japanese stuff can be a bit hard to find... especially when Woody is constantly on the prowl for any Japanese kits and doesn't tell me until he's had his pick haha
Your landing flaps need a little more downward angle. I see no cables for the radio antenna, these are hard on the ki-84 because there are a lot of them.
@@TheModelGuy Don't get me wrong, this Hayate is super cool. I suspect you can re-glue these flaps. The Hayate was ahead of its time, and used flaps similar to modern airliners. Instead of just rotate the lower skin of the inner trailing edge (like the Spitfire, which was of course a 1935 design), the whole trailing wing of the wing extended backwards and rotated downwards in three stages. That also increased the wing area, as well as delay stall. The Ki-43 flap design was similar, but the Ki-84 was even more advanced as the flap area was larger. And please do not call the Japanese army planes Kay-eye. Its KI, from kitai, which means airframe. Cheers, and I liked your Seafire 15 build.
@@TheModelGuy I obtain built models, but not so good in building them. I have a Ki-61 Hasegawa 1//32 which is so and so built, and I can tell that it is super high quality kit. I have been searching ebay for a well built and affordable Hasegawa Ki-84. I have seen that it too is a super well done kit. Good luck with it, but I doubt you need it. I am sure a splendid model will come out. Make sure you build a natural metal version, most are natural metal but I have seen some people do full camouflaged upper surface and grey lower surface. This was very rare occurrence in real life, plus I think natural metal makes the model look more ... metal rather than plastic! I think my "Maru Mechanic" book has a good description of the flap angle when fully deployed. By the way, as good as the 1/48 Hasegawa kits of the Ki-84 and Ki-61 are, the dihedral angle is not presented well, you need to bend the wings up a bit more to get it right. I did not get a dead front perspective of your model to see if your angle is close to "correct". Again, the maru mechanic shows this angle well for both 61 and 84. I think the 1/32 kit does not suffer from that. Cheers.
Bit of a shame you did not address that little mishap with unmasking at 11:30. Would be interesting to know how that got fixed. Nice vid and frankly very nice Frank build.
Try millibutterr. Donut of Milliput and a little Isopropyl alcohol. You can modulate the thickness and fluidity and get it anuwhere you want. Really awesome.
I noticed when you removed the mask over the hinumara it pulled up some of the red, leaving a silver area. Later in the vid it appeared you fixed it. How did you do that? I think the most difficult camo I have ever done was the mottling on German aircraft.


A beautiful model, and a great video. Many thanks.
Thanks Julian. Be sure to watch the newer vids too!
*I totally agree with you : "Try, and try and try again still you reach your goal(s)!", that's a nice advise for our hobby (and for real life too!). Very nice fighter! 🤩👍👏👏👏*
I can imagine how sore your hand must have been after painting that camo. My toughest camo so far was on the Ki-44. Like you I experimented a lot with thinning ratio and pressures as well as trying to simulate the spray pattern in scale.
Plane turned out great, thanks for the Japanese content!
Nicely done! Agree with your advice on self censuring yourself when you see a modeler you admire. Its too easy to get discouraged by it, but its a good attitude to nurture that 'everyone started somewhere...'
The Toryu Ki-45 when I was a kid. I never tried the Italian planes. They were the challenges. I also remember thinking about painting the beautiful hexagonal lozenge pattern on German WW1 aircraft and the the spiral on the prop of a scale Bf-109. Good luck with those hurdles.
This is a wonderful video. So much to soak up. Thank you for your sharing your skills and expertise.
Thanks bud! I’m glad you enjoyed it
Amazing, such a talented person!
👏🏻👏🏻👏🏻👏🏻👏🏻👏🏻great build and camo same at ki-61 tony I liked and the chipping over hinomarus great job 👍😁
nice paintwork!
Beautiful build and video.
The camouflage is very well done and I know how demanding paintwork is.
I use enamels for the spots over a glossy, acrylic surface.
They're forgiving, a mistake can be wiped off and try again.
The hardest paint work I've ever done was a tricolour SM 82, spots of brown and green over a camo yellow.
Even the wellenmuster camouflage is very difficult.
I never tried smoke rings but it will be my next challenge soon.
HAHA...I do the same thing with toothpicks for landing gear when I build so I don't damage the gear! Good stuff. Hardest camo for me was the 1/48 Kinetic SU-33. Just took forever to use the blue-tak to get the soft edge, make everything else, then the next color blue-tak & mask. Then you of course get ghosting so you have to go touch it up (3-colors)....just took forever. Regarding practice, I agree 100%. To those who are new, don't buy expensive kits to practice on. Both the Tamiya 1/48 Mustang and Revell Bf-109G (the 1990's tool) are very inexpensive and build into very nice kits. Lots of old 1/72 Hasegawa are easy, quick to build kits. You don't need a $50 kit to start with, nor do you need photo etch and resin. Just build out of the box and work on the painting and finishing stages. You can put $100 of aftermarket into any kit, but if the finish looks bad, no one will notice.
Great video, just right length, no stupid all music video here. Great narration, great build. This kit showed Tamiya they faced very serious competition from Hasegawa. My hardest camo I've done was my Otaki 1/48 KI-44 "Tojo" Fighter.
Agreed, practice, and try, try, try, then one day...it will all come together. but the main thing is...have fun doin it. Nice techniques shown in here, valuable to helping me step up my game. Thank you.
Nice work as usual.
Just something I would like to see. It would be nice if, in the description of each video, you could list equipment used, like paints, kit, airbrush, micro drill, etc. I find it helps me look for tools I don’t have without having to rewind the video.
I’ve seen other content creators list the computer equipment used, cameras, and mic as well.
Keep up the great work.
I agree there are so many tools out there. Flying S models leaves tool list you should check him out.
That could speed up the editing process as well. Rather than over lay everything. I'll try that next video to see how it goes.
Another excellent video and model. Always a good day when your videos arrive
Nice job on the camo. The inconsistent color saturation looks good and natural. Im building a Kawasaki Hien (again) and working to find the right mix of thinner/pressure on my paint mule.
Your camouflage scheme reminds me of the toughest one I've ever attempted, the desert scheme used by the Italians in North Africa. It's a patchwork of rough circles, each different. I made my own masks and a year later, someone came out with decals.
Nice Frank, BTW. I had this kit but sold it for some reason. Your work makes me wish I'd kept it.
I just finished all 105 smoke ring decals for the Italeri MC205. I’m glad they were included because they went on really well and look great, much better than what I could freehand
Guess I'll never manage your skills thus better just watch and enjoy your beautiful works.
Gorgeous result. Not done any camo on this level yet, but appreciate the candor and why you’re doing certain steps or using various paints.
Simply excellent! Only thing I noticed is that I think this particular aircraft had the symbols of three shooting stars painted on the engine cowl on both sides. But I'm not sure I'll have to check it.
Superb Model - I had the same aircraft and used the full Eduard etch and landing flap etch , plus the VECTOR resin engine kit replacement - great result for you , however
Thanks dude! This kit could very easily benefit from some eduard goodies. But it’s very well rounded out of the box
I love WW2 Japanese aircraft and the Ki-84 is up there.Excellent video and build.Your commentary of the subject and build as well as encouragement is great.👍
The toughest and most challenging camouflage pattern I have painted goes back many years, somewhere around 2003. The old Nichimo 1/48 Ki-45 "Nick" tein engine heavy fighter. I painted mine like the box art and it took many sessions of painting to get it right. It was painted with my trusty Paasche H single action airbrush. I now have a double action airbrush however, most of my current collection was painted with the Paasche. And I must say they look very good.
Great camouflage painting. I love Ki-84!
Great build ! Thank You ! Hope you have a great/safe week ! Tony
That’s a top job there my friend the painting looks amazing beautiful build stay safe 👍🙏
Nice build! And the camou demo will help me with my Ki-61!
I haven't airbrushed a thing yet and have a Ki 84 and Ki 100 sitting on the shelf in their boxes laughing at me. Both 1/48 and Hasegawa. So I bought a little Agptek airbrush kit and the Japanese army color set in Acrylic.I believe for the Ki 84 I'll go with the decals in the box for the 22nd Sentai and I'm guessing they were green in China then grey when they transferred to the home Islands.
For the Ki100 I bought decals including Major Hinoki of the 111th Sentai at the Akeno flight school where he was an instructor after losing a leg to .50 cal. He got most of his 12 claimed kills in an Oscar with the 64th out of Indochina and Chaing Mai Thailand, some against the AVG. He claimed one probable in the Ki 100 (Our records show 1 MIA and 2 returning with severe damage that day)
I'll be picking up as much as I can from your videos so thanks for posting.
Just got one last month for Christmas. Glad you shared this video.
Just started a 1/32 Tony. The camo is similar, so this vid helped with some confidence lol. Great example of a PITA looking scheme.
Great job. Picked up some tips as well. Plasmo's builds are otherworldly.
Realy nice build. Nice to see someone else has the issue of paint lifting after masking. That natural metal no matter whos product it is and how much one destickies the tape or frisket it peels somewhere, leading to feathering out the problem as best you can. The process of painting the color first then the metal can be difficult too.
Outstanding video and presintation.
Superb Build ! Greetings From Poland !
As per usual, great job. Like how the camo came out. Keep up the good work
Great job! Practice does make perfect. I've been lucky 1 or 2 times but metal finishes are definately a chalange and the Japanese mottling seems to be the hardest. There are a few German Eastern front squiggly and splotch schemes that can chalange too.
Great model and Happy New Year to you best wishes from NZ
One of my favorite ww2 aircraft. Superb and inspiring job 👍
That’s one nice looking aircraft love the paint job 🍺
You made great items.. Nice to watch you greet from Holland
Very nice detail, that you added rivets!!! Many little helpful Tipps here and there, definitely have to watch it several times and of course to admire the Camo-Work you did. My hardest camo was perhaps a 3-tone-modern-camo on a tank :D Great work and Video!!! Thx for sharing!!!
My toughest camouflage painting was Macchi smokerings.
My hat goes off to anyone painting those
Landing flaps as installed would defeat the purpose of Fowler flaps (widely used on Nakajima fighters) i.e. CURVE down to help increase lift. Also on the natural metal Franks the wing hinomarus would not have white outlines.
Like the paint job I won't to get my one done and have a go at the camo pattern as well 👍👍
This is a very good kit. I've built two of them over the years. Great detail and not over-engineered like some more recent kit manufacturers. 😉
VERY NICE Build. VERY NICE!!!
Wow I’m learning so much from the community of models builders on this platform. Amazing work. I’m building my 2nd real attempt at model building with a tamiya 1/48 mustang no going to bad. Going to try alcad II Lacquers
Wonderful and nice!!!
Excellent job with the camouflage and totally agree with your suggestion....practice, practice, practice.....even if a mediocre modeller (like me!). Really enjoy watching and listening to your builds so will be checking out what you have next on the bench.
The hardest and possibly the most frustrating camo was a tricolour on an Italian Fiat G50. It turned out ok in the end but it took many hours of painting, touching up and repainting. Does anyone have any tips for any future attempts at the same scheme??
Very nice build/paintwork👍
I made it through with a similar paintwork like yours, om a ki61 1/72 svale. Maby it became a little rough but ok, also spots in german aircrafts is a tuff one.
Good to se and hear how you do it, and you do it very well👍
This is elite modeling at a level I can only imagine. The attention to detail is truly mind-boggling. I fully enjoy watching you build, and get a vicarious thrill. Very inspiring.
Last year I did a suffix 1:72 A6M2 which had wavy lines on the demarcation line between the topside green and the underside beige
Well done. Thanks for posting.
Nice looking kit,the detailing of the cockpit is excellent for \48,mr metal colour is good for 'toothpick chipping' under acrylics too.Im building a \32 'Nick' and need some inspiration for camo scheme,cheers for vid.
fantastick camo work.. my most challanging one was for ICM B-26 in 48th scale.. I wanted to match worn olive drab from the box art and do chipping effect.. it wasn't easy, but I loved the effect at the end.. I need to think about other subject, that would require similar treatment
Hi!" Hayate" have built this long time ago back in 70s but 1/48 Tamiya, loved it. I chose aluminium scheme because easy to paint..lol
Gnarley fingers ! Nice plane !
Awesome job!!
Im building a Ki 84 Tamiya kit from the 70s fit is not great and u used a photo etch kit for the interior. Im at the painting phase now and not sure what finish I will go with. My versus build will be the Hobby Boss F8F -2 Bearcat. I think i got lucky on the decals as they are still in good shape. Superb build sir!!
Once again .. amazing work and execution of detail. Really enjoyed the video. Thankyou for sharing your talent with us. Hope you have a great new year.
pretty camo work - the hardest camos for me are the italian ones (green "smoke rings" on light brown surface) and the silver/greeen combination with colorful stripes on Ki-61
That’s exactly what I’m working on now.
Loved the build, and now really jazzed to start mine. I think my hardest scheme was a Hungarian Bf.109 - the combination of mackerel , hard and soft edges, painted insignia and tricolor fin flashes and winter whitewash meant I spent more time painting it than any project before it since. Also, an FYI, the Ki in the designation is romanized katakana キ and should be read as a word, like “key”
Absolute fabulous work,, bravo,,
Freehanding for German aircraft has been my hardest so far, but my next paint job is gone be the Ki-61 and I’m really not sure how well I’m gonna do with my patience and the limits of my setup
Definitely patience and practice, that's for sure. I spent a few nights on a Tojo as a paint mule before going to the Hayate. If you put a lacquer gloss coat down and use acrylics, you have a safety net to remove the paint with water.
Absolutely brilliant.
Great video and nice subject. My hardest paint job was a heavy conversion of a 1932 Ford coupe into a hot rod and painting flames that had to be the same both sides of the car. Yellow with sunburst red edges and then a white trim line around each flame. Nightmare!!
That's quite an accomplishment having a former president supporting you. The model is great.
Nice one, Model Guy! A beauty of a plane.
Just amazing!
awesome build keep them coming
素晴らしい仕上がりとカラーリング👍
Camo très réussi , bravo a ce montage ...
Great work! I really like the camouflage. The hardest camouflage/paint scheme I’ve ever done is an Eduard weekend edition fw-190 I had a lot of problems with getting the paint to thinner ratio right
German motling is something I've not done either, so that will be a lot of practice.
Damn, the last time I was this early the USAF wasn't even a service
I’m going to be attempting something similar to the camo on a NVAF Mig-17, thanks for the tips
Very nice finish.
The hardest camouflage for me, was paint brushing a splinter camo on a Stridsvagn 103 and the airbrushed Berlin camo one on my Chieftain Mk.10 (both 1/35).... But I will soon do a splinter camo with the airbrush on a 1/72 SAAB Viggen, so that will be a challenge xD
I like the tamiya putty but the Vallejo putty seems to be much better. Just wondering what you think.
I find the tamiya basic one holds a lot better and sands nicer. The Vallejo one is water based which makes it easy to remove. So each works in its own place.
Great Job, I used an OLFA compass cutter and a punch set for roundels currently, no silhouette machine as yet. Hardest camo... spitfire with dark green and dark grey, black based, mottled over, thanks Doog, as that's the only camo I've painted thus far, ended up respraying it because I spilled IPA all over the wing, ooops! What do you recommend for masking alternatives, apart from Tamiya tape or low tac masking tapes? Srayed decals look quite good, its a bit more effort I agree, but its good.
All the Japanese aircraft are unique in many ways. Nice model Japanese aircraft fighter plane. That's awesome. 🤗👍😊🙂🤩
The Ki-44 is my favourite unique design. Looks like an air racer
Just about to start a Tony; this will be a great primer for me
Darn good video - thank you for the tips!
I'm working on the same kit, but adding the SBS resin cockpit set to it.
The hardest camo I have done was a He219. The top was panted grey with RLM 76 squiggles.
Looks great.
My hardest freehand camouflage was a BF109 E-7 'Black 8' flown by Lt. Werner Schroer, 2./JG 27, Ain-el-Gazala, Libya, 1941, Tamiya 1/48
If that's the motling one I think it is, I can imagine how hard it was. I like the german camo, it leaves so much room for freehand work.
Your videos are so good, I would take them to a lonely island with me.
Thanks for your quick response. I grew up in the 60's and am now getting back into building models. Mostly 1/72 WW 2 planes. I have a question about your airbrush. Do you dedicate one airbrush for your detail work, like you did on the KI 84 or use one airbrush and just change the needles as needed.
Thanks again.
I have my Mr Hobby Procon Boy 270 I use for just detailed work. For the rest I use cheep iwata clones with .3 and .5 needles.
You would like Hasegawa's N1K2-J if you like their Ki-84 I'm currently building both at the same time - nice work!
I'll take a look for that kit. The Hasegawa Japanese stuff can be a bit hard to find... especially when Woody is constantly on the prowl for any Japanese kits and doesn't tell me until he's had his pick haha
@@TheModelGuy Hey man, you gotta be faster to get the dealz. I actually need 3 more George’s to complete the series -1 late and -2 early and late.
@@vmoney9106 this guy lol
Your landing flaps need a little more downward angle. I see no cables for the radio antenna, these are hard on the ki-84 because there are a lot of them.
Thanks for the tips Demetri. I did find the flaps don’t really positively lock in position so the next Frank will be better.
@@TheModelGuy Don't get me wrong, this Hayate is super cool. I suspect you can re-glue these flaps. The Hayate was ahead of its time, and used flaps similar to modern airliners. Instead of just rotate the lower skin of the inner trailing edge (like the Spitfire, which was of course a 1935 design), the whole trailing wing of the wing extended backwards and rotated downwards in three stages. That also increased the wing area, as well as delay stall. The Ki-43 flap design was similar, but the Ki-84 was even more advanced as the flap area was larger. And please do not call the Japanese army planes Kay-eye. Its KI, from kitai, which means airframe. Cheers, and I liked your Seafire 15 build.
@@demetridar506 I have another 1/48 Frank in the stash and the 1/32 one. I’m updating 3D printers so the 1/32 Frank is going to be a big one.
@@TheModelGuy I obtain built models, but not so good in building them. I have a Ki-61 Hasegawa 1//32 which is so and so built, and I can tell that it is super high quality kit. I have been searching ebay for a well built and affordable Hasegawa Ki-84. I have seen that it too is a super well done kit. Good luck with it, but I doubt you need it. I am sure a splendid model will come out. Make sure you build a natural metal version, most are natural metal but I have seen some people do full camouflaged upper surface and grey lower surface. This was very rare occurrence in real life, plus I think natural metal makes the model look more ... metal rather than plastic! I think my "Maru Mechanic" book has a good description of the flap angle when fully deployed. By the way, as good as the 1/48 Hasegawa kits of the Ki-84 and Ki-61 are, the dihedral angle is not presented well, you need to bend the wings up a bit more to get it right. I did not get a dead front perspective of your model to see if your angle is close to "correct". Again, the maru mechanic shows this angle well for both 61 and 84. I think the 1/32 kit does not suffer from that. Cheers.
Bit of a shame you did not address that little mishap with unmasking at 11:30. Would be interesting to know how that got fixed. Nice vid and frankly very nice Frank build.
What camera do you use to capture your builds?
I’m using my google pixel 3.
@@TheModelGuy Thanks
Try millibutterr. Donut of Milliput and a little Isopropyl alcohol. You can modulate the thickness and fluidity and get it anuwhere you want. Really awesome.
@Garth Macdonald I learnt this from Marco Frisoni. Really good stuff.
12:13 So true. Lovely final result 👍
Looooove it! 👍🏻👌🏻👏🏻
Nice job on it
Great camouflage! What size needle and PSI did you use?
Thanks
Thanks John! I used a .18 needle at 10-12 PSI.
Happy new year, how is the F-16C doing? I am just starting to do the Tamiya F-15C in 1/48, old kit but pretty good
The F-16CJ is coming together really well. I have a lot of aftermarket going on it so it's a bit of a longer build.
I noticed when you removed the mask over the hinumara it pulled up some of the red, leaving a silver area. Later in the vid it appeared you fixed it. How did you do that? I think the most difficult camo I have ever done was the mottling on German aircraft.
@@rcaso9561 I used a 3000 grit sanding sponge to smooth it out, then laid down some Mr Surfacer 1000 white. Then the red again
@@TheModelGuy Thank you!
Very well done. I would like to know if the Mr Metal Color Aluminum is buff-able and did you buff it after putting down a coat?
From what I've read, you can buff it. I chose not to that way it stayed dull