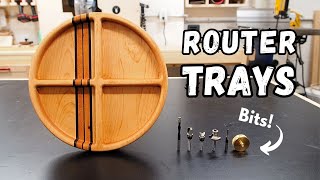
How to Make A Bowl with a Router

Вставка
- Опубліковано 25 чер 2024
- How to make a wooden bowl without a lathe. If you're familiar with making cutting boards, this is definitely right up your alley. In the video I walk you through all the steps for making bowls with a router and some jigs.
-⏱Timestamps⏱-
00:00 How to Make a Router Bowl
01:20 Wood Selection
03:26 Making a Bowl Blank
06:32 Segmented Wood Ring
10:18 Circle Cutting Jig
11:46 Routing Circles
15:24 Material Removal Options
16:42 Drill Press Material Removal
18:44 Making Router Plate
20:04 Flattening Bowl Bottom
21:34 Bandsaw Waste Removal
22:05 Flush Trim Bowls
23:19 Edge Profiles
24:54 Sanding Tips
27:24 Raising the Grain
28:18 Finishing Options
32:16 Final Tips
-📸Instagram🎥-
/ 6_8woodworks
-💲Armor Tool Discount💲-
Use promo code 2IOVMXAQ9W at www.armor-tool.com to save 10% on your order! Mobile workstations, clamps, pocket hole jigs, and more! (This is the mobile workbench I rolled outside and clamps I used to hold the pieces down)
-🔨Tools/Supplies I Use🔨-
Full List: www.amazon.com/shop/6_8woodworks
www.homedepot.com/p/RIDGID-5-...
-As an Amazon Associate, I earn from qualifying purchases.-
Table Saw: amzn.to/3sw2A2G
Router: amzn.to/3xdgS9W
Circle Cutting Jig: amzn.to/3iYXXe1
Spiral Upcut Bit: amzn.to/3f7ZBca
Flush Trim Bit: amzn.to/3g0RS07
Collet Extender: amzn.to/2TFHZwM
Bowl Bit: amzn.to/3j09eLg
Plexiglass Sheet: amzn.to/3f9hqI6
1/8” Brass Rod: amzn.to/3l8fRO6
Drill Press: amzn.to/3fc5hlE
2” Forster Bit: amzn.to/377d4wr
Large Chamfer Bit: amzn.to/3BR20lk
Large Roundover Bit: amzn.to/3idjLni
Drill Press Sanding Attachment: amzn.to/37cSScs
Drill Sanding Attachment: amzn.to/3zOdMLn
Arbortech Contour Sander: amzn.to/2VjOV32
Angle Grinder: amzn.to/376P24C
Circle Stencil: amzn.to/3l6hTyo
Awl: amzn.to/3id3EWC
Incra Miter Gauge: amzn.to/3eKj2bi
Incra Miter Sled: amzn.to/3bmEtNl
Hose Clamps: amzn.to/3rH3dqy
Planer: amzn.to/3sutCaF
Starbond CA Glue Kit: amzn.to/3l9fS4p
Wood Glue: amzn.to/3tYoxb8
Orbital Buffer: amzn.to/2QfjzbK
Light Scouring Pads: amzn.to/3uGW7Dj
Buffer Bonnets: amzn.to/3w9IRrh
Cutting Board Oil: amzn.to/3lfEzwl
Board Wax: amzn.to/3u0gmey
Condensed Router Bowl Bits & Accessories List: a.co/4WUVBE6
For more about woods I use, where to buy the wood, and other tips and info, check out my Wood 101 video: • Wood 101 For Woodworke...
-💻Website💻-
www.sixeightwoodworks.com
For more about my DIY router table, check out / careu4ijcli - Навчання та стиль


30:11 Young man I'm 65 and I grew up building cabinets with my Dad. I want you to know your videos are really good! You are an awesome wood worker, keep sharing your God given talent!!
As an amateur with woodworker, i typically feel overpowered with the entire arrangement ua-cam.com/users/postUgkxrYREG3-7f1Aqk9ams3ZESRNzGnfdUtyQ . Be that as it may, this arrangements drove me through with much clarity and effortlessness woodplans. Works i now work like a genius. That is great!
Great job.. I teach Carpentry at a high school trade school. And I love the way you use the router. I am going to make a set of bowls myself using this method, then I will teach my students. Thanks for the insight...
Thank You for teaching the trade!!!
Don't let it die !
In which school do you teach
A great endorsement. Thank you for passing skills on to others.
@@ConcreteLand few
@@earlneslon7997 ??
One thing you didn't mention that a router can do that no lathe can, is to make bowls any shape. If you use a template you can create similar bowls any shape you like, not just round!
Well done! I like how detailed your demonstrations are and how you use alternate methods to make the bowls.
Ótimo trabalho!
Aprendi muito com sua técnica.
Deus te abençoe sempre.
thank you I knew it could be done. you have given me some great tips. I'm a 65 yr. old great grandmother and I have been piddling with wood all my life, but I am now I'm learning more about the tools, and you are great with instructions so again thank you
Really great job! Thanks for being so thorough with your instructions.
Love the first t-shirt message. This bowl idea is creative to the max and well-presented.
Great info on creating beautiful bowls using a different method.Thank you!
It is great to see an alternative to turning bowls on a lathe. I really like the idea of using segments combined with other glue ups.
I have the Arbortech tools as well and have wanted to get into more carving of bowls and such with them. Looking forward to seeing you use the Arbortech tools in upcoming videos.
Awesome! Yeah, segmenting is such a great option. Love the Arbortech attachments and power carving.
Wow, they all look amazing. Love your information about different tools and using what you have in the shop instead of paying out big bucks.
Appreciate it!
I think reusing the wood chips in resin would really look cool for a bowl or cup and other things. Especially with all those different colors of wood chips in there.
Thanks for showing these tips. I really appreciate and enjoyed watching the video. 👍
Unbowlievable video. Thanks for sharing I know there’s a lot of work that goes into making these videos. Appreciate it!
Thank you so much!
This is the BEST video on UA-cam with the different chapters available for ease of finding what we are looking for in the video. Perfect. Awesome bowls too. lol
Really appreciate it!
I love this video. I learned SO much. After a few tries, I finally got a bowl I am happy with. One shortcut that I found worked for me was to use double stick tape to hold the bowl down, making sure to tape both the bowl area and the outer excess area. Then I routed the inner ring to its final depth, followed by the outer ring all the way through to a piece of scrap wood. That saved the step of cutting off the excess part with a bandsaw (or jigsaw, in my case). It also saved the cleanup with a flush trim bit on the outside of the bowl. The double stick tape held perfectly. .
Those bowls turned out so beautifully! I appreciate the detail you put into your videos and your ability to communicate these steps so well!
Much appreciated!
Great work I love seeing the passion for your work it shows up in your product
Santa kindly brought me my 1st drill press last year & 1st orbital sander this year... so stoked for both! I don't yet have a router but this vid gave me ideas for my 2 tools which I hadn't previously considered... Thank you for the voice-over explanations, these are what I call Useable Art! You are a Master! New Sub. 😃
Wow!! These are beautiful and I love how well you explain step by step the different options and actually show the process as you go through making them. I have a 10 year old son with severe adhd and mild autism and we started going to the kids workshops at home depot awhile back and my cousin and her son went with us one time and her son (he's 3 year older than my son) said to me that he's never seen my son so focused on anything ever. And I noticed the same thing. He was just right into it and I totally subscribed to your channel just show my son the amazing things he could make if he wants to really get into woodworking. We made nightstands at school when I was in junior high and I still have mine. I have no idea if they'll be teaching this stuff when he gets to that level in school but I sure hope so.
Thanks for adding alternative tools, techniques, & finished with pros/cons.
Absolutely!
It's great job! Thanks! You shows easy way instead of too much heavy equipment dependency.
Great idea for the extended router plate. Making one today.
this was a great video. i loved that you understand that not everyone is a wood worker and cant afford all the equipment right away. cant wait for more videos!
Thanks! I try to keep that in mind and share options where I can.
I really appreciate the thoroughness of your explanations! Thanks you!
Thank you! I try to include al the steps.
Router Bowls!! I am following this and am adding the things I need to get this accomplished. Good job and keeping the explanation to the point.
Much appreciated! It’s a fun project.
Great job !!! They look great and you gave the right amount of information without beating it to death. Keep up the great work
Really appreciate it!
Sensacional!
Parabéns pelo vídeo.
Sou grato.
That’s a great idea. Bowls are looking so pretty. Thanks for the content❤️
Great job. Those bowls turned out so beautifully
A great video. Teaches everything you need to know step by step. Not making a bowl start to finish in 60 seconds. I appreciate the knowledge you have shared. You are really helping a beginner like myself. Subscribed.
What a wonderful introduction to making bowls with the router.
Some great tips there....
Looks like I may have to discard some templates, and dig out that Jasper circle jig.
Thanks also for showing the source for all the tools/supplies.
I tend to do more bowls than any other woodwork, so will be using your method for sure.....
Thank you so much!
Excelente trabajo. Felicidades!!!!
The bowls came out awesome, I am going to try this out. Keep up the great work.
Appreciate it! Have fun making some!
Very thoughtful, thorough and creatively entertaining. Thanks!
Much appreciated!
Thank you very much for the woodworking class! Excellent video 👍🏻
Hope it helped!
Hi Nick, Found you from a recommended list on YT and I'm so glad I did.
Brilliant video.
I have a lathe that will allow me to turn 16" bowls over the bed rails and bigger if I turn outboard but this is a brilliant idea which I will copy.
I will be looking at you cutting board videos as it is something I want to get into.
I have subbed and hit the bel
Take care Nick.
Cheers, from the UK, Huw
You got me, Nick! You are so awesome and your projects are so amazing! Beautiful😍
Amazing! Loved watching an alternative to the lathe.
I am actually in the process of making some dice trays for table top gaming. This video is super informative and has helped me rethink the rest of my project. Way to work smarter and not harder!
They finished now? How did they turn out?
Awesome video, I'm never going to make bowls but I learnt a few things which will help me in a few projects and ideas... Thank you.
Lindo trabalho meu amigo 👍👍 parabéns 👏👏.🇧🇷🇧🇷🇧🇷
Nick, I have been making bowls with a router for a while, just using the big flat bit and a spiral upcut bit. After watching this I am going to try it with a bowl bit and drill press. So many great tips here. I will also try it with a lathe. Awesome video.
how were you removing all the excess in the middle? i don't have a drill press..
@@micljbitty I did it with a lathe
Just found your channel! Awesome man! It’s hard to find woodworkers that are super knowledgeable and not pretentious. Really good vibes and great content!
Thank you so much! That’s really been the goal. Appreciate it!
Absolutely beautiful work. Love the variety and all the options you give. Easy to follow all that you say as well. You are great at explaining everything in simple terms.
Appreciate it!
Like the gigantic hose clamp idea for gluing your ring together. Gotta try that myself. Thanks!
Wow!! Those are beautiful!!
Really love vids with natural light coming in like this one. Lit 🔥
Love the message on the shirt you ended the video with, and the bowls are gorgeous!
Words I strive to love by. Thanks!
que bonito trabajo y el uso del router muy profecional, felicidades
Parabéns pelo seu trabalho ficou linda a gamelas
Fantastic work man! Thanks to publishing this video!
Just found your site and happily subscribed love what you do with a router the finished product is stunning
Great tutorial!
Thank you for sharing your knowledge with all
Hope it helps!
Hey! Just watched this video, the first of yours that I've seen. I subscribed right after. I really like the way you present, kind of like we're just a couple a dudes in a garage talking. Great info too. I am inspired to try my hand at making bowls with a router.
One of the best tutorials I have seen on YT. Simple explanations, not rushed, thorough. Most of all, inspiring. If it wasn't winter here, I would rush to the shop to try and make bowls right now. You got a new subscriber.
Meeee toooo! What a tutorial!!!
Much appreciated! Have some sawdust fun when you thaw out.
Thanks!
If no one has mentioned yet, you can put the hole in the plexiglass base by just lowering the router bit into the plexiglass while running, at least for smaller bits this works great.....a big hole like for a 1" bit may be running too fast for the plexiglass to not stick/gall to the bit. Anyway, it will be perfectly aligned with the router this way....cheers for a great video, Bravo, Paul
Beautiful bowls.. Thanks for showing us the process.
Thanks!
Those stripey bowls are _gorgeous_ !
Appreciate it!
Absolutely beautiful work!! I always look forward to your videos
I really appreciate that!
I did get excited about your videos. Thanks for being so detailed.
Great to hear! Thanks!
Absolutely beautiful work!!! Thanks for sharing
Thank you!
I am a beginner woodworker and loved to learn from you. Great video and amazing bowls! Thank you for sharing. I am looking forward to creating some bowls like yours!
Awesome! Have fun!
Congratulazioni. Sei la mia fonte d'ispirazione.
That certainly works, they look great. In regards to the water material, with turning you can use jigs that allow you to cut multiple bowls from a blank. Saves material and gives you more product in the end.
Yeah, the coring systems are great for turning.
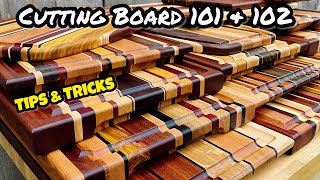
Great video. I've made multiple cutting boards and am ready to move on. Thanks!
Great job! Super!
Extremely well done! Boy, I’ve got so much to learn!
Thank you!
Stunning creations. So well explained. Thank you.
AWESOME! Thank you for posting this video!
Thanks!
Great explication of every step. I gotta get better at that! Making a bowl for a school fundraiser. Thanks!
This is an excellent video. The tools list is very helpful, as not everyone has every one of those tools on hand, even in a well-equipped shop.
I just finished using your technique to make 6 bowls. I had always wanted to replace my many template/flush trim bits with the spiral up cut or down cut bit, which I did do but was a little disappointed. You really have to get the amount of material to be removed to be less than 1/8 inch, and on a big bowl, the base may be a bit thicker than 1-1/8 inch which is the max cutting height. I ended up using my disk sander after the bandsaw to get the material almost flush first. Otherwise the spiral bit grabs the material similar to the flush trim bit which surprised me. I had also wanted a spiral cutting bit to make the circles, and I got the one you recommend and it does work well. If you are making deep bowls, you need a router with a significant plunge range, as you can not use the bit/collet extender. I found my router to have trouble retracting up high enough to start the first cut, even with the 4 in long bit fully set into the collet. Also, your bowl bit has to have a bearing diameter bigger than the collect on the extender, which is 1". I just bought a new bowl bit, 1-1/8" dia, and used it with the extender, then went to put it the router with no extender to clean out a shallower bowl. I quickly discovered that the shank is not 1/2", but is 31/64", which the router collet will not tighten down on. So now I can only use that bit with the extender as I doubt I can return it since I used it. I have never heard of a 31/64" shank until yesterday. Overall, this is a lot of work, but because you have shown a streamlined approach, it is worth the effort. I am now going to adapt this approach and make a matching set of 4 oversized wooden steak plates. I am thinking of using birds eye maple!
Wow!! So beautiful! Awesome video!
Great products and awesome video, thank you.
Thanks. Nice bowls
I'm not a wood worker, but my father is. Great tips/tricks and fantastic end product! What a perfect video. Great info, great tempo, packed full of info... VERY IMPRESSIVE!
Thank you!
Awesome looking bowls. Great instructions.👍🏻 Gonna have to give it a try.
They’re pretty fun! Nice project to change it up.
Great video I learned so much, your a very good teacher. You got a new subscriber out of this video! I look forward to watching more of your videos in the future. Oh yeah those bowls turned out fantastic and I love your shop set up, great selection of tools..I'm super jealous!
I like your style and the way you explain things with options. Thks.
Thanks so much!
good
Excelente trabalho Muito legal mesmo parabéns que Deus continue abençoando você e toda sua família 👪 👪 👪 👍👍👍
Greetings from mexico....great work..I just began doing some woodwork and it just inspired me off my skill on my daily woodwork trainning myself and a whole bunch of tools I did buy,just to start off my buissiness here in mexico. Thanks for sharing some of your wonderful ideas!!!
this channel kicks ass! im glad i found it. looking forward to your shop tour vid. looks like you have a smaller space like a lot of us. Hopefully thats coming soon!
Beautiful craftmanship, excellent results and friendly commentary to the video.
Thank you so much!
Good job. I appreciate your help.
Beautiful!!!! I learned some helpful tips. Thanks.
That’s great! Thank you.
Very luxurious product, love it so much
Nick, really cool video. The bowls turned out beautifully. Thanks
Thank you so much!
Nice work and thank you for sharing your amazing work.
Love that shirt, brother! Live Justly, Love Mercy, Walk Humbly,great words to live by.
Exactly! The 6:8 of Six Eight Woodworks. Strive to live by it.
Awesome, truly. Enjoyed all the way through to the end. Could also inlay the outside of bowls.
Simply Awesome👍🇬🇧🙋🏼♂️
Just found this video browsing. I'm subscribing just because of the shirt. Blessings!
Bowls came out great!
Appreciate it. Really happy with the variations.
Great bowls.
Muito lindo teu trabalho
Parabéns, continua fazendo teus vídeos
ua-cam.com/play/PLFcQCVQ_YIhZVElpkoGNrrUAHSyKpxc-N.html
That's alot of work but they turned out beautiful! Just discovered you.
Fantastic work!! I'm inspired to try this !
Thanks for the new ideas. I really enjoyed watching this.
Hope it helps!
Amazing video and tutorial! Love it and appreciate the thoroughness. Thanks you!
Thanks so much!