Router Table Split Fence

Вставка
- Опубліковано 7 тра 2016
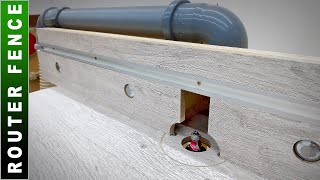
- Rob Brown, the editor of Canadian Woodworking & Home Improvement Magazine, shows how to made a split fence for your router table.
Read the accompanying article on how to make and tweak your own router table: www.canadianwoodworking.com/p... - Фільми й анімація


thank you for making it simple and easy to understand, I am 70 year old male starting out on my diy journey.
J. H. Hey J.H. Same here, almost 70 and just now starting to learn woodworking. Never too late, right bud?
72 here and just starting my woodworking
Your explanation of the fence made your video way better than others I’ve seen on UA-cam. Thank you much. Will be making one similar in the near future.
Mr. Brown you are life saver. I have been searching for "Keep It Simple Stupid" explanations for many wood working projects on my journey to help our students on our wood working journey. I am a Tinsmith, so, many things I understand and many more things that I don't. We were raised with the KISS method.
Excellent video and process. Thank you for sharing. I will subscribe and soon become a supporter. Much success and, Bless You.
This video is tremendously helpful. I just bought a great used router table with a crappy fence. I know what I'm building this week! Thank you! You and Matthias Wandel make me want to go Canadian! Great stuff. I'm so glad UA-cam's algorithm brought you to me instead of another epic fails video...🤣
I have been wanting to make a router table fence for some time now and this video has been most informative. Many thanks.
Hi, just what I was looking for, some ideas for a simple home shop router fence. Will give it a go.
Tis a gift to be simple. The only thing I might do different is to do it in plywood, and the make the movable fence pieces symmetrical vertically around the slider so they can be swapped end for end, left for right and upside to down. This way you can sacrifice each of eight corners in turn. Might need some play in the slider so that turning the fence upside down re registers on the table base.
i like that
Thanks for the video, I had a plastic router fence but it warped and your video is just what I was looking for , I spent 2days going threw all the router fence videos and oh my gosh you have to be a master carpenter to make them , I wanted a good simple fence and you had the ticket thanks again
The information you said will come Andy thanks.
I'm new to woodworking and have become completely confused by all the hype and suggestions relating to routing and tables. I have come to the conclusion that I like the Canadian approach - no fancy hardware (that costs a fortune that could bankrupt the Bank of England, which isn't that difficult) just straight timber, clamps and few bolts that cost very little. Not as beautiful as Woodpecker/Incra and all the rest but who cares when what you make ends up with what you want. Bravo my Canadian friend.
Very good KISS works well for this, into the shop tomorrow, thanks.
Excellent video .. so good I took the plunge and made one this morning out of some scrap ply to attach to my router table, which is fitted the right side of my Bosch XTC table saw .....loved the simplicity of the build and how it can easily clamp on to the table. Thanks from East Yorkshire😀
This is the best video for learners. Thank you sir.
You are most welcome
Thanks for the great video, perfect editing by the way. Your approach with solid common sense is so important; your attention to safety in design is what I needed.
Great wood working application sense. Myself just starting out, excited about getting the best practical approaches. Kudos bruddah. Aloha from Texas.
Im building a split fence now. I used wood blocks for the dust collection port, but I used 2" aluminum angles sitting atop the fence bottom with is 1" thick hardwood making it 3" height for the sub fence. The face of the fence is hardwood and about 4.5" height. Just have to cut the slits in the aluminum with my angle grinder to allow for the 3.5" opening limit for my fence.
GREAT video. Very common sense approach PLUS as all needed elements. Will be making a form of this for my table. Thank you for sharing.
great video...I have been wanting to build a fence for a while, but most of the tutorials I found use a router table with a fence to make their "new" fence....hard when you don't have one. I have also been overwhelmed with not wanting to make it too simple and not have the functionality I need. I hand the whole thing clamped and glue drying within an hour of watching this video. I could KISS you... cheers! I
Thank you very much Rob... Excellent essential info...
This is really helpful and inspires me to make my own split fence plus accoutrements. They'll be far more practical than those supplied with the table I have.
I look forward to viewing more of your videos.
This was very helpful! A parts list wouldn’t go amiss. The MDF fence on my router has been a misery to work with, so I’m going to build one like yours!
I'm planing on building a bigger router table like the one you show in this video and I plan to make a fence just like the one you show.
Thank you very much for the tips.
They have been very helpful.
You have me as a subscriber and I immediately clicked the like button.
Thanks again.
Eric
central Florida
I made one from oak- very similar to this and it worked great for everything I ever did, rails and stiles, raised panels, dados, round overs, etc. I'd like to buy a cool one with adjustment knobs here and there- but I just cant justify it- this here works for most anything you'll ever want to do- great video Rob!
sweet. Love the elegance of simplicity
Thanks for the “ladies” at the end. I appreciate it very much. Sensible design, all the bells and whistles you need yet basic. I won’t say simple.
great fence strong,simple yet flexible really like your approach.
Many thanks Rob, I followed your instructions and made a replica of the one in this video. I did not have any knobs so used wing nuts but apart from that mine is a Rob Brown cloned fence.
I can't believe how well it performs on my homemade router table, great dust extraction, quick to setup and when clamped this apparatus is solid. You could moor the QE2 to it in a force 9 gale and it would not move.
Just the video I was looking for, thanks!
Nice clear explanation, just what I needed to know. All questions answered! Thanks. Subbed.
I really liked this video. Thank you.
Fantastic video! You're the man!
KISS is a wonderful way to go! Enjoyed the video and following your suggestions! Thank you for your ideas.
Great router fence for a beginner, I have been looking to make a split fence for my table, have made my choice after watching your video .
I think it's more than one for a beginner. It will do anything those fancy ones do without needing a huge manual to understand it
Thank you for explaining in terms us newbies can understand
Very nice presentation. Thank you!
Thanks for creating this video Sir! There are many fine approaches out there, but yours clicks for me! Thanks again.
Glad it was helpful!
Great video, thank you for creating and sharing.
Very interesting, useful presentation. Many thanks for sharing.
Nicely done video! Thanks!
Great video, thank you!
Very informative video, I'm definitely going this way, I have some oak to build this fence, just put a router in my Paulk style work station, new to routing(only built houses).. I wish I got into this tool years ago...
I was hoping for the jointer - like fence part. I am really wanting that. Just getting back into woodworking and using my router. I will do this if for no other reason but the split. Thank you
Thank you for an excellent tutorial video! Im very grateful for you sharing your knowledge and explaining whats what. Very informative. Thanks again cheers
Thanks! I am making one soon.
Thanks!!! Learned so much!!!
Great video. Router is the hardest tool to learn. I have an inexpensive router with a split fence and was always catching the wood on the left side fence just as you said. Kept thinking I was must not be using it right. I will modify as suggested.
Thanks for sharing
Thanks you answered a question that I've had for a while with no solution. Now, I can try again to get the right end of the outfeed fence from grabbing my material....thank you
I'm not exactly sure what operation you're doing, but generally speaking, if your workpiece is catching on the right hand fence you're moving the workpiece in the incorrect direction. Almost always, the workpiece should move from right to left. I have had the workpiece catch on the RIGHT hand edge of the LEFT hand split fence, but in that case I just slightly ease that edge so the workpiece slides onto it easily.
Lead fence edge needed to be shimmed out a bit to avoid my situation
Great to see somebody using the KISS (keep is simple stupid) principle when it comes to making a fence. There's a lot of common sense and experience in this video and I really enjoyed watching it. This is one fence I'm definitely going to make. The only concern I have is that over time there is the possibility of the front vertical guide cupping if it's make from timber. Still, the choice is pay $500+ for a manufactured fence or make your own. It's a no brainer!
My router fence clamps to the rip fence on my table saw, plenty sturdy for my needs. :)
Thanks!
Thanks for this great video of a simple application. What would be the problem if I just have one gap on the fence instead the size of my largest bit? What happens if I use a small bit with the large opening?
Greetings from Greece! Great approach as diy became a big bussines. Fancy gadgets and always a link to the shop where you can buy them. Keep safe and keep it simple.
Thanks for watching!
Great Video! That's my plan! Soon! Thank you!
... Even tho the fence is simple, it certainly is well thought out, IMO... without being overthought. ; ) So thanks for the video !!... it kinda makes me wish i had adopted a more useful affinity to my router ( that is gathering dust somewhere in the deep crevices of my shop ; )
This is great. I just discovered it now, in 2022. It looks like the instructions are no longer available, although I imagine I can figure it out. But if anyone has a link to the instructions that would be great.
I realise this is an old video, but if you're still out there: Why do you need to make the gap in the split fence as small as possible? Is it just for dust collection, or does the smaller gap serve some other function? Why not make a fixed fence with a large enough gap for your biggest router bit?
For any router bit size, you want to keep the gap only slightly wider than the router bit - enough for debris to escape. A narrow gap reduces the chance of small stock dipping into the open space. And, a smaller gap will also increase air flow making for better dust extraction.
Thanks! :)
Really liked your fence Kiss principle. I see a mitre slot in your table for a sliding mitre gauge. I am thinking of adding one to mine parallel to the fence what do you think?
What is the dimension of your table and what length of wood (say a 2x4 piece of softwood) would you be comfortable in machining?
2016, well I am late to just be seeing this video. I am so glad I came across it. I am attempting to make a table and fence. I love your approach about keeping it simple. I have a habit of tying to reinvent the wheel. I am going to follow your instructions and hopefully it turns out ok.
"Question.....what did you make the feather boards out of and how far are the teeth apart?
Thanks for you video and I am going to go thru all of them you made.
Rob used maple, but just about any hardwood will do. The fingers are about 1/8" wide and cut on the bandsaw.
Very helpful video Rob, thanks. I understand the fence construction but I still am confused about the statement that some say when adjusting the fence that it is NOT important to necessarily have the fence perfectly parallel to the front of the router table. They say you can semi-permanently anchor the left side of the fence (when facing the table from the front) and only make minor (front and back) adjustments with the right end of the fence. Do you buy that?
Can you tell me how to rout out a circle in the table top to accept the router face plate?
Can you give more specifics on how you shim the outfeed side forward? Do you do this from behind, in front, and what do you use?
I very rarely do this type of thing, but if I wanted to I would put a small shim between one half of the split fence, and the main base of the fence (that the two split fences mate with). This brings one half of the fence out, and leaves the other half in. I can only think of situations where you would shim out the left hand side of the split fence, but there *may* be very unique situations where the right side needs to be shimmed out.
Rob, newbie here, and I have a question about the opening at the bottom of your front fence face .... do you cut into it with each new bit your using ( like making the zero clearance cuts for table saw/mitre saw insert So), then work on your piece with that new bit inserted?
Thank you i like that
What have you done behind the slip fence for the dust collector?
I like to pin the fence on one side with a bolt. That way the you use only one clamp and the placement at the bit is twice as accurate.
I like the KISS approach you take, but wonder: have you ever had the need for micro-adjusting your fence? 🤔
Clamps are strong, but adjusting can be a bit of a hassle..
Nice to have seen your vid! 👍
I'm planning on making trim with full face cuts, so I'm looking for a split fence design that takes up the cut depth after the stock passes the bit, like a shaper fence. I like the idea of using clamps, but not sure how I would modify your design.
FYI - I thought about it and I think putting the sub-fence flat to the table and clamping the split fences on top flat to the table at the same time. Just need the split fence vertical face to overhang onto the table and extend over the suction port, and use two angle braces and clamps per sub-fence. No need for hand bolts and the suction port can go on the flat sub-fence.
I'd only use t-track to place in the fence itself to place work piece clamps.
nice bare bones router table. my current router table is a piece of melamine screwed to the workbench. clamp on everything. i need to upgrade for better dust collection, but i'll kiss it 👍
How do you adjust your fence in and out for fine adjustments?
What material did you use to make the hold-down feather board?
what was on the front of the split face after you took it off that appeared to be either tape or sandpaper?
To me it looked like ...that was where he hadn't waxed it . (Just a thought)
sounds good, but i was hoping your split fence would be more like on a shaper where the outfeed fence face and the infeed can be adjusted separately. This way you can machine off the entire surface of the edge and even into the wood and the outfeed fence can be in so that there is no sniping.
i see at the 8:30 mark you do talk about this, but it is via shimming... that will work... i'm hoping to make one more quickly and easily adjustable... will think about the shimming...
can the fence be used on the opposite side for sliding dovetail?
I'm not quite sure I understand your question. Are you talking about machining the female or male portion of the joint? If you're machining the female portion of a sliding dovetail (which I think is what you're asking), the bit should be in front of the fence and you should be moving the workpiece from right to left (as you stand facing the front of the fence, with the bit in between you and the fence). You can put the fence on the other side of the bit, but then you would have to stand on the other side of the router table, and still make sure you machine from right to left. There are times when I need to machine a sliding dovetail (or other joint) far from the edge of a workpiece, and I might even have my fence on a 45 degree angle so I can clamp my fence far enough away from the bit. I just have to always be careful to machine from left to right, as I stand in front of the clamped fence (with the bit between me and the fence). Hope that helps.
I find it interesting that used Hard maple to make the fence and not plywood. When you hear so much about wood movement.
You could certainly make the fence from ply. The maple doesn't move enough to cause any problems, but your point is a good one. Solid maple is more durable than ply though. You could certainly go the extra step and create the fence from only quarter-sawn maple.
Is your router simply suspended from it's base in the table top? Is it adjustable?
First, I remove my routers base place while it's in my router table. I then add that base plate to the top of the router tables surface. There are holes (aligned with the holes in my router and base plate) that allow me to secure the router to the table. The base of the router just sits against the underside of the table - nothing (other than the 3 bolts) fixes / secures the router in place during use.
Got it, thank you, sir.
I’m brand new to woodworking.... can you tell me how to get longer screws to attach a router to a table? I will try to make a fence like this . Any suggestions for me on building a simple router table? I’ve subbed and look forward to learning from you.
Hi Rob, I have a nagging question. Why a split fence anyway? What I mean is, can you tell me why it would be better to use a split fence instead of a straight complete fence (with a half circle cut out for the bit to protrude into/from?
Thanks :)
With a solid fence that has a whole cutout you can't often get the edges around the cutout very close to the bit....unless the bit you're using happens to be very large. With a split fence you can adjust the opening to suit the bit / operation at hand. A smaller opening is safer. HOpe that helps.
You also can use it to joint edges with split by moving left fence forward in relation to the right fence.
sniping. if you have a bit with no bearing and that will cut into the face a little past the original outside edge you will get sniping on the end of the board. split fence you have the ability to move the outfeed fence out
todo muy bueno y trabajan muy elegantemente pero en inglés quedó loco no lo hablo ni entiendo
It's good to see the woodprix has new instructions to save my money and energy to build it.
KISSGA!