How to Reduce Noise in Photoshop CC | How to Improve Photo Quality in Photoshop CC

Вставка
- Опубліковано 12 вер 2024
- In this tutorial, you will learn how to Reduce Noise in Photoshop CC.
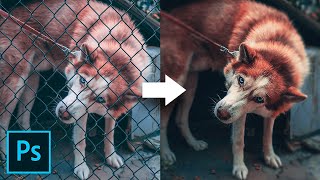
Some images may have a lot of noise, which causes them to look grainy. You can compensate for this by reducing the image noise, as in the example below.
When you apply noise reduction, you're actually removing information from the image. Because of this, it's important to use this feature carefully to avoid removing too much noise, which can cause blurriness.
Let’s start by duplicating the layer with noise. Go to Filter - Noise - Reduce Noise.
Here is what each setting does.
Strength controls the overall effect strength.
Preserve detail: If you use a value that's too low, the image will lose a lot of details. If you set it to too high, you will cancel out the effect.
Reduce Color Noise: If you have noise that looks colorful, this is the setting to use.
Sharpen Details: Reducing image noise also causes the image to lose some sharpness. This setting allows you to add sharpness back to the details of the image.
Remember the goal of noise reduction is to make the image look cleaner and clearer and not remove the noise completely.
❓💬 What other tutorials would you like us to make? Please let us know in the comments.
#HowTech #Photoshop
--------------------------------------------------------------------------------------------------------------
✅ All our announcements are available here t.me/howtechtv
✅ Commercial questions info@howtech.tv
✅ Facebook / howtechtv
✅ Instagram / howtechprojects
✅ Twitter / howtechprojects


Nice video