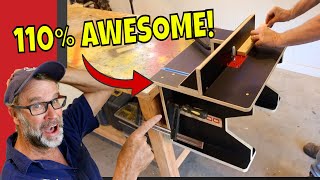
One-day router table build

Вставка
- Опубліковано 5 бер 2023
- Larissa Huff's router table features a versatile and effective design that won't rob you of time or materials.
Read the full article here - www.finewoodworking.com/2023/...
Sign up for the Fine Woodworking weekly eLetter - www.finewoodworking.com/newsl...
Sign up for a Fine Woodworking Unlimited membership - www.finewoodworking.com/unlim... - Навчання та стиль


Dont know how you nailed the 1990s cable tv color tone but it really brings back my nostalgia! Thanks for posting!
Hahaha they nailed it
Haha that’s so true, nice video thanks!
Makes you feel nostalgia / nostalgic, it doesn't bring back your nostalgia. 'Pet peeve of mine is the over and misuse of the word nostalgia in the last couple of years; I'm guessing someone made a tiktok and mentioned it.
I really appreciated that you went into little details, like not pulling hard on the drill press. A lot of videos just assume we are experienced and leave us to learn the hard way. Thanks for sharing your learnings. 🙏
Well, "That Was Easy"! Thanx a million, Larissa!!
I am thrilled I dicovered this channel!
Good job Larissa.
Great video of a well designed, useful table, thank you!
Larissa is the best, more instruction from her!
Great job.
Very cool build. Thank you.
Magic, you inspired me a lot, will start the table tomorrow, thank you
I made it!! It’s awesome!! Thank you!
Thank you for doing this video on you router table. I have been looking to build a small router table and you have given me some really great ideas.
Bravo! I really like this! Thanks
Thank you very much, you are amazing
I just finished my table. Awesome video thank you 😊😊
Simple & professional, thanks
Thanks. This so economical and not too difficult to build.
This is the perfect plan for my Ryobi trim router. Thank you!
thats awsome.. great tutorial! very easy to follow and great explanation!
Hiya, I've been looking for something for my small wood trimmer & this is perfect. Thank you so much for sharing your awesome work 🥰
Hey this is fabulous I want to do this. Thank you for sharing x
Might be my favorite set so far man, this is gold.
Great work, that was awesome.
Amazing job with this walkthrough tutorial. My initial plan was to build a table higher at waist level, but this is more portable and a better option for me overall.
Looks I have the perfect old coffee table to repurpose into a 1-day router table!
🎉 Thanks for this video and tutorial it was easy to understand and follow! I appreciate your hardwork! 😊
👍👍 very cool !
Good job! 👍👍
منتهى الروعة .. شكراً لك.. ،👍👍👍🙏🙏🙏
- Thanx 4 sharing how to make this efficient, practical router table. I've thought about making one so will begin mine in the next few days.
WOW very nice build, Well done ;-)
excellent job
Nicely done 👏
Thanks so much. This was a great video and very informational.
Very nice, thank you
Once again I am very impressed 👍 you are very talented wood worker hats off to you young lady 💪💗
Great steps
Very good thanks.
👍very simple
Well done..
I am going to make one of these, very good video, all the steps are very clear. I like the insert making method. I might add a switch.
Simple is good.
Nice little router table. We shared this video on our homemade tools forum this week 😎
Iiiincredible!!!
I love it!!!
Cleanest workshop I've ever seen....
That because most women are a lot cleaner than men and more organized. Bottom line
😮 I am highly impressed ❤ you go girl 💪😍
00:35 - The organized board of tools on the wall is so soothing to watch!
Great little build and easy to scale. I’ve been looking for a simple no frills bench top router table design and this will do it nicely. I’m going to build this with two small changes…wood glue where applicable and T-track in place of dovetailed slots. Thanks for posting this!
And restrict the airflow around the vacuum port.
and dont cut all the way through the fence.. it looks like the two sides arent perfectly aligned@@carlbruschnigjr1757
nice and simple
The hands of an Artist
That's COOL
Oh I like that a lot! So many of these things are just...so much more elaborate than they need to be.
Fab channel glad I found you … liked and subscribed
thank you for this ma'am
I got to find a diy video for a drill press now! Gezz, I'll never get this table built.
cool
👍👍👍👍parfait
Parabéns pelo trabalho muito bom abraços Deus te abençoe grandemente. Silvio ( laranjal paulista São Paulo Brasil)
Thank you for making the plans free! It’s irritating that so many people put them behind paywalls
Looks like a pretty simple design. The only thing id change is routing in a couple of recesses to take a pair of steel rulers. That way you know your Router table fence is always square.
At my level: I can do it, a big Thank You ! ! !
Nice build, but I recommend a pre-built router insert, which is much thinner than the table top; router bits wont be able to fully present through think top, you will lose the ability to use certain profiles.
Thank you Madame.🎉
I appreciate you taking the time to demonstrate how to build a router table , I am not like you with the high end tool collection, drill press and a lot of space , I am a poor builder with a handicap, I won’t have the money to buy a drill press and all those fancy attachments. When I am in pain I try to make things in my make shift shop and I am very limited on my tool collection. I have a hammer and a drill maybe I can make a pyramid like they made in Egypt with my hammer and chisel. But I sure cannot make a router table . I’m thinking of the old Egyptians how they made great projects with a plum line and a peace of copper , that’s my style I don’t have twenty century electric tools , thank you kindly .
Psssst Larissa.........EARPLUGS!!!..... Btw nice video and I definitely need to make one
Nice Video. With the top being so thick, are the router bits long enough to work with trim router ??
👏show de bola!
pretty woodworker
How would you adjust the fence if it is not square?
Does Larissa have more videos?
Love the detail you put into this tutorial. Also, you are cute as a button!
I’ve got the ryobi 1 1/2 HP router, would there be much different to change to be able to use it? Not a trim router so adjusting it is a bit different. Thanks
You can use that no different then what she is using....just have to match your holes to the particuliar router plate on your ryobi.
Only advice would be to turn the drill press off when lining bit up to center, then raise the chuck, turn it on THEN drill.
NICE 👍, I have and ol small pc tablet stand that I am going to add a plate insert on to, a bit more basic than this one though
Does the wood need to be completely flat or some what flat?
I have seen many builds of router tables for trim routers and they all seem to state that the make of the trim router is not that important and all the builds are somewhat the same, some with more bells and whistles and some without…
But I have to ask and presumably because of ignorance due to not owning a trim router, but how do you adjust the height of the router bit from under the table and is it possible to do it accurately enough?
I have several cheap plunge routers and they are all really bad at keeping their plunge depth, with or without the springs in them, so I think I should go look for a trim router instead…
Thoughts?
I want a router table to help me build stuff but I don't have any of the tools used in diy router table videos lol
What are the measurements for this project?
... all you need is one board from your local wood store....
*blank stare*
Ahh, yes and of course all the industrial grade equipment I saw come by during the ten minutes watching this short video....
Not wanting to be an arse, I really did enjoy the video and there are certainly things people will learn from it, but I'm guessing most people (like me) just have a hacksaw and a hand drill instead of the professional table saw and drill column that you're using. With respect, again. You absolutely look like you know what you're doing, so every compliment for this video, but I did feel I should mention this small bit of criticism. Carry on ! 🙂
You are definitely overblowing the professionalness of the equipment she used. The table saw is nothing special, you can get a basic one for something like 300 $/€/£, or you can use hand circular saw, band saw etc. Heck, nothing stopping you from using your hacksaw, if you're patient enough. The drill press is just a convenience, you can do the same with a regular 30€ drill from Lidl. And no matter where you live, buying a basic sheet of plywood is absolutely nothing special.
And besides, if hacksaw is all you have, why are you mucking around with a router? You have more basic tools to buy before you get to that.
All you have left to do is cover the exposed edges with iron on melamine edge banding! 😀
What's the total cost of all the materials and hardware to build this table? Thanks for the video!
What a joy to see more women in DIY and in teaching roles too! Very nice.
This is just what I wanted to see. Not a big table as I don't have space, but a smaller one. Great!
Please do not add music to any DIY or demo video. It hurts the ears and very hard to focus.
Use t25 screws
Need a drill press and. Clamp
Very nice! One thing you should do though is learn how to use an impact gun for running screws, and save the drill for making holes. I noticed you let that bit spin over the screw heads a few times during the video and that mars the screws. When you learn to use the impact gun properly, it is less likely to spin out on the screw head and is far easier. It also is less likely to heat up the screw and snap it off while it is driving in your material. A lot of people incorrectly think this is the opposite, but after years of using both, I can tell you an impact gun(while noisier) is far better for installing fasteners than a drill with a properly set clutch. The key is learning how to use the variable speed trigger, and learning when to stop when the screw is seated.
Agreed. I stopped using a drill for running screws years ago for the reasons you listed. It is more difficult to use a drill to run screws anyway. Requires much more pressure on the back of the gun to keep the screw seated, due to the torque not letting off. That's what impact guns do, is rapidly stop and start torqueing the screw to maintain a proper seat in the head. The vibrations also help remove over tightened bolts and screws as well. A regular drill will just snap off heads or damage them so much that you can't remove or reinstall them when needed. The tricky part definitely is learning to manage the trigger pressure and learning to stop so you don't over tighten screws/bolts.
L
When using a drill press, there is a serious hazard in using just your hands to hold the work piece material. When a drill bit binds or seizes in the work material, the material is swung around so fast that it often takes your hand with it before you can react or let go. A fellow that I worked with lost a finger when this happened to him. Pinched between the work piece and drill press column.
Please clamp your material to the drill press table. Or at least swing your material around in the same direction that the drill bit turns, so that your material contacts the drill press column before turning on the power. And hold down firmly if not clamped as your work piece will climb up on the drill bit, also causing it to bind. Anything too short to contact the drill press column before starting needs to be clamped, and that includes drill press vises.
That fly cutter spinning at that speed set my teeth on edge.
Well interesting video. Why do you not use clamps and really on your arm strength instead? Also you appear to have forgotten a little ‘v’ channel at the bottom of your fence for wood dust to go……this seems to be the thing to do in the 20’s!!
Thanks
Bob
England
nobody i know has all this equipment? but nice video
Great video. Boy did I complicate my build. One comment; I wonder if anyone else counted the times you tapped the router top when introducing the video, lol....Drove me nuts(not really) cheers...rr Normandy, Fra.
Is there a material list? (Apologies if I missed seeing it.) There is a comment at the end of the video that the router table can be built from "one board from your local box store". The size of the sides makes me think a couple 1x8s are cross-cut to length and glued up, then ripped to width?
Article in the description
@@FineWoodworking I re-read the article in the description and can't see other materials listed other than the MatchFit parts.
It's all made out of one sheet of plywood, what are you people talking about?
00:14 _I've got a Makita_
I was thinking when you first fitted the fence and how you might have to check that it’s square in the horizontal plane and then realised … DOH! It doesn’t matter does it because the fence will always be 90 degrees to the router bit…. What a silly man I am .,, hahah 😂
Have any plans.
In the article linked above.
Why no dimensions
So as a beginner I need to buy a drill press? Nice
Any suggestions for how to build this project for those who don't have access to an industrial drill press?
You can buy a guide for a hand drill, or you can make a thicker block with a carefully drilled hole in it and clamp that to the surface and use that to guide to drill bit with the hand drill. Use a brad point bit so it doesn’t swim out of place.
@@llsheridan1034 Thank you for the suggestions.
If you ignore the inserts, this should be very doable with just a handheld drill. I worked for years on a "router table" that just had a 1-in. hole drilled in it. -Ben
You mentioned plans for this build? I don't see them?
First link in the description
Why do you guys use Imperial measurement system?????
cause
@@FineWoodworking hard to argue against that 😅
Not bad. I think I'd make one small change. I'd let the stretchers into the sides. I'd use some glue. This would add a little more strength to the base.
Could not find plan?
First link in the description.
Why don't some off you give the meserments to make it easier for beginners thanks 😮
Because there are plans linked below.
Seems about 5 to 6 inches too high on that workbench.
Nice simple build, but your casual use of PPE is a worry. No ear or lung protection while drilling is a problem. Hearing and lung damage is incremental. All of those small operations, add up over time. Drilling and shaping create fine dust every single time. And composite materials like that melamine particle board, are especially damaging to your lungs.
I would definitely add an edge to that melamine board used for the table top to protect it instead of chamfering it. It would protect it, and make it look a lot better as well.
Exactly. That may just be Melamine, which is pretty much considered inert and in limbo at present with regards to health research and its carcinogenic potential, but what it's veneered to is particle board, a thoroughly nasty concoction that more often than not contains formaldehyde and crystalline silica, both of which being fully capable on their own to cause cancer through moderate exposure. Moderate, not long-term occupational but simply moderate. A respirator should always be used when working with particle board to any extent, no exceptions. Unless, of course, one is all-on on inhaling carcinogenic fumes and having their lungs shredded and permanently scarred by microscopic crystalline shards.
Hearing protection is a given. Although one can certainly nearly recover from short-term exposure to high decibels, the damage is as you've stated, compounding over time. For the woodworker, that compounding damage is like whittling away at a chunk of wood over a long period of time, taking tiny slivers off with each stroke. Although it never really looks like much is changing over the short term due to how little is being shaved off at a time, the end result is a sizeable pile of whittled away slivers in the long term without much actual wood left to work with. That's how it goes with hearing loss. You won't notice it today or tomorrow. You'll notice it when you can no longer hear birds chirping or music being played or people talking. Again, best practice is to employ the hearing protection any time machine is turned on, no exceptions.