Replacing a Compressor, Start to Finish

Вставка
- Опубліковано 26 чер 2018
- In this video, we show Kalos's process of replacing a compressor from start to finish. We replace a Copeland scroll compressor in a Carrier unit and demonstrate some best practices along the way.
Our compressor installation process has several phases, including a preparation phase. That's when we do our research about the failure that was diagnosed, learn about warranty and billing information, and acquire all of the necessary materials for the job, including acid test kits, a matching capacitor for the new compressor, filter-driers, and virgin refrigerant (in the case of a burnout). Upon arrival, we confirm the diagnosis and ensure that we have the correct replacement equipment (including the compressor and hard start kit).
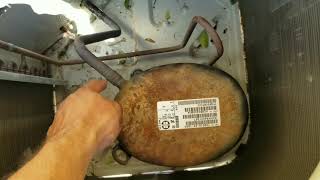
In this case, our compressor failure was diagnosed based on a loud grinding noise and a leaking internal bypass valve; in a scroll, that would indicate a scroll running backward or shorting. We also notice an oil leak on the copper line set. We determine that there is a mechanical failure without significant acid. (You can usually smell acid or notice fouled oil; in that case, we recommend following the complete acid protocol with a thorough testing kit.)
Our first step of compressor removal is to recover the existing refrigerant completely, and we speed up the process by removing our Schrader cores. You can also see how the charge amount might have contributed to the failure. As we recover the charge, we can clean the drain and evaporator coil as well as check over the rest of the system, including the metering device.
With the refrigerant charge fully recovered, we unwire the compressor completely, remove the foot bolts, and cut both refrigerant lines as near to the old compressor as possible. Unsweating is NOT recommended, but be sure to purge the system with plenty of nitrogen if you have to unsweat the lines. When you cut the lines, make sure you clean the copper with a sand cloth BEFORE you cut and then protect the lines from contamination with something like masking tape or by flowing nitrogen when it's practical. Once all that has been taken care of, we can then remove the old compressor.
When we insert the new compressor, we also install new filter-driers as necessary. (In this case, we just use a new liquid line drier, but burnout cases may require a new suction drier.) We lower the compressor into the condensing unit and tighten down the bolts. When brazing, we use heat-blocking putty to protect components and flow nitrogen (2-5 SCFH) to keep the lines from oxidizing or getting contaminated. Then, we install the capacitor and replace the contactor as necessary. Try to arrange your wiring in a way that will prevent wire rubouts.
After that, we bubble-test our joints and then pressurize the system with nitrogen. The pressurization settings will typically be around 250-500 PSI but will vary by system type and refrigerant type, so be mindful of those. The pressure should hold steady, and the oil in your vacuum pump should be clear. If the pressures decay too much, there could be a leak or moisture in the system.
Once your system is clean, tight, and dry, you can liquid-charge the system. Make sure you don't add liquid refrigerant directly to the compressor or anyplace where it might get into the compressor. (The discharge port is USUALLY safe because it should have a check valve, but be mindful of that. We usually recommend adding the refrigerant to the liquid line.) You can also turn on the crankcase heater to reduce the probability of liquid slugging on startup.
Once the charge is equalized, you can run the system with an amp clamp on the compressor to check the amp draw. If you notice odd noises or problems, turn the compressor off and diagnose the problem. Once you ensure that the system starts up appropriately, use the factory superheat settings. Take all of your necessary readings (including superheat, subcooling, discharge line temperature, and delta T), check the system in heat and cool modes, and make sure you WATCH the condensate drain out before walking away from the job.
When sending the old compressor for a warranty return, be sure to braze the ends of it shut (or follow the manufacturer's guidelines for shipping return parts) and state what the failure was in the paperwork. That is the end of ac compressor replacement process.
AMRAD: www.americanradionic.com/
Carrier: www.carrier.com/carrier/en/us/
Mitsubishi Cooling & Heating: www.mitsubishicomfort.com/
Refrigeration Technologies: www.refrigtech.com/
Read all the tech tips, take the quizzes, and find our handy calculators at www.hvacrschool.com/


Wow thanks for posting this!
Wow, probably the best procedure written up on compressor changeout. Looks like a top-notch service company.
Pride in workmanship right there! Many contractors will recover, unbraze/rebraze no nitrogen, change drier, vac and charge. No cleaning or other testing and I’ve even seen them leave dirty filters. I would go out of my way to hire a company like this. You only get one chance to do it right unless you want to do it over.
i don't think you're speaking too fast, very easily understood if you're a tech. Thanks for sharing your knowledge!
Brian you are one knowledgeable and conscientious guy. A rare quality in these days of cutting corners. A++
Great video Brian, good info for new and veteran techs. Nice check list / replacement procedures list.
Wow! A boss that not only stocks your truck with a recovery machine & a vacuum pump....but a boss that stocks your truck with a $800 recovery machine & a top of the line, expensive vacuum pump as well!
I hope his techs appreciate that.
Everywhere I have worked, I was told that I had to buy all the tools. Only parts, materials & the service van & gas card was provided. (& thank God they supplied that!)
Yeah, if his guys leave, they have a very high chance of working with lesser gear than that.
It seems to me shops that do not invest in gear, don't invest in their guys either.
Thank you for a very detailed description of correct procedures and creating a concise video. Very useful compilation of HVAC servicing information. Thank you for your great contribution to HVAC industry as well as UA-cam DIY community. Bravo !
Always good when the boss does a training day. 👍🏻
Great video Brian,
thanks to you & staff. There is nothing like hands on for teaching.👍
Tnx for taking the time and sharing, excellent reference.
Solid all 'round, nice work!
Great video. Thanks for sharing your knowledge and tips
Nice thorough compressor change out.
Awesome video! It seems like every time I watch a video a week or so later I’m actually doing what I watched. I hope a compressor isn’t in my future
I like to use wire loom for my compressor wires. Gives a clean look.
With covid-19 happen your videos are really helping me learn !
Very thorough and informative video
EXCELLENT video which you had the printed version of you print checklist and tools list.
Excellent work on relocating the bi-flow drier...
You made this fun..plus i like seeing your techs comfortable..some bosses make their staff nervous and anxious 4 no reason lol
Great video.😀
Really great videos thanks
Good video. Well done.
Thanks a very helpful review of the entire procedure.
Damn! That’s quality work. 👍👍
I agree, just found this and it is very detailed. Worthy of a book mark !!
This video is awesome. I’m gonna learn a lot. time is money thank you so much.💪🏼
very nice keep up the good work.
Great job and video
Nice video thank you
Great instructions! Thanks!
Just saw the decal DEL-AIR on the service panel.
I use to work for DEL-AIR Jan 96 - Apr 03 .
Captain Duane Lay commander & chef !
Great Job Thanks!
Amazing stuff! Sounds good too Your channel consistent!
though didn't anticipated the ending
Muito top suas aulas 💯💯💯
I had the same problem with my Testo clamp temp probes. With that 8 pin connector design connection, you can forget about trying to repair that connection. I did my Fluke K connection style replacements without incident, easily.... now its $110 later for two Testo replacement pipe clamps. ouch... The expense of Fluke pipe plamps are worse, they are about $150-180 each. The only consolation is they have the repairable K connection.
I just did a compressor swap on my mini split. No I didn't have all the recovery system and all that, but busted compressor in the middle of the summer SUCKS.
I had someone braze a line to the outlets, and then I just used flare fittings to connect it to the condenser. Not ideal but it works. I didn't nitrogen purge because I don't have any nitrogen.
I pulled a vacuum for about 30+ minutes, no micron gauge so it's the best I can do, then when I confirmed there's no leak (left it alone for 10 minutes to see if the vacuum is lost), I released R22 into the system. Then powered the compressor on, and got it charged by the superheat method (it's the only way I can do it). New compressor is cooling much better than the old one. I think the old one was busted to begin with and it just failed suddenly one night. It was making a lot of noise and weak (the needle on the gauge was vibrating like it couldn't suck hard enough) before failing. So if your AC wasn't cooling well even if all the refrigerant level is correct and there's no leak, your compressor is failing.
Great video Thank u Sir.
Great video nice seeing someone else changing a compressor besides me Lol.
I know that’s right
I envy the air handler location. Where I live here in California the majority it's all new construction, within 20-25 years and most of everything we deal with is up in the attic. So not only do we have long lineset applications we have long drain line applications, using Bluetooth digital devices for measurements is always a hassle. Oh yeah not to mention ductwork. Big time high production low cost contractors installing tight duct systems on oversized equipment is a constant nightmare which I lose sleep over LOL... However great video!
Yep, I agree because I worked as an HVAC Service Tech. in SoCal for 11 years and Arizona for almost 4 years now. The attic temps. in the summer are much worse in Arizona however. Luckily, we've got plenty of rooftop packaged units here though, and would rather work on those instead. The guys who work on basement furnaces/air handlers are spoiled in my opinion lol.
John Kickass there are some horrible basement locations... we’ve got some attic stuff which does suck being 120° and 90 plus% r.h.
Another awesome video, saw that he pinched and brazed closed the old compressor, Copeland asks that you use tape the fittings closed not silver solder :)
cap, plug, crimp, solder, yes. Tape? Tape covers a lot of territory. But not for very long.
What would be an example of a good swedge tool that can be used on the discharge line safely?
Quick question regarding the bolts and nuts, etc which are holding down the compressor. Long story short I removed the nuts which included some rings but I lost one ring. Is it okay to screw back on without the ring. (Portable Ac)
Excellent list
is the recovered refrigerant can be use again? thanks
Bryan worked on a heil package unit daul fuel. Had to replace a compressor which was under warranty. The Schrader valve look different from the ones I usually see. Their also on carrier units have you seen them looks like they can be remove the whole core with wrench. So my question is can I use valve core tool on these
excellent..!!!
WOW really professional vary hay standers ....hop you gays in Michigan
NICE VEDIO,THANKS, PRAKASH JAISWAL,KOLKATA,INDIA
For the drain pan treatment, it would be better to spray the condensation side of the coil, under side in this video.
When you braze the liquid line, keep that seal off until you are done. This will keep it from melting!!!
Can the reversing valve cause compressor failure?
How do you test for issues with the reversing valve, and what are the most common failure states?
Brian Orr where can I get that white HVAC hat at????????? Love that HAT!!! 👍👍
Thanks for that very thorough video. I like that checklist as well that you made for yourself... Is there a way I can obtain a copy?
That’s the link for the list he used, it’s great! I keep a copy with me whenever I have to do a change out on a compressor.
i would love a comprehensive vidoe for this procedure. there are some assumptions made that someone watching this has some experience. no guidance on what hoses go where, some fast forwarding through the process... but otherwise not bad.
Que bomba de vacuo top e magnifica❤️💯
Just curious, on the larger CFM rated vacuum pumps and larger sized vacuum lines, do you run the risk of pulling to quick of a vacuum? Also, not quite clear on the procedure you were explaining when placing in the factory charge on the discharge side. Do you have a detailed description of what is involved? Thanks for all you do Mr. Bryan!
Your not going to pull to quick of a vacuum. It’s about how low, not how quick. And the charging, he was referring to adding refrigerant back in through the liquid line instead of the suction. To avoid liquid refrigerant in the compressor
@@jeffb8437 he was concerned of freezing. If you pull extremely fast you can run a risk of freezing but it's rare. More apparent on really small systems and if ambient temperature isn't warm
Nice video, thanks, guys, I have a Chanel similar to yours but in Spanish, I am from dominican republic
How did you adjust your CFM per ton constant to 350.
I assume you must be in dry climate.
That's not completely comprehensive you say? Still some variations you say? Other techs would wreck that job at so many points and just not care. Very impressive work Professor Orr. Saving this for later review "totes" 😆
Do you have a link for the step by step? Great educational and hands on video!
I would also like the link.
where can I find a copy of the pdf in this video?
Did you guys verify the piston was the correct size? I assume it's good since the result was positive. However it wasn't shown.
43:25 ... “the ants go marching one by one ☝️ lmao !
Compressor hangouts have been a thorn in my flesh. I've always understood that the oil has to be drained from the old one and oil measured in with the new one. Oil is not even mentioned in this video. Any insights?
Oil is contained in the compressor (only small residual in lines) and the evaporator is higher than the condenser. Since the comp was replaced there is no need to drain the old - it also could very well be contaminated and should not be mixed with new. It is worth checking if you’re making a repair to an existing system with a known leak where the evap is lower than the condenser (roof mounted).
Did you end up verifying piston size?, Thanks for sharing Bryan
Yep, it matched up
Nice job, why not use measure quick for startup of new compressor?
Do you guys memorize this stuff or do you carry simplified steps and follow them when needed? That’s a lot to remember
It’s actually easier than it seems
This isn't difficult.
@@foobarmaximus3506 after a few months of being in the field, I agree. It’s just difficult to anyone who hasn’t gotten their hands dirty.
where can I find a copy of the pdf in this video
Probably on the website
hvacrschool.com/wp-content/uploads/2018/01/Compressor-Installation.pdf
hvacrschool.com/wp-content/uploads/2018/01/Compressor-Installation.pdf
This is late, but I cringed, when you mentioned discharge muffler vs drier, I ACTUALLY found a job with NO COOLING It was a lobby @ a RICKELS in UNION NJ naturally the drier broke down from the heat, all I could do was cut it out & use a piece of tubing to replace it . , I shine a package unit on a roof. 3 toms , with that muffler , Cheers 🇺🇸🇺🇸🇺🇸🇺🇸
hello sir Good day , very nice video , please share a copy of your checklist for changing compressor thanks
How do you tell the difference between a discharge muffler and a liquid line filter/drier?
It’s location for starters. Between the compressor and condenser coil would be the discharge and between condenser coil and txv the liquid. Usually some markings or a sticker at least on the filter driers, not always the mufflers
Is there a good reason not to reuse the acid test if it was previously used and no acid was found?
26:00 How do you flow nitrogen while you’re doing a compressor. I’ve never been able to successfully flow nitrogen through the compressor.
May I ask how is measuring the return air wet-bulb and supply air dry-bulb at the evapourator helping determining the superheat performance?
Doing a compressor Changeout tomorrow. Watching this video to refresh and make sure I don’t miss anything. Any chance anyone has the procedure PDF file? I took lots of screenshots just in case. LOL
What is that stuff you use while brazing in the line drier & compressor?
Wet rag by refrigeration technologies. Solderweld makes a similar product called hot block which would be my preferred choice. Otherwise all of refrigeration technologies products are great
Get your boys some aerosol can wands, Bryan!
Can you reuse the acid test later if it doesn't change color?
It’s designed for one use only
I'm designed to be cheap.
@@maynardr6 sometimes cheap can cost a lot more money LOL
Why on earth would you replace a perfectly good Amrad dual run capacitor, especially with a Amrad 200 multi? Otherwise, excellent work all around.
Yes... that was a little overkill, but in general replacing the run cap with the compressor is a good idea so I just demonstrating
Your videos and podcasts are simply the most relevant, the most informative, and the most accurate that I've seen or heard anywhere. And, I really appreciate your sense of humor. Thank you very, very much.
Hi sir, thank you for your fantastic video. Would you please tell me how we can purge nitrogen when we want to change the compressor? I mean there is no way for flowing nitrogen when the discharge valve of compressor is close? Or even for removing the compressor can we purge nitrogen? I can not understand it? Based on compressor structure there is no way between suction and discharge for nitrogen flow?!
When you replace a compressor. Does it have to be the same brand compressor? Or can you have a different aftermarket compressor installed?
What is the difference use soldering or hard welder
you guys go through all this all we do is change the compressor out change the drier and we're done we aint got the time for all that js , but dang this was great ,it's great practice though
Great Video,
Is POE oil required on new compressors?
Pro tip: it’s only half true you don’t have to rinse off your evap coil after using evaporator coil cleaner. In fact the only time it’s ok to not rinse the evap after using the cleaner is when the system is actively being used as the condensation rinses the coil off. Otherwise you should rinse it off... read the can that’s what it will tell you
True. What you don't rinse off, you will be breathing into your lungs. Seems like common sense to me.
Three guys for one residential split unit compressor change out?
Why not. Trainee
Do you have this check list available or for purchase.
What coz the acid build up in system?
Need that task list please.
Wish I worked for him. Anyone know where his company is located? Bouts to move!
Anyway I can get this check list on pdf?
how do we construct compressor name plate whose not present or dried out
16:47 I see that DEL-AIR sticker 🤣👌
These guys are the polar opposite of the clown that was at my house last week.
Great video. Where can I get The checklist you used?
hvacrschool.com/wp-content/uploads/2018/01/Compressor-Installation.pdf
Climate Master puts Supco hard start kits in some of their heat pumps from the factory.
I have seen an entire building with problems because the installers removed them. Call the manufacturer to be sure it shouldn’t have a hard start kit. Those little single phase compressors are very touchy. They need the perfect capacity to not start out of phase and lock up.
what white color substance did you put on the compressor before Brazing?????
Simple wheat flour. It's used for baking and brazing. LOLOL
Where in illinois is this ?
Orlando, Florida
Can you please send me that list for this project please ?