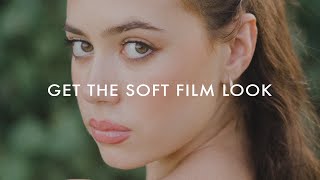
Skin Retouching In Lightroom Classic - Easily Soften and Smooth Skin Tutorial

Вставка
- Опубліковано 21 вер 2024
- 📸 My Lightroom Presets: www.mitchlally...
🎥 My LUT Pack: www.mitchlally...
⚡️ Learn to create beautiful photos with my Creative Portrait Photography Class: www.mitchlally...
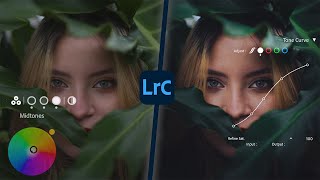
Portrait Retouching and Skin Softening in Lightroom Classic! This is the easiest way - leveraging the new tools we have in the latest version of Lightroom. Smooth out skin with the texture slider and subject selection.
🐇 I use Narrative Select to speed up my workflow: mitchlally.com...
👨🏽💻 I use Squarespace to build my websites: mitchlally.com...
🎧 Get a free trial of the best music for your videos: mitchlally.com...
🔧 My Gear
Main Photography Camera: geni.us/sony-a74
Main Video Camera: geni.us/BzuX7Gp
My Favourite Portrait Lens: geni.us/35mmGM
Vlogging Lens: geni.us/sony-v...
Wide Lens: geni.us/17-28mm
Zoom Lens: geni.us/tamron...
My Drone: geni.us/NQNbf
On Camera Audio: geni.us/j0veiA
Voiceover Mic: geni.us/s0gKA
Voiceover Recorder: geni.us/AbX3
Rode Wireless Go II: geni.us/XfLTU
My Favourite Lav Mic: geni.us/Akwok
Cheaper Lav Mic (still good): geni.us/7Rkht
Travel Tripod: geni.us/HFnPEtY
Best SD Card for the R6: geni.us/YbwaR
Reflector (must have): geni.us/Aq02H
ND: bit.ly/nisivar...
CPL: bit.ly/nisicpl
BlackMist: bit.ly/nisibla...
My Camera Bag: geni.us/i8uU
Best Editing Hard Drive: geni.us/WslG
Best Backup Hard Drive: geni.us/m3wg
Spare Batteries for R6: geni.us/O5d6Nc
Spare Batteries for R6 (cheaper option): geni.us/WNfoJ4
Best Battery Charger for the R6: flashlight.nit...
** Clicking any of these links above helps support my channel as I get a little commission from each link used (and doesn't cost you any extra!) **
💬 Join the discord to chat and hang out: / discord
Follow me on Instagram:
/ mitchlally
Get in touch (Business only):
mitch@mitchlally.com


Very useful. I'm 66 and started with photography 3 years ago. I tried Ps. I watched video for 2 months and got fed up. A month later, I wanted to pick it up again and forgot most of it. I now make a portrait, export to Ps and use the Neural filter for softening, then to Luminar AI for teeth, eyes; lips,... and back to Lr. Lol, don't laugh...;-). I find this new version of Lr super and you did a great job explaining. Thanks Mitch.
Follow your passions ♥️
There’s more to photoshop than watching just videos.
Dedication and commitment
This is one of the best and most helpful tutorial videos I have seen in a LONG TIME!
Thanks mate!
Big thumbs up for this video! Most of my subjects have varying skin tones, and your information is right on target...THANKS!
I absolutely love this video! Super easy follow along tutorial! 🥰 I’m self teaching myself photography and this is so helpful. Thank you
Appreciate it this homie! Finally know how to give images that smooth effect!💯
You’re welcome! Glad you enjoyed it
Thanks Mitch - crisp, clean presentation full of great ideas with NO useless "promotional" BS at the front end. :)
That's how a lot of creators are able to make a living. Fast-forward if sponsors and promotional "BS" bothers you, but we would have far fewer creators making good content without them.
@@ko300zx I get your point but some creators handle this better than others. For example, I see vids with "intros" that are 30% of the entire vid. No point in taking that much time if the viewer quits viewing before the creator's message before they get to it.
Thank you , so useful! Yes, I’d love to see more of this type of content and behind the scenes 🤩
Thanks for the tutorial . One of the best I've seen so far on Lightroom
Great tutorial! Thank you so much, Mitch!
Best to you,
Lucio
great quick portrait editing in LRC! thanks!
awesome tips for the non-pro, appreciate your teachings.
Cool straight to the point tutorial 👍
Thanks, mate!
Thank you very much!!
Thanks! I went searching for information that would help me determine if I could use LR for my photos and this vid sold me.
Great information!
Clear, concise and so helpful! Kudos and thank you!
cant wait to use these tools my next editing sesh. Also that Burleigh preset looks super clean Mitch👌
Step by step to success, easy to understand thanks
Thanks brotha! This helped a lot ! Ijust started doing photography
Thanks Mitch I appreciated your detailed and clear explanations, not taking anything for granted, i.e. assumed knowledge of LR stuff. Very helpful and I enjoyed following along with you one your work flow, Well done.
Thank youuu sir, more power to you. Love from India 🥰🥰🥰🥰
Thank you, a great video. I use Lightroom every day and I still learned so much from your video. Keep it up.
Ohh gosh! So east to follow! Thank you!
Thank you 🙏
Oh wow. Super helpful for me, thank you!!
Thank you so much for this, skin retouching can be really daunting sometimes
This alone was very helpful!! Thank yoh
thx mate!
This tutorial helped me immensely! Thank you!
Thank you so much for this! It is so helpful
Excellent tutorial 👌🙏🙏
Congrats! Very good video and explanation!
Simple, easy to follow and straight to the point - great vid mate.
love your presentations. clear concise. big fan cheers
Thanks so much! Great job!
An easy and quick tuto, thank
Very useful, Thank you so much
So helpful!
Thank you so much for this tutorial ! So helpful
Appreciate the tutorial mate!
Many many thanks for the video
thanks
Great stuff! Thanks!
I love your outdoor presets. Do you have any for indoor portraits?
I've got many many videos that show the presets being used for indoor photos!
You earned another sub, great vid
Instant sub and preset purchase!
I always love your content ❤ great tutorial!
Thank you !
Good job! 👍
thanks.
Awesome video once again!! I am loving the new LR Classic updates!! On your presets, has there been an update since the release? My version only has 3 OG versions, reg, drama & flat. Yours here has 4 versions, green shift & 2019?? Please let me know if there is an updated version. Thank you :)
Thank you so much. this is very useful :)
Could you please show us what is the setting for saving the picture you edit in Lightroom for jpeg web and for prints? Thank you
Kala q nagbago n ng career c idol tubid😅.. nway, this is the most understandable and accurate explanation about the triangle😊
Well done.
I having problems bc when I click add mask it only is giving me the option of subject, sky and background. It’s not giving me face or anything like that.
Thanks for this tutorial, vert helpful. Just 1 question- did you apply that final preset to the entire photo or just the mask?
The best one ever ❤️
The video is literally 10 minutes long how can you determine this so fast lmao 😭
Not doubting mitch btw lol
@@tjvisuals hahaha homie watched it in 10x speed >.
I'm not taking about this video I'm taking about your content so I put it before watching
@@hexa-tech got it just kidding 😂
super thanks
Mitch, what presets did you use for these? I loooove 😍 please tell me if they’re your own that you sell them 🥲
Hey! I used Burleigh for this one :) I lifted the black point on the tone curve up a bit for that faded look
@@MitchLally what version of lightroom has this? I can't find it on my version and I got lightroom classic 18
What if the people option isnt there? mine says my computer doesnt have enough graphic memory to support the feature, how do i fix this?
Hey there great video! I'm curious if there is a way to batch edit with this feature and the new AI features theyve added? It's probably already out there and I just haven't seen it yet, but I thought I would comment here in case I can't find it. I just wondered if AI would identify the same face and re-touching, even though it may be a different pose or background. Thanks for your awesome videos and any feedback.
thanks mate
❤❤❤❤
Hello Mitch! Thanks for your video! Another question more or less related to your work. What kind of laptop / computer are you using? Not too long ago Litghtroom started having a major slow down. Would be nice to know what you are using :)
am trying to get the lightroom app in my pc bt its not working .it downloads but cant login in
please help mre out .thnk you
Damn... This got me soooo close to actually doing this. I am on LR Classic 23. When I slide texture it affects the whole image and not just what is in the face mask. Also when I slide it the mask does not go away. I don't know what I am missing...!! ALSO... my texture slider is not where it shows on your end. It is much farther down the panel in "effects"
i "liked" and "subbed" bro BTW...
good
Can you apply this to mulitple images and fix the skin in all?
great video--thanks so much. one question--how do you apply your edits of one photo among many in a shoot, to the rest of the images (batch edit). I find that when I copy and paste settings from one key image, to the others in a batch, I constantly have to "update" the ai masked settings. Is there a way, or an order, to do this to speed up my edit? The things that I am doing to my batches include: applying a preset i have created for contrast, dehaze, saturation, etc, then, healing out blemishes and acne, then applying a mask that does three things at once--eye brightening, skin smoothing and teeth whitening. I also apply a vignette and then crop a little. I'm thinking there must be a way to do this work to one image, then apply it to many, WITHOUT having to constantly update my masks. I keep getting a message in LRC that reads, "adjustment that may affect... changed" and I am then prompted to update the mask. Thanks again for your help.
Can anyone tell me how to switch between faces.?? I established two faces initially and clicked on one and worked on them. Now I want to go to the other face but don't know where to find them. I really wish that Mitch would reply to his subscribers.
Is this available in lightroom cc?
what a version u use in this video bro?
It would've been great to see more specific techniques on how to reduce common elements in faces, eg. lines, wrinkles, shade under eyes, etc. It's a nice discussion on how to refine Lightroom's people detection AI
You just left me hanging with a bunch of circles all over the face. How do I get them to work their magic???? I don’t understand what I missed that everyone else somehow just got. I’m so frustrated. There’s no “ok” or “done” button. Somebody please help!
Ohhh you just hit close??? No save?! That’s so weird. You should’ve added that in the video. Otherwise great video.
Which preset did you use ?
R u using ur preset in this photo?
sad there is no tool like color uniformity from Capture One, that tool works much better
"latest version of lightroom classic" which is? Would be great to indicate exactly the version you used for this tutorial, at least for posterity sake
For anyone curious, it's Lightroom Classic v12+
The red mask scares me so much
👍👍👍👍👍👍👍👍👍👍👍👍
That was not quick and easy.
This is amazing. Thanks so much for making this easy! I would love more content like this. #newsub
thanks man
Thank you! This is very useful :)