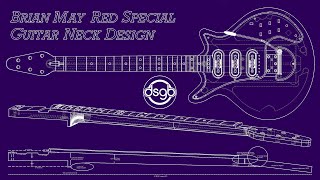
Red Special Build - PT10 Neck Finishing

Вставка
- Опубліковано 29 вер 2024
- Part 01 - Blockboard Sandwich - • Red Special build - PT...
Part 02 - CNC Body - • Red Special build - PT...
Part 03 - CNC Neck - • Red Special build - PT...
Part 04 - Body Glue Up - • Red Special Build - PT...
Part 05 - Router Bearing Repair - • Red Special Build - PT...
Part 06 - Applying Veneers - • Red Special Build - PT...
Part 07 - Binding and Staining - • Red Special Build - PT...
Part 08 - Veneer Sand Through Repair - • Red Special Build - PT...
Part 09 - Neck and Fingerboard - • Red Special Build - PT...
Part 10 - Neck finishing - • Red Special Build - PT...
Part 11 - Frets - • Red Special Build - PT...
Part 12 - Assembly - • Red Special Build - PT...
Part 13 - Demo - • Red Special Build - PT...
: : : Neck Finishing : : :
In this episode, we blow through a number of large, time consuming steps rather quickly! I crammed a lot of progress and a lot of footage into one video so there wasn't an undue amount of time spent on preparing the neck. Even with that said, there is still another entire neck video to come!
When we last left off, the fret board, neck and accompanying hardware all finally came together. Now we dive right in to marking and drilling holes for the tuners. I went with the closest match for the tuners that were originally installed on the guitar when Brian and Harold first completed it. I landed on a set of 1960's Teisco open-back tuners, and I couldn't be happier with the look of them!
Once I was assured of their placement and fit, it was straight into filling the very open grain on the neck and fretboard. I went to my trusty Bob Ross Black Gesso to ensure a happy little neck, and while messy and time consuming, it worked like a charm. A couple coats were required in total.
One step I had trouble visualizing was how to mask the fret marker dots. My pal Doug Short set me up with some adhesive plastic dots that were the size of the pearl inlays. Once applied, they are very firmly affixed, and the spraying of lacquer and subsequent sanding passes were completed with no incident. I used a scalpel to carefully pry them up and peel them off. Big thanks to Doug for our seemingly unending collaboration on this build. Check out his build and lots more info here: dsgb.net
Following a tip from Jonathan David Griffin, I used a mix of Behlen's nitrocellulose Stringed Instrument Lacquer and Mixol black universal tint to paint my fingerboard fingerboard. I lost count how many coats I did, but between level sanding and the smooth round over edge, it seemed like it was never enough. Then on to staining the mahogany sections of the neck with the same 85:15 General Finishes Empire Red : Medium Brown mix. I then coated the entire neck with the same Behlen's lacquer. (minus the black tint) Again, many many MANY coats until everything was flat and flush. I polished using a series of Meguiar's car polishes on drill mounted sponges.
I also took another opportunity to add a few extra adornments to the side of the neck for a bit more character and authenticity.
Music: "Zero Circulation" by Smokescreen. (My old band)


its nice that you say in the comments what supplies (paints etc) you used. Most folks leave the viewer guessing. I've seen the Brian May interview about The Red Special, looks like you did your homework. Very nice work.
Thanks for watching! Happy to share what I know.. but I'm just a beginner.
Hello ! You did a great job, I was wondering if you could explain to me how to apply lacquer properly, how many coats ? And what grit you used ?
Hi Luke. I already have frets installed in my neck without a stain, just the oak and fret dots. Do you think I could use the black paint you use to paint the fret board black so I can finish with a clear lacquer?
There's probably a video on UA-cam for this, but I think Fender do or used to, or occasionaly, spray lacquer when the frets are on. (but don't quote me on that) You might need to do some clever masking of the frets and the back of the neck but it could be done. I used black tinted lacquer, sprayed on, as seen in the video. The issue is sanding it back and getting it totally flat. It would be much more tedious this way. I think it could be done, but might take a lot of work. You might pose this question on the Red Special Facebook forum. Plenty of people more knowledgeable than me on there. Good luck!
What kind of color is the black you used to cover the grain? water-based acrylic..
That fret board with the finish is just incredible. I also like how you stain with black then rub off... Thank you
Beautiful work❤️
Excellent results. This is where most BM replicas get it wrong and don't put a gloss epoxy finish on the fretboard.
Been enjoying watching these Luke. Is there a video for finishing the main body? Or is it basically the same process?
Thanks, Dan! Basically the same process. I did shoot a bunch of me spraying the body, and polishing both it and the neck... but as I did things out of order and I was already approaching TWELVE videos for this guitar, I decided to leave it out and not go backwards. I also didn't really "get" how to spray the thing properly until right around the end of my neck. It took that long to click for me. I was putting on way too little each pass. I'm planning to go back and do a slight "overhaul" to replace and repair a few things. If I have the courage, I plan to respray and re-polish the body. If I do, I'll try to work it all into one video.
Simplemente perfecto!!!!
Thank you!
Luke, You are brilliant to have built a Guitar which I've admired for 45 years or so. Sounds sooo sweet - must be a lot of fun to Play. THANK YOU for answering my question re: the neck finish. I am afraid though because my neck is on the guitar as are the frets - Can I clean the frets afterwards ?? All I want is that slippery looking black fingerboard.
There's a lot to it... getting the neck pure black is one step, getting it ultra glossy is another. You CAN spray lacquer on the neck with the frets in, but its a more delicate process. Fender sometimes do theirs this way, then remove the lacquer from the tops of the frets. However, if you didn't fill the grain before the frets went in, it could be very tricky. I would google this process before you try it.
How far are the tuner-holes away from each other?
How did you level sand the black laquer? With sandpaper?
Yeah. I think I just used 400 grit paper underneath a sanding sponge so it conformed to the curve a bit.
what paint did you use in the body and how much
Info in the description. But I put on many layers of paint, sanding back after every 3 or 4 coats to check that the grain was completely filled. Then I probably did 5 or 6 after that, sanded it smooth, then moved to the clear coat.
Hola! El tinte que le pones al cuello es color caoba?
All the info is in the description.
I have a question. what kind of mechanics are these?
Machine heads? They are vintage Teisco tuners.
@@Lukeyourself Ok. Thank you.
Beautiful work❤️
Great!
I CANNOT find out what they put on the necks ( fingerboards ) to make them so black & shiny. from any video... Please, I'm probably on my last Les Paul and I want to do this...It looks so...Playable.... Please someone message me.
I put all the ingredients and the (sped up) process in this very video. Go to 2:39 and you'll see all the components. Also read the description for more detailed list. Lots of ways to do it tho.
Beautiful! Love the worm holes! Did you use Rustins?
Van Faux No. I used Behlen’s String Instrument Lacquer. Couldn’t get my hands on Rustins in the States, despite my best efforts. Video description details what was used instead.
Where did you get the tuners?
eBay. They're old Teisco tuners. But sellers may not know they're Teisco, so you may have to search for "vintage" or "open back" etc
@@Lukeyourself ok, tanks
Hi Luke, watching this great video again. Can you tell me what are you doing at 3.07 ish. Are you rounding off the edges of the fret board slightly. Thanks
Hey Peter! I'm using the same scraper tool I used for the binding to scrape away the excess black paint until I've just exposed the tape line. It helps the tape come off easier, helps keep the paint from chipping or peeling off, and also reduces the thickness so there isn't a "ledge" of paint there. I didn't keep exactly square to the fretboard, as I was hoping to remove just the lip connecting it to the tape, so I had more towards the top of the fretboard. If that makes sense. Always trying to avoid a sand-through.
@@Lukeyourself Thanks Luke. Fantastic job
Great Videos Thanks! Could you tell me where you got the 6mm plastic inlay covers from that you protected the inlays with whilst spraying the fretboard black. Thanks.
Amazon has a lot of options. Search for 1/4 inch masking discs.
@@Lukeyourself how many layers for the lacquer?
@@joethrelfall6370 Well, my count is irrelevant because I didn't know what I was doing. This was my first time spraying lacquer and only on the very last day of coating the body did it click how to do it properly. So I put on a ton of coats and very carefully sanded back after every 3 or 4 until I couldn't see anymore pits in the finish. My advice is just aim for that. Keep going until it's smooth. It takes time, but it's so worth it.
Again, fantastic song