Making an Electrolysis Tank for Rust Removal

Вставка
- Опубліковано 19 вер 2024
- *Reposted...just didn't seem right without some actual electrolysis to wrap it up.
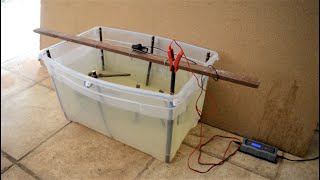
Electrolysis is a great method for removing surface rust from ferritic objects using electric current. This video deals with constructing the electrolysis container. The size of your container should be governed by the piece you are cleaning. There are a lot of different ways to go about this. Here's what I did.
Important Notes:
Using a ratio of 1 tablespoon Washing Soda per gallon on water
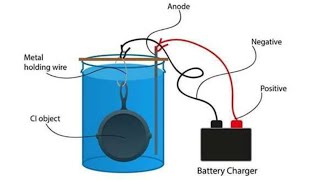
Connect positive lead (+) to your sacrificial anode
Connect ground / negative lead (-) to your cathode (what you're trying to clean)
Electrolysis Tank Materials:
3x 1/4" x 5/8" steel screws
1x 1/4" x 1-1/2" steel screw (Main electrical connection)
8x 12-10 AWG, #12-1/4" stud size ring terminals
~8ft 10ga wire
12ga mild steel plates 2x (9" x 14"; 9" x 9")
6 gallon plastic tub...clear containers seems to work best. The colored plastics I found to be too brittle.
3ft of 3/4" Solid aluminum rod
2x Jackstands
Vinyl tape
PVC insulators cut to size (may not even be necessary since the rod is connected to GND anyway, but whatever)


Great idea with the jack stands! Nice set up!
Great vid! Very good explanation of electrolysis! I would also pop the dents out.
You went OCD on this project but it is a nice set up...good job.
Good idea, the only thing I might have dome is submerge your steel plates in Vinegar over night to remove the mill scale from the Hot Roll steel plates so they work more efficiently but that's a good idea. Also what you can use for long say 3' parts is 3" PVC pipes @ 3 feet long with caps glued on and 1/3 of the pipe opened length wise for a tank for long parts. FYI After the electrolysis scrub off the part under running water with a wire brush to remove the black scale created for best results.
Instead of all the wire connectors, next time just strip the wire in that spot and wind it around your screw and feed it off to the next one. No need to cut the wire until you reach the end.
How the heck have I never thought of this?? Gonna try it on my next setup.
good skills and we see we are in a presence of a perfeccionist, BUT... but for remove rust from that kind of piece we actualy can achieve better results simply with an electric driller with proper rotary brush bit.
it simply cleans quickly and the metal will stay as new, very clear.
this process shown here is very good for other kind of complicated pieces, not for simple surfaces pieces. but thank you anyway for show your construction. the 4 plates is a good idea instead of a simple rod, as shown in many videos.
Yes, you are correct. This was shown purely for demonstration purposes.
The difference is. Using a wire cup brush affects good steel and rusted steel and is much more abrasive. With this method it only affects the rust. You can then remove the blackened finish with a mild scotch rite pad or wire wool. Basically you preserve more metal this way. This is important for tools for example or quality parts. If you were using this method to de rust rebar or an old cold chisel it would be overkill and angle grinder with wire wheel is the way to go. One other benefit is you don’t end up plastered in iron oxide dust, or your workshop using electrolysis
Good video you might consider drilling a hole to put your bolts thru use double nuts and the panels won't move its a pretty easy process you can also just submerge the part in mollasis water there's a good video on it from a guy in Australia keep going
You are making simple thing complicated.
You mark the bucket, but apparently the lines where there for that in the first place. Thanks for sharing!
You have caught all kinds of flack for your attention to detail on this project and I am surprised by it. I've built a few of these tanks over the last few years. I feel like the attention to detail removes all room for doubt if it doesn't work properly. You can be confident in the design and build of the tank and then focus on the attachment point of the piece or the power supply itself.
Honestly, my opinion about your design and choice of materials doesn't matter. What matters is does it work for you?!
Keep on eeling and chilling in your electrolysis tank!
This dude loves his steel wool.
I would pull the indentations out of the vise tail cap. What do you need are few tools such a pein ball hammer, a chasing hammer, a bossing mallet and a Shot Bag + Metal Forming Domed Head Stake as receivers
Mate, you should have said at the start that you have never done this before. While you don’t mention it in the title or your commentary It’s very obvious that you have got all the info off UA-cam and then made the video before you have tried it. I have been doing this for years and I have a similar size tub which I just fill with water and throw a hand full of washing soda in there. No measuring needed. No bullshit about dilution rates and I don’t use fancy plates which have been wire brushed ect. For years I have just been using a piece of 1/2 rebar made into a rough square that sits on the bottom of the tank and every so often I take it out and give it a quick hit with a wire wheel. It’s pretty buggered now though so I need to make a new one. Again for years I have been using a very cheap 12 volt 4amp manual battery charger and I usually just plug it in and leave it going for 24 hours. You can’t over do it because the electrolysis only attacks the rust. All the talk about keeping the 3 & 5 volt leads on the asx supply incase you need to dial it down is rubbish as well. And as for hydrogen embrittlement, what are you building a fucking space shuttle? Embrittlement is mainly a problem for high tensile steel like grade 8 bolts but this can be relived by baking in an oven to drive the hydrogen out. Don’t be surprised if your power supply starts cutting out or dies because you are effectively creating a short with this set up which is why it doesn’t work with the modern multi stage electronic chargers. Mate, seriously dumb it down and keep it simple, plug the 12 volts onto it, sit back, crack a beer and watch it do its thing. Good luck with it. Cheers Stuart 🇦🇺
I appreciate your comment but what it boils down to is this:
If we were bakers, you're saying because I gave a recipe, I clearly don't know what I'm talking about and haven't done this before.
You've been baking for years and you don't need a recipe. You don't need any fancy gadgets, just a hand mixer, and you just throw some ingredients together and voila!
The problem there's no entertainment value in me baking a passable cake and not even providing the recipe.
Getting back to electrolysis, embrittlement is a concern for steels with high carbon content and at higher voltages. Just because you use a 12V battery charger doesn't mean everyone will. Also cast iron, including ductile iron, has higher carbon content than Grade 8 bolts, which are made from medium carbon alloy steel.
I also disagree that the 5V lead isn't useful because 5 or 7V is what I'd start out with for restoring much older, delicate steel.
Also, my power supply is still going strong.
Cheers!
D_I_Why!?!? Ok, point taken and I apologise if I sounded arrogant, at least that’s how it comes across reading my comments back to myself. Also you make some valid points. Better to tread carefully at the start. Cheers Stuart 🇦🇺
If you made the tubular aluminium rod shorter than the bucket and put wooden broom handle through it can then rest it on the sides of the bucket, insulated. Or pieces of old radiator hose on the ends to insulate. Try swapping wires neg to parts and positive to iron plates.
It amazes me that everyone uses battery chargers and similar for this. I use an 80 watt solar panel (it's actually 4 x 20W panels in a fold-out arrangement) with the voltage controller / regulator removed. Gives me about 17 to 20 volts, depending on what part of the day and how the sun is shining (we get mostly clear, sunny days where I am). In a tub about that size, I only use two anodes - a bit of old scrap steel plate in each end of the tub. I can then suspend parts / camp ovens etc from a bit of pipe laying across the tub. I connect the negative lead from the solar panel/s directly to the part being cleaned, with the alligator clip and the part both fully submerged in the electrolyte solution. No need at all to be so fussy with cleaning steel pipe / wire / plates as John has said below - just clip the alligator clips on and give them a bit of a wriggle - they will make good enough contact.
Good video though - explains the process well especially for anyone who has never done this before.
if you were American you would use a battery charger too. i don't see why it amazes you, lots of cloudy,rainy areas in America. also no one in America does this the way this nutty professor guy does.
I find using a heavy gauge steel mesh like heavy duty steel window screen just wrap everything Or shape it into a basket then take 4 pieces of anything sturdy like 1" pvc or anything non-conductive cut to about the height of the basket and Glue/apoxy it to the bottom of the tank standing at the center of each side of the steel basket so It can’t slide and hit the plates also Put something under the basket or pouch to keep it just off the bottom of the tank So water can also get underneath everything It’s just so much easier than hanging everything Just toss it all in the basket good to go
ran an oxilating fan over the bath , it disperses the gas so it never reaches the amount to actually explode , it allso moves the mess on the water intoo one corner a little
allso the bigger the surface the more amps you'll run though the water , think 1 plate or 4 way smaller plates should be enough
Would u like to know why the part turned dark?
I looked it up.
Hydrogen embrittlement is the process by which metals such as steel become brittle and fracture due to the introduction and subsequent diffusion of hydrogen into the metal. This is often a result of accidental introduction of hydrogen during forming and finishing operations. This issue is caused by material properties (diffusion of hydrogen), environment, and stress. This phenomenon was first described in 1875
It's Amperage that makes it work faster, not voltage.
No, that isn't correct. I could wire more power supplies in parallel at a lower voltage and the reaction would be slower.
Look up any plating or electrolysis process, the amount of work done is directly related to current density st the anode/cathode. @@354tb35yb5y
WTF? Built mine and finished three projects in the time you explained your wire connectors
If you use 16 gauge wire for the cathode then you can use 16 gauge wire throughout. At 2 Amos you can use 18 or 20 gauge wire safely. But I liked the video
Hi,
May i ask how many Amp you used for that?
gee,s such small cup for such large tank - crazy
Hey great video man ! 👍
I fell asleep watching this.
You can also use basic math to determine the tubs volume at any desired level...
Wire the POSITIVE side to the iron plates and the NEGATIVE to the rusty parts, hanging from copper
Yes, that is explained at 10:58.
What are you insinuating the jack stands from???
In the setup I've shown it isn't really necessary because it's attached to ground anyway, but if you were using any other combination of leads, like a +12V and -12V to get 24V, for instance, you would want to electrically insulate the jacks from the rest of the circuit. I thought it was relevant so I included it.
I have some old zinc anodes removed from my boat. They still have plenty of metal left. Can I used it as the anode in this application?
yes zinc works perfectly
If you want to zinc plate your project.. go for it
how much washing soda do you use per gallon of water
1 Tablespoon / Gallon of water
What did you use for your power supply?
I used an old computer power supply.
You're overly fussy about cleaning the steel wire etc. but your power supply is not good . It's not that complicated !
Hi, would you mind elaborating on why you think the power supply isn't good for this application?
Your power supply is wide open to the world and looks very unsafe especially working near a conductive water solution, I prefer to use a closed in manual battery charger. I use rebar iron as the sacrificial anode and did not polish with steel wool for a good connection. Works beautiful. Also the negative anode can be attached to your iron relic and be submerged. I do this all the time and it remains in pristine condition . Positive anode stays out of the water or itwill be eaten away !
The power supply isn't used in that condition under normal operation. In the video I just wanted to test if it worked at all and that I could see if anything arced / blew in the power supply. The power supply is normally enclosed and it has overvolt protection that shuts it off if there is a short. Rebar will get the job done in a pinch, but it's usually not the best option, or best 5. The reason for this setup is because the project piece was quite big and intricate, linked below:
ua-cam.com/video/lQ-m_x60RLE/v-deo.html
Mr OCD, i bet your teachers had a time keeping you focused. You heard them but wasnt listening to the precious details.
Over killed
You are going way overboard on how to do this. It's not that hard to do!!!
wow over complication of a simple process
I was not sure I agreed until he mentioned the torsion on the wing nuts... I knew that at this point we needed a flux capacitor...
Okay kept watching you do not have to be exact on measurements you could use salt your just making the water more conductive throw a handful in fill it up enough to cover the part and plug it in neg on part your not making beer lol
youre making things over complicated. these electrolysis tanks are easy to make...you must be one of the many oner fussy engineers
A good wire brush would be much more effective...…...
No, it would not. That's the reason I went down this path in the first place.