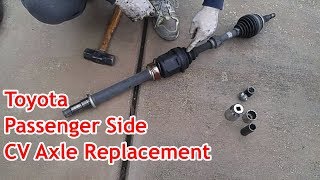
1996 - 2000 Toyota Rav4 Right Front Axle AWD CV Boot Replacement FULL DIY w/ Toyota Boot Kit

Вставка
- Опубліковано 16 бер 2023
- This video is a full DIY for replacing the right side AWD axle and/or CV boots on '96 - '00 AWD automatic Rav4s. The video shows how to:
- remove the front right axle on a '98 Rav4 AWD A/T
- how to disassemble the axle and replace the boots
- how to re-assembly and re-install the axle.
This repair is very similar on many other Toyotas. The "other video" mentioned in this video is an even more detailed DIY on the driver's side axle replacement which has more detail about using a slide hammer and different tools and techniques for removing certain fasteners:
• 1996 - 2000 Toyota Rav...
The driver's side CV axle boot replacement very similar, and is shown in detail here:
• 1996 - 2000 Toyota Rav...
Here are the Timestamps, Part numbers, and Torque values:
00:39 Different boots on '00 versus '98
01:39 How to identify an OE Toyota axle
03:04 Note about the transfer case and transaxle setup
04:20 Lift the front end (both wheels up)
05:09 Inspection of worn-out boots
05:36 Remove the wheel (21mm)
06:37 Loosen the axle nut (30mm, six-point deep socket)
08:28 Push the axle from the hub
09:22 Remove one brake line bolt (12mm)
09:36 Remove two ABS sensor bolts and ABS sensor (10mm)
10:20 Remove the sway bar/stabilizer link (17mm plus H6)
11:18 Disconnect the tie rod end (17mm, rental tool is OEM tools 27276/57276)
12:57 Remove three fasteners for the control arm (17mm)
14:00 Seperate the CV axle from the wheel hub
15:24 Remove the cover (12mm)
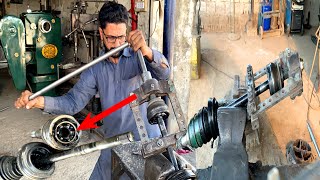
16:09 Options for removing the axle
17:21 Remove the CV axle (Powerbuilt Kit 41 slide hammer is
shown)
18:30 Axle on the bench
19:28 Make match marks on the inboard joint housing
21:14 Remove the inboard boot bands/clamps
22:58 Pull the inboard boot back
24:03 Make a match mark on the tripod
25:11 Remove the tripod snap ring/retaining ring (Pliers: example, Lang
1409)
27:00 Make the last match marks between the tripod and
shaft
28:10 Tap the tripod off the shaft (brass punch)
29:12 Remove the inboard boot
29:58 Inspect the grease
31:03 Remove the outboard boot clamps
31:21 Remove the outboard boot
32:54 Note about inspecting and cleaning the outboard joint
35:09 Cleaned up outboard joint and tripod
35:29 Sorting the parts in the Toyota boot kit 04438-12305
37:50 Prepare the shaft for boot install
39:13 Grease the outboard joint (Raremax LFG(KAI), 90999-
94304)
39:54 Install the outboard boot
42:16 Install the outboard boot bands/clamps
43:41 What to do if you break a band/clamp during install
48:34 Install the inboard boot
49:32 Install the tripod to the shaft using the match marks
52:58 Grease the tripod and cup (Raremax SLF, 90999-94166)
53:45 Install the cup over the tripod using the match marks
54:27 Install the boot to the cup
55:07 Install the inboard boot bands/clamps
58:44 Install the new o-ring and new circlip (coat with ATF)
01:00:40 Note about the ATF, transfer case, and shaft seal
01:01:52 Note about re-greasing the wheel bearings
01:02:51 Coat the circlip with MP grease and position the
opening downward
01:03:20 Re-install the CV axle shaft
01:05:30 Inspect for proper shaft install
01:06:09 Re-install the shield/cover (two 12mm bolts)
01:06:19 Re-install the axle to the wheel hub
01:07:46 Temporarily install the axle nut
01:08:29 Re-install the control arm fasteners (two bolts and
one nut, 17mm; torque to 94 ft-lbs)
01:09:25 Re-install the sway bar link (two 17mm nuts, H6 to
hold the ball; torque to 54 ft-lbs, or 33 ft-lbs for 2-door
models)
01:11:29 Re-connect the tie rod end (17mm and 1/8" cotter
pin, torque to 36 ft-lbs)
01:12:19 Re-install one 12mm bolt for the brake line
01:12:33 Re-install two 10mm bolts for the ABS bracket and
sensor
01:13:06 Torque the axle nut to 159 ft-lbs (30mm, very
important torque spec)
01:15:18 Re-install the nut cover and a new cotter pin (5/32")
01:16:07 Last check on fasteners
01:16:44 Re-install the wheel (21mm, lug nut torque is 76 ft-
lbs)
01:17:35 Refill with ATF through the ATF dipstick (AWD Rav4
uses Toyota Type T-IV ATF, 00279-000T4)
To check the ATF level, click this link:
• 1996 - 2000 Toyota Rav...
I hope this video was helpful for you! Thank you for watching, and good luck with your repair! - Навчання та стиль


Here are the Timestamps, Part numbers, and Torque values:
00:39 Different boots on '00 versus '98
01:39 How to identify an OE Toyota axle
03:04 Note about the transfer case and transaxle setup
04:20 Lift the front end (both wheels up)
05:09 Inspection of worn-out boots
05:36 Remove the wheel (21mm)
06:37 Loosen the axle nut (30mm, six-point deep socket)
08:28 Push the axle from the hub
09:22 Remove one brake line bolt (12mm)
09:36 Remove two ABS sensor bolts and ABS sensor (10mm)
10:20 Remove the sway bar/stabilizer link (17mm plus H6)
11:18 Disconnect the tie rod end (17mm, rental tool is OEM tools 27276/57276)
12:57 Remove three fasteners for the control arm (17mm)
14:00 Seperate the CV axle from the wheel hub
15:24 Remove the cover (12mm)
16:09 Options for removing the axle
17:21 Remove the CV axle (Powerbuilt Kit 41 slide hammer is
shown)
18:30 Axle on the bench
19:28 Make match marks on the inboard joint housing
21:14 Remove the inboard boot bands/clamps
22:58 Pull the inboard boot back
24:03 Make a match mark on the tripod
25:11 Remove the tripod snap ring/retaining ring (Pliers: example, Lang
1409)
27:00 Make the last match marks between the tripod and
shaft
28:10 Tap the tripod off the shaft (brass punch)
29:12 Remove the inboard boot
29:58 Inspect the grease
31:03 Remove the outboard boot clamps
31:21 Remove the outboard boot
32:54 Note about inspecting and cleaning the outboard joint
35:09 Cleaned up outboard joint and tripod
35:29 Sorting the parts in the Toyota boot kit 04438-12305
37:50 Prepare the shaft for boot install
39:13 Grease the outboard joint (Raremax LFG(KAI), 90999-
94304)
39:54 Install the outboard boot
42:16 Install the outboard boot bands/clamps
43:41 What to do if you break a band/clamp during install
48:34 Install the inboard boot
49:32 Install the tripod to the shaft using the match marks
52:58 Grease the tripod and cup (Raremax SLF, 90999-94166)
53:45 Install the cup over the tripod using the match marks
54:27 Install the boot to the cup
55:07 Install the inboard boot bands/clamps
58:44 Install the new o-ring and new circlip (coat with ATF)
01:00:40 Note about the ATF, transfer case, and shaft seal
01:01:52 Note about re-greasing the wheel bearings
01:02:51 Coat the circlip with MP grease and position the
opening downward
01:03:20 Re-install the CV axle shaft
01:05:30 Inspect for proper shaft install
01:06:09 Re-install the shield/cover (two 12mm bolts)
01:06:19 Re-install the axle to the wheel hub
01:07:46 Temporarily install the axle nut
01:08:29 Re-install the control arm fasteners (two bolts and
one nut, 17mm; torque to 94 ft-lbs)
01:09:25 Re-install the sway bar link (two 17mm nuts, H6 to
hold the ball; torque to 54 ft-lbs, or 33 ft-lbs for 2-door
models)
01:11:29 Re-connect the tie rod end (17mm and 1/8" cotter
pin, torque to 36 ft-lbs)
01:12:19 Re-install one 12mm bolt for the brake line
01:12:33 Re-install two 10mm bolts for the ABS bracket and
sensor
01:13:06 Torque the axle nut to 159 ft-lbs (30mm, very
important torque spec)
01:15:18 Re-install the nut cover and a new cotter pin (5/32")
01:16:07 Last check on fasteners
01:16:44 Re-install the wheel (21mm, lug nut torque is 76 ft-
lbs)
01:17:35 Refill with ATF through the ATF dipstick (AWD Rav4
uses Toyota Type T-IV ATF, 00279-000T4)
To check the ATF level, click this link:
ua-cam.com/video/HOcu3zuq1AY/v-deo.html
This repair is very similar on many other Toyotas. The "other video" mentioned in this video is a more detailed DIY on the driver's side axle replacement which has more detail about using a slide hammer and different tools and techniques for removing certain fasteners:
ua-cam.com/video/HOcu3zuq1AY/v-deo.html
The driver's side CV axle boot replacement is also very similar, and is shown in detail here:
ua-cam.com/video/C0flMKkEyIg/v-deo.html
I hope this video was helpful for you! Thank you for watching, and good luck with your repair!
Woohoo! Another video that can help me with my 1999 RAV4 with almost 395,000 miles! Thank you so much for posting.
No way -- 395K miles!! That's outstanding! Great job keeping that Rav4 on the road!! : )
What an excellent detailed professional instructional video for RAV4 CV axle boot replacement. You are 100% correct about using the OEM shafts; aftermarket shafts are not balanced and do have vibration at certain speeds. 👍 👍😊
Thank you! Yes, I agree - you never know what you're getting with the aftermarket shafts! Toyota OE is best, whenever possible. Thanks for watching : )
Thankyou so much for your video. The most professional, clear and concise car maintenance video I have ever seen. You are helping so many home mechanics attempt and fix more than they thought possible. Our grand daughters 98 Rav will appreciate it too.
Cheers. Dave from Australia
Thank you! That's my goal : ) Thanks for watching!
Wow! Really in-depth and comprehensive! It's appreciated, thank you. This will come in handy when I actually need to do this for my Corolla.
Thanks, and thanks for watching! : )
This really helped me out with my MR2 today! I called my local Toyota dealer to ask about the grease part numbers and clamps you mention at 36:30 and they were completely useless. Thanks for making this!
I know what you mean! I don't understand why Toyota doesn't just label or bag the clamps and greases - that would be so simple! Hopefully in the future they will do that.
Great job on your MR2 DIY and thanks for watching! : )
@@L35inColorado Subscribed ;)
Doing this job soon for my sister-brilliant video!
That's great - good luck on your DIY, and thanks for watching! : )
I was 15 years old and on the back seat when my parents were driving me around in their brand new RAV4. I still see them driving around daily in town! Thank you for sharing your work
They are great, fun little cars! : ) Thanks for watching!
Thank you for another very detailed RAV4 video. Hope you can do a video on clutch change on AWD.
Oh boy, I haven't done that job before, but I know it is a BIG job! Thanks for watching - if I ever do that job, I will record it : )
@L35 in Colorado I read few comments from some owners who have done it said it's not easy. I have AWD manual and it has clutch shudder when cold but normal after it warms up. Will eventually need replacement in the future. Currently at 190k miles.
Absolutely legendary video. Thank you so much for putting the extra time and effort to make such an educational video. This information helped me so much!!
I'm sorry I missed your comment - outstanding job on your CV axle DIY!
Thanks for watching! : )
Another great video 👍🏻
Thank you, and thanks for watching! : )
Excellent video!
Thanks, and thanks for watching! : )
My 96 rav4 felt better when I switched out the Toyota type 4 with the valvoline maxlife atf.
I've heard this from others! Thanks for adding your tip, and thanks for watching! : )
Great
Thanks! And thanks for watching : )
❤
So good video. You definitely put along of effort. I have never seen a video go above and beyond like that. 👍 thank you. Do you need to put up car on park or natural
Thank you! Put the transmission in Park, as usual, and set the parking brake. Be sure to block the rear wheels, then lift the front so that both front wheels are off the ground. Good luck, and thanks for watching! : )
@L35inColorado sorry in this case can you still rotate the axle even if the car is in park and not neutral
@@fmattrwd That's correct - the vehicle shown in the video is in Park. You can rotate either front wheel when the vehicle is in Park and lifted. Also, if you rotate one axle, you'll notice that the other axle is rotating in the opposite direction - that's how the open differential works.
The reason you need to lift the entire front end (both front wheels off the ground) is because you must to be able to turn the axle that you wish to remove, such that when using the slide hammer or other tool, you can rotate the axle until you manage to find the "sweet spot" for the snap ring (discussed at 16:41).
If you're doing both axles, then do one axle at a time.
I hope that helps : )
@@L35inColorado thanks
great video like always, whats the part number of that o ring?
Double-check me, but I believe the part number for the RHS shaft o-ring (at least for the AWD Auto's) is 90301-26006.
Thanks for watching! : )
Question, I hear a clunk/popping sound when turning my wheel while stationary and when backing up and in stop and go traffic. I was thinking about checking the LCA bolts and tighten them to the 94 pounds, would this effect my alignment if I do this?
Is this what you're describing?
ua-cam.com/video/nVGMeQUF2G0/v-deo.html
If so, the suspension on the Rav4 is a little different. The 94 ft-lbs torque value that you're referencing is for the fasteners that connect the control arm to the knuckle: you can certainly check and tighten those without affecting the alignment. The fasteners that affect front-end alignment on Rav4 are those from the knuckle to the strut assembly (camber) and the nuts on the tie rod ends (toe).
(Check page SA-5 of the pdf linked below to see what I mean)
The fasteners on the Rav4 which are most similar to those shown on the Tacoma in that video are different on that Rav4, and they aren't part of the alignment adjustments. On the Rav4, the "equivalent" fasteners would be the fasteners and brackets that connect the the control arm to the main front suspension cross-member.
Here's a document for reference (the link is a pdf) - check out page SA-40 for torque values:
www.rav4world.com/attachments/sa-pdf.84329/
There are quite a few reasons for the clunking you're describing, and it is a good start to check all the fasteners (as it sounds like you're doing). You can use that document above for reference. Another item to check are the various rubber bushings in the suspension system: they all eventually deteriorate, which causes gaps, which in turns causes clunking/knocking/banging.
If there was any work done recently, back-track through any components that might have been loosened/removed and re-check those thoroughly. Another item that can cause clunking similar to what you're describing are the fasteners that secure the steering rack to the main crossmember: check those too!
I hope that helps - good luck : )
Heeey ! ✌️✌️ How are you doing? What happened to the ML 163 , the one that belongs to your family member?
There's still the ML500 running in the family - I did a couple videos on it recently (water pump replacement, and oil cooler & oil filter housing seals)! She's a good truck - she just keeps on tickin', like those W163's do! : )
Thanks for watching!