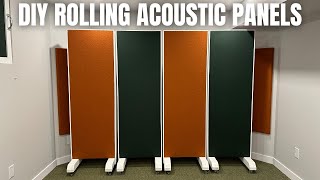
DIY Acoustic Panels for a home studio or podcasting room

Вставка
- Опубліковано 20 чер 2024
- Here is a step by step tutorial of how you can DIY your own affordable, high-performance acoustic sound panels for a podcasting studio or home office. This DIY will save you hundreds of dollars over buying premade panels online. Sound panels are great for controlling the echo and reverberation in your studio, making your recordings sound better. This DIY took me about 30 minutes per panel at a cost of approximately $25 each.
Materials and Dimensions
Frame:
Material: 1''x4''x8' pine boards cut to size
Cut to final size of 16" x 32"
Cuts: 2@Vlog-rw2kh- 16'' (top and bottom) and 2- 30.5'' (sides)
Find at the Home Depot: rstyle.me/+4u2bcOKPvNafNhuB1k...
Filling:
Rockwool batt insulation. As shown here from Home Depot. Order online and pickup in store: rstyle.me/+zy6EqMK7KDkO1j6UOQ...
Fabric:
Be sure to pick something with a loose weave similar to a linen. The fabric I used came in a 42'' width. Here is a great option on Amazon: amzn.to/3tQPu6a
DISCLOSURE: These above links are affiliate links. By purchasing products through them, I receive a very small kickback commission at no additional cost to you. Thank you for your support!
#DIY #acousticpanels #musicstudio #podcaststudio #soundpanels #homestudio - Навчання та стиль


Nice video. Very straight forward and doable by almost anyone. I wish I’d seen you stretching from the middle. I went from corners, not ideal. For rockwool especially, I’d suggest using some 0.7 mil plastic sheeting to wrap the rockwool, just for extra lung protection. I got some 10 oz cotton duck on clearance, which worked well.
Fantastic job young lady. Very well done and to the point, Thank You.
Very nice simple straightfoward video! Only thing missing was the hanging part, which i was very interested in. Can you show how you do that with these panels?
Hard to believe that little hook/bar will hold that up - considering the weight....
Doing my own panels and have seen dozen of videos like this, but this one is hands down the best I've seen. Nice and simple as it's supposed to be. Thank you for sharing, amazing!
Thank you for the feedback! I really appreciate it!
I need this video. Thanks a lot 👍🏾
I recommend also adding a block on the backside on the top and bottom to create an air gap of 1-2 inches
yi 6hh777y
Nicely done...thanks for sharing this
You're welcome! Thanks for watching!
Excellent video, thank you!
You are welcome! Thank you for watching!
Nice, simple build. Best to mount them so they stand off the wall about 2-3 inches if you can. It helps improve performance when there is a gap between the panel and wall.
Thanks for the tip! And thanks for watching!
@csimet: Have You done this before? ...curious how YOU would go about separating the panel from the wall - 4" to 6" ?? See my discussion/reply above... Thanx!
@kjc4414 Yes. My frames have a back brace piece (1x3), top and bottom, that I mount another cleat (1x4) to perpendicular. It holds the entire frame off the wall 4". I use standard picture wire and hangers (heavy duty)... it pulls the frame snug to the wall with the extra 4" standoff.
Great 👍
These videos became somewhat of a trend nowadays.
The sheer lack of data is indeed troubling.
Great execution, yet no information whatsoever.
Acoustic treatment (contrary to popular belief), is a process of decision making which derives from a greater understanding of the environment it is designed for.
What is necessary for that particular space?
What would be our target frequencies?
Is it a critical listening environment?
I suspect that without a comprehensive analysis of the room and acknowledging its purpose, such endeavor would be futile.
If this video is strictly for entertainment purposes or "DIY project tutorial" I think that a disclaimer would be fair.
Also a few pointers for some of the comments..
It is true that an air gap behind the panel could yield "better" results, by slightly lowering the "cutoff" of the absorption frequency - how much of an air gap.. well that is a completely different animal.
In short - it depends on the depth, the material, angle of incidence and a few other parameters.
Another issue to point out regarding air gaps - for some reason the consensus states that when "air-gaping" a panel is mustn't touch the wall it is mounted on.
Well, that is not necessarily the case.. by fully detaching the panel we are forming an "escape path" for some of the frequencies, depending on the depth and amount of insulation.
another burning matter would be diffraction or the "edge effect" - primarily known from speakers with sharp edges, this phenomena also occurs from hung panels.
best way to tackle these issues would be to create these panels with internal braces which are meant to hold the insulation and essentially create an air pocket at the "back side" of the absorber, and also build the sides top and bottom of it semi open allowing sound to hit at different angles and degrees, this (in essence) can turn a small 10cm (4") panel into a 60cm (2') absorber simply by allowing the sound to penetrate to the "width" of the insulation.
Last thing, some (me included) might find mineral wools to be irritating and a possible future health hazard, by applying a thin layer of "Dacron" (polyester wool) infront of the fiberglass/rockwool (between the fabric and the mineral wools) you could minimize the particles spreading into the room whilst barely (or insignificantly) affecting the absorption impedance and effectiveness (it might even benefit you!).
Alternatively, Hemp or other eco-friendly insulation materials could be a more suitable choice, just make sure that the material's properties are aligning with your needs (I'd suggest further reading about - Gas flow resistivity (GFR), tortuosity (Pathways in porous medium) and porosity (Pore diameter and fiber/cell structure).
Would like to have seen it finished and hanging but thank you for the video!
at 6:17 in the video it's hanging and finished
I saw the fabric is thin. Is the rockwool fiber gonna airborne circulating the room? Is it safe for daily exposure? I'm planning to do it in my living room.
How many panel do you think you could make from one 8ft board?
Great video! Is the final wood cut 30 & 1/2" or 32" each? Thanks!
Thank you. Cut at 30.5 but overall when you add the thicknesses of the top and bottom piece it will measure 32” once assembled.
@@ThisArtisanLife Thank you! Would you happen to know the size of the nails you're using? My wife and I are actually going to build a few this weekend and we're picking up the materials today. Appreciate it!
@@PabloLaFrossia nail size will depend on your method. I used my Milwaukee Brad nailer with 18gauge 1.25” long brad nails, but different tools have different sizes nail requirements. If you are doing them manually, I’d probably suggest pre drilling holes and screwing them together using wood screws.
For a much bigger effect, you need to offset the panel from the wall by the thickness of the panel. Doing so entails a totally different mounting system.
...can you elaborate?
@@kjc4414 Sorry for the confusion, kjc. If the panel is 6" thick, the space behind it needs to be 6". If the panel is 2", the space behind needs to be 2" etc...This is not a hard and fast rule, but I've seen it specified more often than not. Stay well...😀.
@@acreguy3156: actually, I was looking more for the method of hanging them - the "totally different mounting system" you spoke of - if they are 4" or 6" away from the wall - if you don't mind speaking to that... TY!!
@@kjc4414 Hi kjc. I've never hung sound panels before. I've only heard that the gap has to equal the thickness of the panel. Having said that, I would assume you'd have to build some sort of stand-off devices that project 90 degrees from the wall that could attach to the rear of the panel, which would need a compatible receptacle for receiving the standoff. Perhaps Googling might help. I'll do some looking as well and post back.
*EDIT* Thinking back, I've seen where people used legs at the bottom of the bigger panels and hence, let them sit on the floor. Not the most pretty solution but it would make vacuuming easier 👍.
@@acreguy3156: I assumed that was the case - just thought you had done it - so looking for that "quick fix"... I am about to build my recording studio from the ground up - and when I get to the interior - I will definitely do this with my panels... Thanx for the input!
Hey, which product of Rockwool is it exactly? I have the problem that many are too soft as the safe n sound...
I used the R15 from Home Depot.
rstyle.me/+zy6EqMK7KDkO1j6UOQlpdQ
Nice video, Michele but I skimmed through it. There are hundreds of people building these panels on YT but I have yet to hear what frequencies they are targeting. Anyone with basic skills and tools can make these panels but unless you know the effect, it's a waste of time and money. Again, your video is excellent and well produced but meaningless until we know the target frequencies. If by skimming, I missed it please accept my apologies.
Have a look at DIY Perks from about 7 years ago. Might help you
@@keithsnowdon3968 Thanks Keith 👍.
It's great that you're trying to design your DIY rooms, but I keep seeing things like this and I know many of you are guessing and copying what you've seen. Yes, we've all done that. But as Alice in Wonderland asked the Cheshire Cat, “Would you tell me, please, which way I ought to go from here?”
“That depends a good deal on where you want to get to”, said the Cat.
“I don’t much care where-” said Alice.
“Then it doesn’t matter which way you go,” said the Cat.
If you don’t know where you are going, it is highly probable that you will never get there.
@Michele: You are showing everyone that you really know nothing about acoustics.
Yeah, there is a lot of stuff on UA-cam and the internet.
The opinion of 10,000 people is of no value if none of them know anything about the subject.