Great informative video. Would be great if you did a definitive video on what tests should be done and how they are carried out when doing an EICR in a domestic property. I'm sure it will be a big wake up to some out there! 😊
Yes, the cables pretty much work out as the same length, it is more likely that the switch contacts were adding in the extra resistance seen when testing at the light fitting.
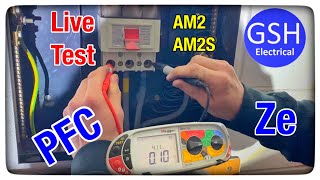
If its 1.0mm twin and earth it will be the same value at light point or switch. 1.5mm twin and earth will be different value at light point and switch because the cpcs has a different size at 1.0mm
Hi Gaz! Would you consider doing a video on selection of breakers/other circuit protective devices? It's something that was never formally covered in my apprenticeship and would be handy for others I'm sure?😀
So by "polarity", do you mean whether the switch interrupts the L or N conductors? Sorry Gary for an additional question - and forgive me I'm a student - but would your measurement of 0.09Ω be equal to the loop impedance of the circuit?
Please i want to ask you this question; what's the right order in which you should arrange your circuit breaker in your consumer unit. should it be from the lowest breaker to the highest or highest breaker to the lowest and why... Thanks
Hi Gaz, thanks for the video. I'm interested in all things eletrical but I'm not a qualified sparky. In the video when nulling the leads you say that "if it was flashing zero we know it's below zero". As you're going to measure the R1+R2 in ohms (a positive value) can you explain how you can get a resistance below zero, ie a negative value or what am I missing?
You get a negative value when the meter over compensates for the lead zeroing. Sometimes due to a bad connection during the lead zero or if the instrument was previously zeroed with longer leads and then the leads are swapped for shorter ones but the zero measurement was not re-done.
Hi! I have the am2 exam in 2 weeks, my question is what about the paralel path on R1+R2, on the am2 do i need to test with cpc conected, or disconected from MET? Thanks for an eventualy answer! I realy appreciate yyour video!
Hi, not sure any AM2 circuit has a parallel earth path. They will not want you to keep removing conductors that don’t need removing as this add to the wear and tear on the rig. Remember you can talk with your instructor 👍🏻
I don't remember measuring the R1+R2 at the light switch during my training a few weeks ago, only the continuity of the CPC using continuity test method 2. Very strange.
Why use that method and not a industry test as you say a college method should we not teach the young guys the industry standard. I had a guy with me on a big job and all I got was in college we did this. You also say a reading below zero is that my bank balance.


Great informative video. Would be great if you did a definitive video on what tests should be done and how they are carried out when doing an EICR in a domestic property. I'm sure it will be a big wake up to some out there! 😊
Learn something new everyday. Nice one mate!
Thanks Ro 👍🏻
What about the extra length of cpc to the switch?
I am wondering the same,. Isn't the circuit the same length for both tests?
Yes, the cables pretty much work out as the same length, it is more likely that the switch contacts were adding in the extra resistance seen when testing at the light fitting.
If its 1.0mm twin and earth it will be the same value at light point or switch. 1.5mm twin and earth will be different value at light point and switch because the cpcs has a different size at 1.0mm
That r1r2 lead treble I brut on through it in bin because the reading were jumping all over the place the best way is put it in the buzz bar
Thanks for your thoughts 👍🏻
Hi Gaz! Would you consider doing a video on selection of breakers/other circuit protective devices? It's something that was never formally covered in my apprenticeship and would be handy for others I'm sure?😀
So by "polarity", do you mean whether the switch interrupts the L or N conductors?
Sorry Gary for an additional question - and forgive me I'm a student - but would your measurement of 0.09Ω be equal to the loop impedance of the circuit?
Please i want to ask you this question; what's the right order in which you should arrange your circuit breaker in your consumer unit. should it be from the lowest breaker to the highest or highest breaker to the lowest and why... Thanks
Hi Gaz, thanks for the video. I'm interested in all things eletrical but I'm not a qualified sparky. In the video when nulling the leads you say that "if it was flashing zero we know it's below zero". As you're going to measure the R1+R2 in ohms (a positive value) can you explain how you can get a resistance below zero, ie a negative value or what am I missing?
You get a negative value when the meter over compensates for the lead zeroing. Sometimes due to a bad connection during the lead zero or if the instrument was previously zeroed with longer leads and then the leads are swapped for shorter ones but the zero measurement was not re-done.
Hi! I have the am2 exam in 2 weeks, my question is what about the paralel path on R1+R2, on the am2 do i need to test with cpc conected, or disconected from MET? Thanks for an eventualy answer! I realy appreciate yyour video!
Hi, not sure any AM2 circuit has a parallel earth path. They will not want you to keep removing conductors that don’t need removing as this add to the wear and tear on the rig. Remember you can talk with your instructor 👍🏻
@@GSHElectrical thank you very much for your answer! I wish you all the best!
Hey Gary, just a quick one, can you explain why you test on the switch side of the cpc rather than on the loop terminals?
It’s the longest part of the circuit and proves the switching line is working when the switch is operated 👍🏻. Thanks for watching Gaz
I don't remember measuring the R1+R2 at the light switch during my training a few weeks ago, only the continuity of the CPC using continuity test method 2. Very strange.
R1+R2 should be done at every point on the circuit
Hi mate, where did you get the R1 R2 link leads from?
Link in bio…
🙏🙏🙏🙏🙏
Why use that method and not a industry test as you say a college method should we not teach the young guys the industry standard. I had a guy with me on a big job and all I got was in college we did this. You also say a reading below zero is that my bank balance.