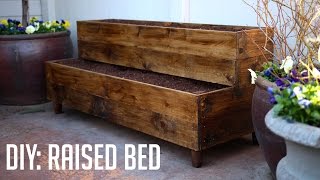
Project: Garden Raised Bed (Step by Step)

Вставка
- Опубліковано 4 жов 2024
- In this video I show how I constructed these beautiful raised beds.
Item List:
Landscaping Lumber / Garden Lumber
tinyurl.com/hmk... (This lumber goes on sale for $2 each once or twice a year)
2in x 8in x 8ft Lumber
tinyurl.com/gv9...
2ft Rebar
tinyurl.com/zpu...
3 1/2 inch Deck Screws
tinyurl.com/z9m...
5/8ths Spade Bit. In the video I said 1/2 inch but use 5/8ths instead.
tinyurl.com/zj5...
Drill, Saw (Electric or Hand) and a Drill Bit slightly smaller then the screws to pre-tap the screw holes.
#Gardening #RaisedBeds #GardenBeds


thank you very much, been looking for a cheap raised bed that would be easy for me to build.i am 53 and its to hard to bend over any more. i have been gardening all my life and i thought i was going to have to give it up this year because of a bad back. thank you again. they are beautiful!!!
Thank you very much for commenting and the kind words! The wonderful thing about these is if you want a little taller or shorter, one just needs to adjust the number of side logs. The garden lumber was picked up at Home Depot during their yearly black Friday spring sale; which is actually coming up here in a month or so. They retail for $5 each but getting them for $2 each saves a lot of money. Over the summer I pinched a nerve in my back which has made life more difficult. The one thing I am glad for are these beds and not needing to get on the actual ground to plant anything. I'm looking forward to the new growing season because of it.
so sorry to hear about your back, but i know how that feels.have you looked into having the nerves burned,i have had all those other shots and they didnt work.but my doctor burned my nerves and boy you feel like your old self again, they grow back again but it takes any where from 2 to 3 years. i just thought i would let you know because alot of people dont know about it.
Thank you for the heads up - I truly appreciate it. That sounds divine. :)
VERY nice raised bed design!
Thanks! I tried to mix simplicity, strength, cost, and design into one. :)
I like this design! Thank you... am just starting to think about how I want to do one.
Your most welcome, and thank you for watching. :)
Aewsome! What I love too is these are actually mobile. If you were to move and wanted to take them with you, unscrew them, pull out the rebar, and the whole thing comes apart and can be moved. Nice.
You know, I had not thought about that but you are correct. it would take some time but it all can be reversed and taken down and rebuilt someplace else. I like the way you think.:) thanks for watching and commenting. :)
I'm researching different methods and designs of beds right now for my own, and since I'll be moving that's one of my considerations. This is a nice design and being movable is a big plus.
When you do settle on a design, I'd love to hear about it (even if it is not mine). I always love hearing what others are up to and designing. :)
Another very informative video. Wish you had done this video before my beds were built. Outstanding!
Thanks. I do apologize for the delay. :-/
Nice job Joe... I love it!
Thank you! :)
Awesome work! So gorgeous!
Thanks Debbie :)
very nice. they look heavy though. Also, many wait one or two seasons before painting pressure-treated wood.
You put a lot of work in these I have only enough energy for one lol..Great WoodWork thou.
Thank you for the kind words, it's much appreciated! :)
Nice. How long will the plastic liner hold up?
Unfortunately it didn't hold up for long, several months perhaps; something heavier would he held up far better but I've never replaced it since this video was made. Otherwise the beds are still in fantastic shape five growing seasons later. Thank you for watching and commenting. :)
Love the beds!
Brent
Thank you my friend. its so nice to finally have them done. Now I get to enjoy them for what they are. :) Ohh and those Black Cherries are turning into beautiful plants. Their leaves are stunning and slightly different then I've seen in the past. :)
They're 2 saved seed generations so who knows. Did I tell you not to pull the sepals at harvest to keep from splitting? Anyway, love them little cherries.
Brent
Yup Yup, I remember, I can't wait to taste them. :)
That it a really nice looking box but those 5/32 gaps have got the OCD community IN A FRAZEL!
Ohh I know the feeling! haha.. If I were to build this again today, I'd do things slightly differently. I also ave better tools now. Thanks for watching :)
Anyone who is inspired to build raise beds seeing this video, a reality check and tips for expectation management:
Your landscape timbers will never look like the ones in the video. Depending on where you are, there's very good chance that your local Home Depot or lumber yard carrying landscape timbers that is plagued with bows, crowns, twists and crooked in all sort of direction.
And the worse part is that, they will have cracks and lots of splinters, after all these are landscape timbers.
So how do you deal with that?
well, I sanded my LTs with 80 grit and made sure they are smoothened enough for the splinters and roughness to go away. No need for too much sanding (it will be waste of time and detrimental for the pressure treated layer since these are just raise beds.
A light pass with 80 grit and some weather gurad stain and sealer should bring them to the picture perfect quality.
I made sure the ground is levelled enough, did not measure for the bed to be level. Don't think that's necessary even if there is little bit of slope in it.
Also, put weed fabrics on the inner sides, I don't think they are necessary on the bottom since they will go under 1 ft of soil.
Thank you for posting and the added information. I was lucky with the lumber I received (via truck). I did order 5 extra boards (just in case) and a few were very twisted indeed, but I just returned those for a refund. These beds are now 7 years old and just this year I replaced the top-boards. I didnt use treated the first time, then the price of lumber sky-rocketed, but this was a good year to replace them finally with nice treated wood. Beds still look fantastic otherwise. :)
Three thumbs UP!
Well Done
Can you please send me all demintions and woods I need per bed. Thanks
Looks great
Thanks! I want to shove some Ollas into the new ones. :)
***** I didn't realize that you posted videos otherwise I would have subscribed to your channel a long time ago. The ollas are awesome. I would really like to see that!
Think I'm up to 95 videos or so.. Some are better then others, but it's been a blast so far. I lost heart a little last season having to find a new gardening plot. I had permission to garden on my old spot but I'm happy I didn't - the owner leveled the entire parcel of land to dirt. It was very sad.
***** I'm glad to see that you are able to have a garden this season. I don't know what I would do without my garden.
I'm done tilling in my 40x40. been looking at building the boxes, and I really like how you did yours man. Let me ask you, are they 7 timbers stacked in height, or 6? Or did you use however many to make the plumb at the top? I think I will till the ground where I'm placing mine, and o plastic inside. Might regret it later, but hey nothing last 4 ever...good job, and I know a 2x8x8 when I see one, so worries on the miss calls..
Thanks for the kind words. They are indeed 7 tall, though the two beds in the back are 7 tall in the front and 8 in the back due to an sloping yard (I should have gone 9 in the back but that's okay). I'm 6ft tall and 7 boards high + trim board is prefect to sit on. There are two tweaks that I should mention. 1) get some 1/2 by 1/2 metal wire mesh and place it on the bottom of the bed before you fill it. Not last year but this year some critter dug under the outside of the beds and got into them, making all kinds of tunnels. Im not thinking Mole, but could have been a Vole or Chipmunk; any case the mesh will create a boarder were they can not get in (thru the bottom at least). 2) Notch the corners of the beams and interlock the corners, then drill a hole down the center of the corner for the rebar; an even stronger corner. I'm gong to do this myself for the next bed Im building. Thank you for commenting and watching. :)
Rebarb?
I have a bad habit of saying "Rebarb" but I mean "Rebar". :)
Very neat. Almost too nice to put dirt into.
Thanks :)
So five total 2x8’ boards for the tops and corner bracings?
Yup.. 2 boards for a 4ft sides, and use those leftovers for corner bracing.. 2 boards for each of the long sides once the 4ft sides are in place (these will have to be cut down slightly to fit between the two 4ft boards).. and the final board to finish off the remaining corner bracing..
I went with untreated wood, but had to seal it to protect it from water. It's been a few years now and they are holding up okay, but if I were to build more of these beds I'd probably go with treated wood (for the top bards).
Note: I say 4ft sides loosely, as they are slightly longer then 4ft to give extra for the overhang lip as shown in the video.
Cragfire Gardening good man, thank you for the quick reply and inspiration behind all of this. I made one on a slope and used 1/2” threaded rods with galvanized washers / nuts in the four corners instead of rebar, which allowed me to adjust for leveling. Came out amazing! Thanks again!
Fantastic! Really good idea with the 1/2in threaded rods for leveling!
Hopefully this link works.. This is what my beds currently look like. I added the mini flower beds to the front and the trellis to the top this year; the trellis is very much over kill and can support me! The main uprights are held in place by 6 inch lag bolts going up thru the bottoms of the bed top boards. [ tinyurl.com/y4bvcat8 ]
Cragfire Gardening absolutely incredible sir! 👏🏼
Nice Job....Which color you used to paint the lumber?
The red stain seen in these videos is a "Sedona Red" stain... The stain, even with a protective coat took a beating in the summer Sun and had to be reapplied each year. Last year I switched to Behr's "Cherry Cola" paint with high UV protection. The color differs slightly (slightly), but I can already tell I will not have to repaint them this year. Which will be nice. Thank you for watching and commenting. :)
Hi its me shannon again. ive got a ? for u. I just got my wood, and i am getting ready to drill my holes. the wood is 3.5 x 3.5 x8. in the video u say messure 4.5 x 4.5 and drill hole in center.now i might not be understanding some thing or stupit to wood messuring or did u just mean to say messure 3.5 x 3.5 instead of 4.5 x 4.5.. thank you shannon
Sorry for the confusion.. Being dyslexic sometimes I spit out different number then I mean. Measure the width of the wood and mark that measurement down the length from one end.. Use a speed square (or straight edge) to mark a straight line. Then going from the corner of the wood to a corner of the straight line, draw a diagonal; then repeat with the other corners creating an "X". At the center of the X drill your hole. Once one is made you can clone the hole as shown in the video for the other pieces of wood.
Hope this make sense. Be careful. I found that dimensional lumber isn't exact.. meaning 8ft can be up to an inch longer and require trimming. I do not remember if I mentioned it in the video, but I took the time to make sure my 4ft sections were indeed 4ft, same with the 8ft.
I just rewatched the video to double check. Yeah the lumber I used was 4.5.. If your lumber measures to 3.5, then yeah use 3.5.. Double check the width measurement with a ruler though.
What is “rebarb”?
Jeff - it's short for 'reinforcing steel bar'. Here's a link to a retailer here in the UK: justthejobsupplies.co.uk/products/reinforcing-steel-bar-rebar?variant=24674917351524&sfdr_ptcid=34071_100_542006038&sfdr_hash=dd12fcef44186ec1f479a004584d3d24&gclid=CjwKCAiAx_DwBRAfEiwA3vwZYqmTyZ7Sk-1IoOJ95PaW0zYvm5Ac9-anLDIoJ6V2zT0yVMlBV3n2PhoCMnMQAvD_BwE
where do you get your dirt from?
My local dump has a composting program where they collect our fall leaves and branches and compost them down. When ready and filtered for large particles, we can buy it back fairly cheap. Each of my beds are roughly 3cu yards and it cost me $15 for 6cu yards (not counting paying my neighbor for his help and his truck use). This year I bought more, five 5 gallon bucket fulls for $1 (for all five).
I compost all my own leaves, twigs, clippings from garden, flowerbeds and lawn plus kitchen scraps and what I can get from my neighbors. Only thing it costs me is time and exercise which is fine by my wife. LOL
heh True, True, That is the best way to do it. :)
You keep saying 2x2. I don't see where you are using 2x2's at all.. I see landscape timbers, and 2x8's. Am I missing something?
You are correct, I just rewatched the video. That was when I was talking about the Trim Pieces which are indeed 2in x 8in x 8ft. Where I say 2x2x8 at time stamps 11:00, 11:24 and 11:33 are incorrect; I meant 2x8x8. I'll add a note. I also double checked the video description section and again I put 2x2x8 but the link itself was 2x8x8. All corrected. Thank you for pointing this out to me. Good Catch.