I just ordered my first Cricut machine on Cyber Monday and I can't wait for it to get here lol. We all love to read books in my family so these will make cute stocking stuffers this year.
That extra clear laminate is great because it sticks the sheet to the desk and then you peel it off and squeegee it! This was cool, I could probably do this in silhouette studio.
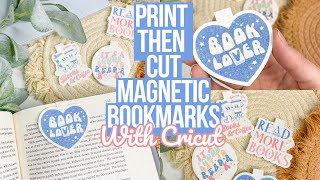
These are cute! Another option for the asymmetrical images is to attach a shape, like a circle or square. It would allow for them to line up symmetrically.
Hello Cori. Love your idea! Thank you… The printer you linked , i am not sure is the one you use : the description says it is only working with amazon dot. Do you use Alexa to print? Or is it just ALL envy HP printers that do a good colors printed?
Hmm... it prints from my computer. It probably says that because it's ALSO compatible with Alexa. Not ONLY Alexa, though. I do think most HPs I've used print well!
Is there a way to do this on something more substantial? I know there is faux leather, but with the pebble texture I don't think an image would adhere very well. Idea's?
I am following your video. However, when I unite my image and click arrange to send back, it does nothing. So I am stuck with the white offset image and my original image turns white. How do I fix this? Thank you


Great project for those of us who are always nervous to try something new.
I'm so glad you think so!
I just ordered my first Cricut machine on Cyber Monday and I can't wait for it to get here lol. We all love to read books in my family so these will make cute stocking stuffers this year.
Awesome! You're going to have so much fun!
Thank you for these easy to follow steps! I was always so scared to use the Cricut and you made this a great experience for me. Thank you so much!
You're welcome!
That extra clear laminate is great because it sticks the sheet to the desk and then you peel it off and squeegee it! This was cool, I could probably do this in silhouette studio.
Yes, you could definitely do it with a Silhouette, as well!
I love these. What a great quick gift idea. Now to find sticky magnetic sheets. 😊
They are linked below my video! :)
Thank you Cori for your tutorial ❤!!!
You’re so welcome!
Amazing tutorial and tips! Thank you so much. ♥
Thank you!!
I really like this project. Be good gifts for my group of ole HS special friends!
Yes! Perfect little gifts or stocking stuffers!
So cute! Thank you for an excellent tutorial!
You're welcome!
These are cute! Another option for the asymmetrical images is to attach a shape, like a circle or square. It would allow for them to line up symmetrically.
I love that idea!
CUTE!
Thank you!
Why does the cricut not read sensor marks despite being fully printed?
Hello Cori 👋🏽. Great Video. Question: Why didn't you just cut the Laminate sheet where the Bookmarks ended at? Just curious. Thank You. ❤😊
I definitely could've, and saved some of the laminate for other projects!
Okay. Thanks. ❤😊
Great tutorial! Could you please let me know how heavy is the cardstock you are using? is it 300g?
I linked it in the description below. It's 80lb cardstock.
Hello Cori. Love your idea! Thank you… The printer you linked , i am not sure is the one you use : the description says it is only working with amazon dot. Do you use Alexa to print? Or is it just ALL envy HP printers that do a good colors printed?
Hmm... it prints from my computer. It probably says that because it's ALSO compatible with Alexa. Not ONLY Alexa, though. I do think most HPs I've used print well!
@@HeyLetsMakeStuff thank you! I will have to read more about it . I really do appreciate you answering me , Cori.
Is there a way to do this on something more substantial? I know there is faux leather, but with the pebble texture I don't think an image would adhere very well. Idea's?
You could print on sticker paper, then adhere it to a magnetic sheet and probably cut the magnetic sheet out!
Could you use vinyl?
I don't think I would? It's not sturdy enough to hold up as a bookmark.
Did you add a score line, I tried to find it in the video but don't see it.
I didn’t. I meant to mention it, but I found it took too long to add for very little benefit. Just folding it was easier! :)
The link for the cardstock doesn't work for me. Can you tell me the gsm of the card you used please. Thank you.
Weird! Try this link: amzn.to/41uvZib (affiliate). I use 80lb. Just basic cardstock, nothing fancy!
Is there a reason you're not just printing these on magnet sheets?
Yeah that's what I thought this was going to be...
I don't love the printable magnet sheets and getting them to fold and magnetize properly is really fussy.
I am following your video. However, when I unite my image and click arrange to send back, it does nothing. So I am stuck with the white offset image and my original image turns white. How do I fix this? Thank you
Make sure you are ONLY selecting the offset. If your image has turned white, then you've selected that as well when uniting. Hope this helps!