How to make PS1-Esque graphics with Blender 2.8 (UV mapping)

Вставка
- Опубліковано 16 вер 2024
- This reuploaded should version should be far better than the previous video, there should be no missing footage
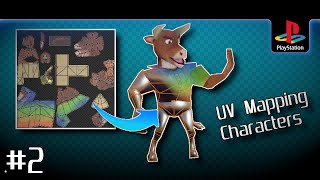
Before we can make textures for our models, we first need to tell blender how to apply them. You can't paint without a canvas, so we need to go about making our canvases with UV Mapping. Sorry this video took so long to make :( I had a lot of issues putting it together.
For the character design survey - www.surveymonk...
FOR THE UV MAP CHALLENGE! - Here is the breakfast machine as a full model you can have.
drive.google.c...
I hope you liked the video,
Like and subscribe for more content :)
Follow me on Twitter - / sicklywiz
Watch me Livestream Monday and Friday - / thesicklywizard
Check out the PS1 Subreddit - / ps1graphics
Come hang out in our PS1 Graphics Discord :) - / discord
Support or buy me a Coffee if you liked my content :) - ko-fi.com/thes...


Just wanted to let people know that if you're following this tutorial with Blender 2.9, the Display Stretching has been moved to the overlay menu at the top! (:
Also live unwrap was moved to the options in the top right
i guess Im randomly asking but does any of you know a way to get back into an Instagram account?
I was stupid lost my password. I would appreciate any help you can give me!
@Leo Antonio Instablaster ;)
@Nico Caiden I really appreciate your reply. I got to the site thru google and I'm trying it out now.
Takes a while so I will reply here later when my account password hopefully is recovered.
@Nico Caiden It did the trick and I now got access to my account again. I'm so happy!
Thank you so much you saved my account :D
I love these PS1 Style tutorials. Not only do you learn how to do this artstyle, you also learn new things about Blender overall.
dude after like 3 years of not being comfortable with blender i try replicate old game graphics and im being taught blender the best way ive ever seen how is this series under 1 million views dude
I'm flabbergasted. I've always seen these UV images ever sense the sims 2, but other than understanding what they were for I never looked into how they work or were created.
I do understand that what your showing is the result of decades of advancements vs what I guess had to be done back in the 90's.
and thus, I was introduced to the pain that is trying to UV Map textures
I have watched a bunch of texturing tutorials so far and this is the first one to really make me understand everything and get the basics right. Awessome work!
Gosh! Thanks for the footgae man. Btw thanks to you I'm on my way to model an environment similar to PSX Silent Hill
Nice! Id love to see it :)
just started this series a couple days ago and am brand new to blender.. had looked up PS1 graphics specifically. im happy with the convenient timing of your uploads!!
I hope to put out atleast one tut a month, hopefully more
Like I said, I find it pretty awesome that you're still working on this; that sucks to hear you had a lot of issues with making it, but I think it was well worth it.
The next tutorial shouldnt take as long fortunately :)
oh brother, i've been struggling with uv-maps for a whole year, in fact, i dropped 3D just because of how bad i was in uv stuff xD
thank you SO MUCH
This is the best video about uv mapping I've ever seen. Simply amazing and helps me a lot to understand about this subject!
Thanks!
This is insanely good ! Not only for ps1 graphics, but for understanding the subject of UV mapping in general. Thanks a lot :)
This video answered SO many questions that I had about UVs. Thanks a lot! BTW, if anyone is wondering why their UV-live unwrap isnt working or cant even find it. It seems to be under the "Options"-dropdown in the upper right corner of the main 3d view of the UV Editing tab.
This is a gem of a video, thanks for the information. I have watched several Blender UV tip videos and I have never seen someone talk about the, "Average UV Islands" feature or the use cases for pining vertices in the UV map.
This is the best video I've watched about manual UV wrapping so far. Congrats.
Not the hero we deserve the hero we need. Awesome video dude! And by the way, I think the video length is perfect.
Yo the sematrising the legs part was so helpful. I know that making the UVs stacked on top of each other will make them share the same texture data. But before using this method, I had to do it all by hand by separating the parts into an individual object, delete half of it, mirror and then apply so they will stack and be one island so it wont take up UV space and struggle with making similar looking textures. I even made a tutorial on it a few days ago and it quickly got outdated the moment I saw this video. Nowhere on the internet has explained this amount of detail about UVs and shared what other things you can do to make it work. Thank you so much you have saved my tired ass. Now I don't need to waist so much time on doing my old way.
Wow... just.. WOW... perfectly executed tutorial. Thank you.
This is the best UV mapping tutorial I've ever seen and I would've never guessed by the title.
Thanks for making these! When you say that you cover something in a previous video, a link to that video in the description would be super convenient
I keep coming back to your tutorials dude, they are amazing. Love the Spyro music aswell.
I don't think I could be any happier with this video! You have taught me more about UV editing in this one video than all of the other 15 or so that I've watched on the same subject. THANK YOU
I just recently installed blender and I'm extremely new to 3d modeling it's always been another art from I'm interested in so ill def be HEAVILY using this tysm this is super helpful!
This is such a great tutorial. Actually hearing the reasoning behind ever choice and explaining why is so great and a lot of people really miss that part.
did you ever an episode where you give the character clothes and stuff?? this tutorial is great, thank you for your work yo!!! Now its time to bring this little guy to life
Bro, this tutorial series are amazing! Thank you for create this.
i`m learning low poly and using your videos to help me.
For those who can't find Live unwrap in Blender 2.9, once you open the UV Editing tab, there's 2 live unwrap checkboxes, one on the left UV view under "UV" menu, this is not the one you want, if you look at the right window, under Active tool/Options, check Live Unwrap. I dont know why its hidden like this..
love the rayman 1 soundtrack
This really is an amazing tutorial. It's packed with the basics and a lot of little tricks and shortcuts that you can come back to to gain speed and efficiency. I'm gonna keep it and come back to it regularly for sure!
Really useful tip at 22:10. Saved me a ton of work!
If you have a symmetrical model, you can use the mirror modifier, mark your seams then unwrap. After that apply the mirror modifier. The symmetrical halves of your UV will automatically be perfectly overlayed.
There is also an addon called Magic UVs and theres an option called Mirror UV, does 5he same job
these long videos are PERFECT! pls keep doin them
i love your tutorials, good knowledge with right amount of examples
Oh shit! A new video!
thanks man! im trying to make a third person rpg game its my first rpg and my first third person game this is gonna be really helpful
bless you sir
You put so much work into this... really great job!
You are amazing thank you for breaking everything down so simple subbing right now
These tutorials are super helpful thanks for making this
17:33 the Follow Active Quad is the secret sauce I didn't know of!
Commenting so I can find it later 😅
i belive that the box rotation is because is gets more useable space in the UV map.
Love your tutorials man thank you
lmao you updated it this in the middle of me watching the old one, it kicked me out haha
GIVE ME DOUBLE THE VIEWS! ITS APART OF MY EVIL PLAN!
@@TheSicklyWizard you monster..
Omg this is top quality stuff
at 3:25 you show a scene. im wondering how you get the gate so pixilated and the graffiti on the wall aswell. what type of look is this considered. thNK YOU!!
14:37 wow. how did u do the unwrap animation?
what an incredible introduction to uv mapping though.
This is the good stuff!
This is awesome. Which video should I watch first if I know nothing about blender?
16:23 bookmark
Thank you for sharing!
Np
so... .you use allot of polys for ps1. Not trying to be THAT guy, But you should try to use textures ANY TIME over physical geometry that it is possible, that pot thing looks like 100 tris. that table and objects is basically your whole ps1 budget. I love budget modeling and I break this rule at times, with some objects, but I am trying to learn. This is my desired style of preference, I guess I should up load something to YT some time to show People, then say "hey great work! I would love to work with you making PS1 games" Though I am probably going to bite the bullet and just throw my self down the "learn to code" Stairs over and over until it stops hurting. But If you read this, I would like to say that these are highly appreciate video, And this is a sort of art that needs to become it's own thing and you are breathing life into it, thanks for building the art that powers dreams.
my idea of uv unwrapping is to go A, U -> cube projection
I cannot thank you enough for making think video. You should make videos on Udemy.
Really helpful! Butttt... how about UV mapping a low poily/PS1-ish head?? I can't for the love of me figure out how to do it.. It just keeps messing things up. Do I have to first apply the mirror modifier? Do I need the front and side and top and bottom photos of my head to UV map it? Where do you place the seams to cut the head up? Could you pleaseeeee do a video on this?
Hey, sorry bout that, i was going to do uv maping the body when i got to character design. Yeah id apply mirror modifier and adjust.the character from there. I was just setting up a video for making base characters so i can make more asymmetrical character with hair and accesories. I absolutely intend to do this
@@TheSicklyWizard I thought I'd make a quick video to show you how a noob like me is struggling, maybe it helps you figure out what kind of things to cover in your videos? :D ua-cam.com/video/PH6oDqXiXYg/v-deo.html
Really appreciate all your work so much. With your help I could at least create something that looks sort of ok :) Before today I could only make tables haha.
@@TheSicklyWizard Another issue I'm running into is the painting.. when there are more than 1 UV maps, for instnace the face and nose and ears separately.. I cannot seem to paint on all of them or smear from one to the other. It is as if the borders cap it off like a mask but I am not in mask mode. How do you get around that? :P Lots of things to talk about omg! So excited!
@@DutchVikingGuy21 not entirely sure what you mean by multiple UV maps. Do you. Are you struggling with multiple island? Or are you struggling to to use multiple UV maps in a material?
is there any way to keep pixel density the same across multiple objects?
can you do how to actually make textures that look like ps1
Im slowly getting there
Do you have a discord community?
Yes
discord.gg/kkqJGzSMYv
How are you going about changing the texture resolution? Are you changing it within blender via shader nodes, or are you setting the resolution prior in photoshop etc?
I set the texture res in blender, when made the colorgrid i set the res in the menu
hahaha I shouldnt have modeled a dragon as my first blender project, uv mapping that boi wont be easy. Especially since I messed up and have vertices everywhere inside the dragon
Oof, yea modeling gets complex yo
it shouldn’t be too hard as long as your topology isn’t messed up, just think of how you would deglove a dragon
ps1 rat