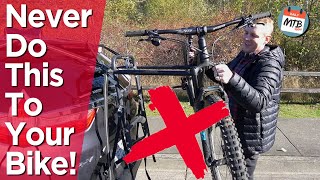
Thule T2 Pro XT and XTR Hitch Mount Bike Rack Assembly Tips

Вставка
- Опубліковано 7 сер 2024
- My video summarizes HOW TO properly assembly a Thule T2 Pro XT and XTR hitch mounted bike rack. THULE should be ashamed of themselves for creating such a horrible and utterly useless instruction book as it provides nearly ZERO information on how to build or use the rack properly.
In my video, I don't actually show myself building this rack but rather pointing out where all the bolts and washer and support bars go.
The 2021 Thule T2 Pro XTR is Thule's latest rendition of the already excellently designed T2 Pro XT. The XTR model adds a set of roller wheels to the bottom of the rack to help facilitate easier moving on smooth hard surfaces such as driveways and garage floors. This bike rack, while very well made is quite heavy and can be quite awkward to move without any help. Having roller wheels means that a single person can transport this rack around with relative ease. The Thule T2 Pro comes in two variants, the 9035XTR that has a 1.25-inch hitch mount while the 9034XTR uses the 2-inch hitch mount. Both versions will easily carry 2 bikes with ease however if you ever intend to upgrade to the T2 Pro XT/XTR to a 4 bike carrier using the T2 Pro XT/XTR 2 bike add-on (9036XTB) that ONLY the 9034XTR model with the larger 2-inch hitch pole can handle that kind of weight. Choose accordingly. - Навчання та стиль


This is the best video I have ever watched on UA-cam simply because it provides so much information in such a simple way for so many people who are seeking it. Thank you!
Oh my god!!! This is the BEST VIDEO!!
I tried 4 others (newer! 2021) and this video is the most complete! Right down to the details about the screws, when to tighten,, why the blank key works the way it does, silicone added, and why. Appreciate this SO much! Thank you.
Glad you liked this vid. Yes I'm quite OCD about things and I think for the future when things need servicing and thought if I don't spell this out now that I'm going to be in a world of hurt later trying to take things apart when they need fixing. An ounce of prevention is a pound of cure.
Great video! I few tips that I discovered:
1. when you strap down the rear wheel, you should thread the end of the plastic strap INSIDE the hole, not around the outside (I noticed you were attaching it outside). That will give a more secure hold, especially for the narrower tires.
2. For me it was a real pain to get the rack to go into the hitch receiver the first time (I have the 1 1/4 inch receiver), because the friction wedge was sticking out. I wrapped it in a cloth, then used a big channel-lock pliers to squeeze it together - that made it go in easier.
3. I didn't have a helper, so I did the assembly entirely off the car. I layed the bars face down on a carpeted floor, extended the rack out flat and set it upsidedown on top of the bars. That was I could easily put in the 4 bolts all by myself. Same for the front wheel holders.
Thanks again for posting this, I don't think i ever would have figured out how to put in the key tumblers!
-Dan
Fully aware. I demoed what can be done but for sure if you loop the strap inside vs. outside you'll get more or less length. Its funny how the manual doesn't clearly show that but I knew it could be done either way. Thanks for watching my video!
thank you for that 2nd tip!!
Echoing the same sentiments as others. Thank you so much for this concise and precise video! While my instruction manual had all the pages, I seriously questioned if I was having a “moment” because the graphic instructions are absurdly terrible. You made this understandable and easy like it should be! Thank you!
Glad it helped!
Could never have figured this out with the instructions in the box!
yeah the instructions are laughable. In my case it was worse b/c there were blank pages!
Thank you for going step by step and not only visually showing us but your explanations are very clear, I like that what your explaining your also showing visibly not like other videos that others say what to do then cut to the part done. I like how for example you explain how to fit a bigger tire by loosening up the strap and showcasing the process with great angles so the viewer isn't wondering or guessing what you're referring to. I had your video on my iPad as I assembled my T2 PRO XT, easiest assembly ever thanks to your video, Great video.
Glad you liked the video! Yes the devil is in the details and there is NO point doing a UA-cam video if I'm not going to show someone HOW to do it. Its amazing how many complain how long my videos are and how they say I "patronize" their intelligence. I'm glad you that YOU appreciate the video.
So glad I found your video online. Thule should be ashamed of the "instructions" they provide with the rack. Especially considering what they charge. Your video was very helpful!
Glad it was helpful!
Thank you!!! The Thule instructions were worthless. I had no idea how to put it together. Your video saved me!! Thank you so much for taking the time to produce such a comprehensive and easy to follow video!!!
Yes the Thule instructions are so blah! Glad you found my video handy!
This was probably the best video I have found on assembling my rack (which I just received yesterday). My manual included all of the pages, which yours was missing. You have some great pointers such as using lube on the screws. As soon as you had mentioned the orientation of the two beams, I had to go out and see if I had them in the proper direction (luckily I did). I found putting this together with the abysmal instruction manual similar to assembling something from IKEA. Thule could easily have made it into a good manual just by adding a few words and suggestions. For example, how tight the screws should go, and some information on the proper use of the rack. I assembled the rack by myself on the back of my vehicle. It honestly was not that difficult, although you have to have the second screw available once you get the first screw partially in. And of course, I did drop a washer more than once on the driveway, and had to use a magnet to locate it, so it might be a good idea to place a hunk of cardboard, or a sheet under the rack during assembly. One other thing - there have been reports of vehicles getting ticketed (at least in Canada) because the licence plate is obscured by the rack. I see Thule offers an optional plate holder for the rack, which attaches to the rack itself. Unfortunately, this was out of stock. So I guess I will take my chances.
Glad you liked the video! Its funny how something as straightforward as a bike rack can get confusing b/c of how the manufacturer documents or packages their product. Given how expensive these racks are that taking proper care to assemble this properly is key. Not sure how others feel about something pedestrian like a bike rack but I take care of everything I own and this rack is no exception.
This was incredible. I would have never been able to do it without this video! Thank you!!
Glad you liked the video!
Awesome video. Just picked mine up today!!! Assembly tomorrow after golf. These things are like unicorns right now!!! Your video will guarentee an easier assembly. Very much appreciated dude. Pat from Ontario Canada
Glad I could help!
I watched several install video’s for this bike rack. Yours was by far the best.
I'm glad you liked the video. I'm quite detailed oriented and while my videos can be verbose and long that there would be NO doubt in how to properly assemble this rack and have it last for many many years.
Assembled mine today with your awesome video playing alongside. Man oh man thanks again!!!
Great to hear!
This video saved me enormous amounts of time and frustration. Thank you for creating it.
Simple and precise instructions I wish Tule had hired you to do their assembly instructions
Thank you for these instructions. They are very clear (unlike the ones supplied with the bike rack). I watched your video and then installed the bike rack with no problems.
Glad you were able to get the assembly and installation all sorted out. Thanks for stopping by.
Thank you for the video. All your tips were very helpful. To me you sound like a smart sensible guy and I back that observation up by the fact you drive a Tundra.
Great video! The instructions in my box were thorough but this made it a whole lot easier!
Great video, you're a youtube hero with this one. Only addition I would add is that the knob to tighten the hitch didn't work until we both put the lock in with the blank key, but also turned it 90 degrees in place. If you mentioned that, I'm deaf, but it took a good bit of disassembly for us to figure that out on our own.
Thanks for sharing
Thank you so much for making this video. I don't think I could have assembled this without your video. THANKS AGAIN!!
Glad I could help!
Great how to assemble video. You’re absolutely right about the instructions. They look like cave drawings. Your video was so helpful. Thank you so much!
Glad you found my assembly video useful. Stay tuned as I got word that my 9036 XTB extension came in so I will be upgrading this rack to a 4 bike unit soon!
I just got my T2 XTR, with out this video I could not have assembled it. Thule should give you a commission. THANKS !!!!
Glad you liked the video. I WISH Thule would give me a commission for teaching others on how to assemble this rack. Sadly that will NEVER happen :(
Thank you. My instructions didn't have blank pages and had more pictures, but they were absolutely incomprehensible. I'm sure you saved me at least an hour on this.
So glad my explanation helped. Yes the manual book sucks and the person that wrote it and approved it should be fired for incompetence on their lack of ability to write proper technical documentation.
You saved me a ton of time and although the instructions on the Thule website are a bit better than the woefully inadequate printed ones, they are still inadequate. Thank you for making this video and keeping me from losing my mind.
You're very welcome! Glad you were able to get this all setup with no issues :)
Thank you for your great video really helpful. Mine got on the store today and assemble it with the help of your video. Thanks!!!
Glad you liked my video! Thanks for watching :)
Thanks for taking the time to make this video made installation even easier
You're most welcome! Thanks for watching.
Thank you for a great instructional video. Just finished assembling and your video was extremely helpful!
Glad it helped!
Thanks for the video. I have assembled hundreds of bikes, toys, etc. over the decades and the instructions for this are laughable. I couldn't have done it without your video.
Glad you found the video useful. It really really shocks me that for a brand as well known as Thule that you'd think they would have the resources to hire someone that can do a proper illustration and write a few lines on how to assemble things. While it isn't rocket science that if you're not handy in "spatial" recognition on how something should look assembled they're gonna really struggle with this.
@@piercedasian exactly. before finding your video, I showed the instructions to two people and asked them what they thought and they told me that someone in China must have written them. They could have made a video like yours or include a link to YOURS in their instructions on any new sales!! :)
Thank you! I wish I had found your video before muddling through the almost useless manual. Very helpful, great tips, and just long enough! Thank you again.
Glad my video was able to make things simple! Thanks for watching!
Dude! Great job! I didnt even have to look at the paper instructions!
Thanks! Subscribed.
Thanks! Don't worry about the paper instructions... they SUCK!
Wonderful and easily understandable video. I haven't purchased it yet but as part of my research this has been a great aid.
It's a great rack - very heavy especially if you upgrade it to the 4 bike version but despite its unwieldily weight (4 bike edition) that its by far my favourite bike rack. Great quality and good looks and easy to assemble - permitted you use this video of course :)
Well done! I sincerely appreciate the visuals and concise explanations.
Glad you liked the video!
Thank you!!! Just purchased one & found the instructions difficult to understand ~ your video made for a smooth installation! Best to you & yours, Ed & Fam
You're welcome!
Thanks for this, you're right about the instruction book, although mine had a few more printed pages than yours, it was still a challenge to decipher. Well done!
Yes I have no idea who at Thule is writing their technical documentation but they should be fired!
Great video.Thank for posting this. Well done!
Comprehensive explanation of rack features, assembly and tricks(synthetic lube etc) to get the most out of the unit. Maybe THULE should commission you as their product specialist for sales etc 👍
glad you liked the video. It just drives me batty that instructions are so poorly drawn up and the shops that assemble these racks - they assemble them but god knows if they cross threaded anything or did the necessary steps to prevent damage to the rack prior to delivering it to you. Build yourself and you'll know exactly the amount of care put into assembling it.
Just picked an XTR up to replace my aging Yakima Holdup. I found your video and didn’t have to open the owners manual once. Thank you!
You're very welcome!
You are a lifesaver! The instructions that were included were terrible, as you said! You made assembly easy! Thank you so much!
You're very welcome!
Thanks for the video, just got my XTR yesterday.
You're welcome. Thanks for stopping by!
This was super helpful! Thank you for creating this video
Glad it was helpful!
thank you for this video - you saved me a lot of frustration and time! Explained very well!
Glad it helped!
I just ordered this rack. Thanks for your video!
You're very welcome. I'm sure you'll get many years of great use from this rack.
Thank you so much for sharing best video I've seen so far
The best assembly video out there. Great job
Glad you liked my assembly video!
I bought this and the add-on with two more racks! You really helped in a few questions that I had! One was the rubber inserts on the end caps! I wasn't sure if they stay inside or not! The instructions for the high price of this rack are very poorly made! Thanks for making this video!
No problem. Thanks for stopping by!
Great how to assemble video and tips. Apparently in checking with Thule, the paper manuals where not printed properly. They did have instructions downloadable from their website that fixed the printed version. However, those are a little better, but no where near what you have provided! Thank you so much for this great video.
yeah it is mind-blowing that a misprinted manual can be shipped with their premier product. I guess people make mistakes but still... what an awful set of instructions!
Excellent video. Many how-to videos have annoyingly long intros and/or the creator babbles about stuff unrelated to the task. Not yours, just a straight forward demonstration. Thanks I assembled and installed my XTR yesterday.
Glad you liked the video. Stay tuned for the 9036XTB 2 bike add on installation in June (that's how far back they're backordered for 2021).
Who are the 10 people that gave this a thumbs down. This was an excellent video.
Haters are always gonna hate :)
Awesome video, made my life easier tonight. Thanks!!
Glad the video helped!
Thank you so much for the great video! It help us put ours together.
Glad it helped!
Very clear and very helpful. Highly recommended
Glad it was helpful!
Wow, you are so right about the dismal instructions. Great tip about extending the strap!
Also, I had a problem with the locks, I did not realize that one key is for installation and the other ones are actually to turn the lock, Duh! No wonder I could not turn the lock on the Knob with the installation key and also tried to insert the cable lock with the regular keys and they wouldn't go in!
Every thing else was pretty easy, but I was dumbfounded with the locks until I saw your video.
Thanks!!!
glad that you were able to get your rack all setup properly. Yes the instructions are absolutely idiotic and what use are pictures if they don't tell a proper story on how to actually assemble the bloody thing! Great product, terrible instructions.
@@piercedasian Absolutely, even Ikea instructions are better than these, and that says a lot!
It makes you wonder why the racks could not hav e come with the locks preinstalled by Thule.
Thule really needs to pay you for this tutorial. They should be embarrassed with what they gave us. Thank you.
yes Thule technical writers are ridiculously bad at what they were hired to do.
Super helpful video, assembling this would have been much more difficult otherwise. Thank you!!
Glad you found the video useful! Thanks for watching!
Excellent. Thank you! When I first opened the instructions I was like wtf is this?!? Your video was spot on. Well done sir.
Glad you liked the video! Thanks for watching!
Thank you! Thule should be embarrassed at the extraordinarily bad instructions they provide. This assembly would have been impossible without you video.
Thank you for the video. I found it to be helpful.
Thx you for sharing helped to save me time
Thanks for the great video. I figure after Thule saw this video they decided to complete all the pages in the assembly instruction manual. Mine had all the pages, but instructions were about as cryptic as Ikea. One thing I didn't expect is that the rack doesn't sit flat; i.e. parallel to the hitch. It leans in toward the vehicle quite a few degrees. I imagine it is designed this way purposely to reduce the cantilevered weight, but I'm using it with a truck and camper so the very wide handlebars on my Rocky Mountain Altitude come within one inch of my camper. If the rack was level, it wouldn't be a problem. I guess my Rocky will be riding on the rear rack.
lol I bet someone was really asleep at the wheel when they made the instructions... Either way, I'm glad that subsequent versions of the manual are complete even though you may as well be reading hieroglyphics.
Thank you for this video. Some great tips and advice!
Glad it was helpful!
Thank you thank you thank you! Super helpful. I am in awe and send you many thanks!
You are so welcome!
Awesome video 👍🏾
Thanks for the visit
Maybe someone else pointed this out, but you may have gotten a misprinted instruction manual. Mine had pics to install all the parts. Super easy to assemble (did it fairly quickly in the REI parking lot) and all the screws aligned with the holes (which apparently Thule is notorious for messing up). Great bike rack! Thanks for the vid 👍🏽
Glad you liked the vid. Yes I have been told numerous times that my manual book was a misprint but even if they were a complete printed instruction booklet that they're still pretty cryptic.
Thank you so much, this was very helpful!
You're very welcome!
Dude thank you! I came here about the locking mechanism and no other video explained that the one key is an insertion key only, and not meant to turn the lock.
Haha glad you found my video helpful!
The later printing had the blank pages filled in, but there are still no details. Your video was most useful in building the XTR bike rack.
Glad it was useful. I just received my XTR rack extension kit so I will be posting a video on how to add that piece onto the rack soon. Stay tuned!
Very nice demonstration. Thank you!
You are welcome!
Thanks - you are right, the Thule instructions for the initial assembly absolutely suck. You hit on a few key points that really helped me out! Well done.
Glad you liked the video! I do like how well the rack is made but wowzers does Thule need a lesson in documentation.
Thanks so much, very helpful. You're right the included instructions are garbage but this video answered all my questions that the instructions didn't
Glad it worked out for you!
Muchas Gracias! You save me few moves with this thing!
Glad I could help!
THANK YOU, THANK YOU, THANK YOU! super job on providing great instructions. agree with you, saw the instructions and was like, ha? thanks again
Thanks for the video, much better than the manual from Thule. I notice the Manual (online at least) does seem to have all the pages now).
weird that Thule can even "approve" those kind of instructions. I mean, the assembly isn't rocket science but something a little more descriptive would help those that are not so mechanically inclined to properly assemble this rack.
Great video and instructions! Thanks!
You're welcome!
Great video, I’m considering this rack. Can you fully open your tailgate with the bikes on, or, with just one bike in the back tray?
Couldn't help but notice your red CRX!!!!! love those cars!!!!!
lol yes, the CRX is one of the cars that I have been hiding in storage for literally 15+ years. Bought it in exceptionally good condition but did a full paint restoration on it anyways b/c the factory paint was in just "ok" condition. Cost a small fortune to get it restored to as near factory condition as possible but it is probably one of the nicest stock ones rolling around in this end of the country.
Excellent video! Thank you!
Glad you liked it!
Thanks for the video. Lots of detail. Just a quick comment on grease and thread locker use. Superlube is a synthetic grease. It's not a silicone grease. As it is synthetic it will repel water and it's a good choice for the plastic ABS carrier. Unfortunately it is a lubricant that never really dries. So those bolts or screws could move over time. So periodic re-torquing is a good idea after some serious mileage. You definitely don't want to use a Loctite threadlocker there as the uncured resin, if it comes into contact with the plastic, will attack and stress craze the plastic. So avoid all contact there. Anything that's powder coated or anodized or bare metal is fine. How do I know this? I was a Loctite rep for over 30 years. Also, 243 or 222MS are great choices for the bolts. Both are removable. Thanks again for the post. Great info. Cheers.
That's a valid point and I stand corrected on superlube. Yes I definitely wouldn't want to use the blue/green/red loctite on the fasteners as you've said, it will attack the plastic. Fortunately for the screws that I used superlube on that they're a low vibration (I think) fastener so I hope it doesn't come loose anytime soon.
Very helpful! Thank You
Glad it was helpful!
Very helpful. Thanks.
Glad it was helpful!
Incredibly helpful!!!!!!
Glad it was helpful!
Omg I felt like an idiot about the keys... thanks, this helped
That is a good work. I like it.
I'm glad you like it
Excellent Job, thanks
Thanks!
All I needed to know was how to get the bike rake on and off our car. You didn't really address it, but you video had the detail about using the key to unlock/lock the knob to tighten/loosen the rack, so that was good enough for me to figure it out. I had thought that when the knob was tight, it was locked, and then wouldn't move, which is the opposite of how it works.
Glad the assembly video helped you figure out what you were looking for.
Awesome video. Thank you so much!!
you're welcome.
Thank you for making this video. I was struggling with the Thule instructions. They are lacking.
You're very welcome. The Thule instructions are terrible at best.
Life saver. Thule owes you big time.
thanks. Boy if I got a dime for every time someone has mentioned this on my channel I could retire! Thanks for stopping by!
Nice video, very clear and instructive. Do you know how to install add on to 4 bike or switch from 4 bikes to 2?
If you look on my channel I actually have a how to on the 4 bike conversion :)
You’re a lifesaver. Thank you.
Thanks very much for your helpful video. I watched a few times just to make sure I was thoroughly familiar with everything. I actually got a full instruction booklet, however the two innermost holes ( closest to the main tower) on the two wheel baskets don't line up and I could only use two screws. And yes they are pointing in the proper direction. I wonder if anyone else had this problem. Other than that, this is a very easy to use bike rack.
glad the video was helpful. If the basket holes aren't lining up I would take the rack back to the dealer you purchased from to get an exchange. Mine lined up perfectly and given the steep price of this rack that I would expect nothing less than perfect.
@@piercedasian Thanks again for the video and reply. I couldn't wait to return it through Amazon and needed it right away so I made due with just two screws on each basket. I took it and my road bike on the highway with out any problems. And that was with a flat front tire. It is still very stable. I guess if there had to be a problem this was the best problem to have. Not too happy but at least I can use it seemingly w/o problems.
@@garykurtz3009 if you take out all the screws and then try and line up the holes, find the one that is least lined up, put the screw threw and find the hole with the basket and holes slightly away from the screw, the screw will be bent a little, but once you do one slightly, find the rest, and screw them in a little at a time.
The instruction manual that comes with this unit makes an ikea manual look like a grade 1 book🤣. Thankyou for this video!
I 100% agree. The instructions are WORSE than what comes with Ikea furniture.
Great video. Do you think it's possible for me to remove the bike holding bars from the main attachment (that goes into the hitch reciever) and store all 3 parts separately for the winter? I live in a shoebox and I can't keep the whole bike rack stowed as is.
Yes, absolutely. Just make sure you that you keep the washers and bolts in a bag that you won't lose otherwise you'll have to source new ones from a Thule dealer (they're metric BTW) and while it likely won't be expensive that it is a bit of a nuisance to try to find missing screws and washers when you really need them.
Great video. Can you tell me exactly where the serial number if found on the Thule T2 Pro XTR? Thx
thanks... you did a great job... especially your discription of Keys and how they are used... the thule instructions were horrible.
OMG, so glad you found the video useful! The folk at Thule have some serious competency issues with writing technical documentation. Its unbelievable how poor their instructions are.
Thanks, that was quite helpful.
Glad it helped
Thanks for this video!
My pleasure!
Very helpful. Thank you. Now if I can solve the problem of the failed folding release handle, all this will have been worth it. Relearned another valuable lesson: avoid Scandinavian products that require assembly!
Not sure if what I will be posting soon will be relevant or not but I am taking apart our Thule rack soon to install the 2 bike add on module which would also require me to tear into my release handle assembly to "extend it". Perhaps my disassembly and explanation will help you fix yours? I'm still waiting for my extension add on to ship to me (expected late may).
Thank you so much! We got this bike for a little less new in an opened box. We think the person gave up with the bad instructions and returned it!
lol well their return is your gain. Hope you're loving this bike rack b/c I know we sure do!
Good Video, I am still not clear on how to unlock the rack to take it off when not in use.
Just insert the key into the hitch knob, unscrew the knob and pull rack off of hitch.
Very well done. Thank you.
you're very welcome!