LP Projekt - Part 1 - Sunburst

Вставка
- Опубліковано 7 сер 2014
- Hallo Leute,
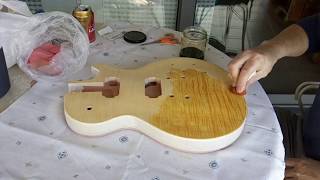
im Rahmen meines neuesten Projektes, den Nachbau einer 59' Les Paul, hier nun der erste Teil. Das Beizen des Sunbursts.
Zum Korpus:
Einteilig aus KhayaMahagoni, beiges Binding; Flamed Mapletop aus kanadischer Bergahorn 17 mm; Gewicht 2,5kg.
Benutzt habe ich Farben von Stewmac aus den USA:
Colortone
Vintage Amber, Orange und Red Mahogany. Der Grundton ist Vintage Amber, der dunklere Rand ist eine Mischung aus Vintage Amber, Orange und Red Mahogany.
Weitere Teile werden im Verlauf des Projektes folgen.
So, nun viel Spaß beim Zusehen. Kommentare und Fragen sind ausdrücklich erwünscht.


I'm stunned at the rubbing speed the guy achieves during application - starts slowly and in a matter of seconds he's up to breakneck speeds. The control demonstrated in acceleration/deceleration is also hugely impressive.
Obviously practice makes perfect - bravo!
This has to be one of the most Beautiful rub on finishes I have eve seen...Bravo!!
An absolute pleasure to see you work sir. A craftsman who puts love, care and personal satisfaction into what he creates. Beautiful !
I’ve seen this video so many times but I just love watching you dye that guitar! Such a beautiful piece of wood
Now that's a PROPER burst. The gradation is absolutely perfect. Looks natural and organic. Amazing job.👍
It just looks like stain rubbed onto a guitar to me.
@@stratoleft Says the nobody in the comments.
Talk less my guy.
Unbelievably Beautiful my friend...Bravo!
So beautiful! The deep center amber and maroon/blood red outer is my favorite color burst! Great work! When I add the outer red, I tend to move towards the center (just a little distance) as I go around. This helps me to avoid making a defined separation between the two colors. I want the colors to blend nicely as they move from red to amber. Just an application methodology that works for me. Your application method is interesting and helps us learn. Your results are superior. Best wishes and thank you!
That outcome is absolutely beautiful. The best one I've seen on youtube ever.
English Translation:
Hi Guys,
As part of my latest project, the replica of a 59 'Les Paul, here is the first part. Pickling the sunburst.
To the body:
One-piece in Khaya Mahogany, beige binding; Flamed maplet top made of Canadian maple 17 mm; Weight 2.5kg.
I used colors from Stewmac from the USA:
Colortone
Vintage Amber, Orange and Red Mahogany. The basic tone is vintage amber, the darker edge is a blend of vintage amber, orange and red mahogany.
More parts will follow in the course of the project.
So, have fun watching. Comments and questions are welcome.
That top is AWESOME! FLAMING AND SUBTLE QUILT! As the colour builds it highlights the figure even more! GORGEOUS!
Beautiful. All you're missing is a Corona beer with a lime and a palm tree!
Eres excelente amigo, admiro tu trabajo. Tu trabajo es un excelente mensaje de un gran artista, ¡felicidades!
absolutely beautiful work my friend and cool music as well
Oh yes. This burst is beautiful. Very tasteful.
Beautiful!! Love the music as well :)
Outstanding dude Awesome finish 😁😁🤘🤘
Man I love those flames! beautiful!
Absolutely amazing-beautiful work!
I would have left it after the first coat. It looked awesome!
I love this way for paint looks easy and beautiful by the same time !
Love the tone - both, colour and sound 😊
Beautiful job!!!
the time you took, and the way you blended the layers of stain, is Mad-Scientist Status !!!! amazing ! i hope mine turns out half his gorgeous !!!! thanks again, this channel has been my savior through this process !!!
Wonderfull, you are an artist!
Arte y presión! Excelente y exquisito el trabajo final!
Good job dude..more vidio like this pleace,l really enjoy evry proces that you've done..
Beautiful. Absolutely the best hand-applied burst.
I really needed this. Im doing my first sunburst and i wasn’t sure what i was doing. This helps.
Beautiful work, but my favorite was the after the second application of yellow! :D Beautiful cap on that guitar.
Fantastic work.
Excellent work!! Looks better than factory. I have searched the web along with youtube for a guide as I am attempting to assemble, (NOT BUILDING) a kit, and this is by far the best video out there. Plus Vittorio sharing his expertise on procedure is so helpful. I don't expect to get a result anywhere near what he has done but even then it should be better than if I did not use this as a guide at all. THANKS MAN!!
My god that is beautiful!
Fantastic work
Ihre Arbeit ist hervorragend
That is absolutely stunning.
Tolle. Das ist ziemlich genau das, was ich bei meinem ersten Gitarrenbau vorhabe. Danke für das Teilen!
Absolutely gorgeous!
Amazing flames! excellent job!
Sehr schönes Video. Hat mir definitiv weitergeholfen.
That's one wild looking piece of maple!
Beautiful grain pattern ,just right for staining
thx for the video ! great background tunes !!!
You are doing a very nice job just stop to show some love
Very well done. Stunning top.Great job. Good luck with the clear.
Bad Assed !!!!!!!
Thanks for sharing....
wow ! that thing almost sun-bursted itself when you added that yellow !!!
My god, you know how to use the colors!!!!!
I'll try to do the same..... Thank you
I beg to differ! I love this song!!!!!!!!
Schöne Arbeit!
I agree with everybody who hated the (so-called) music in this vid. But never mind, it's a stunningly BEAUTIFUL burst! If I had a Les Paul, I'd want it to look just like this!
That is wonderful!
Nice. The most important thing is to make sure any sealer is sanded off first or the dye won't penetrate.
Very beautiful!
Klasse! Ich will es auch mal mit einem alten italienischen Ahornbody versuchen. Wenn es nix wird, dann ist es halt so. Der hatte mich mal 15 DM gekostet, da macht man nix falsch. Zumindest versucht haben will ich es wenigstens 😊
Beautiful work better than factory 👍👍👍👍👍👍👍
Das ist sehr gut!☺
Yeah, very nice top.
Bravo!
NICE!! I built a guitar much like yours (I tried to duplicate Slash’s guitar in Sweet child...), I used amber shellac and then top coated with epoxy resin. Factoid; the reason why wood takes on certain appearances/hues is because the darker (Tiger Stripe) wood is less dense than the harder surrounding wood so it soaks up more die. If you stain a ‘figured’ wood then do a fairly light sanding then denser wood gets lighter (has less color pigment) making the stripes look darker. I’m not sure if the ‘pros’ ‘airbrush’ the Maple top to
enhance the coloration/stripes. Think of the ‘figured’ wood as a W (wave-like) knock the high spots off, you’ll leave the less dense areas darker. Then there's the darker-> lighter 2 dye method
Very nice job
Real nice, man!!
Tony Vincenzi Thank You
Absolutely beautiful finish an there but if I hear that loop one more time I’ll lose my mind
Turn it down. Simple
@@daveg4236 look sir I understand for the average persons attention span that’s a great solution. I don’t have that attention span if I watch a volumeless video I lose interest lol
@@brendanmanning9683 fair enough. And this is one of those. Wipe on. Sand off. Wipe on. Sand off.
@@daveg4236 yeah which oddly I find rlly satisfying watching a burst like this come into existence but again that loop just drives me crazy after the 30th time lol
awesome !!!
The music makes me want to spray it candy apple red.
Absolut wahnsinnig der ober Meister
AWESOME...
Amazing, thanks...
Amazing! Would love to try .y own cherry charcoal finish this technique!
bravo !!
Hi, the effect on the maple is really very good, I'm interested and I would like to know if it is suitable for coloring spruce with equal success and without staining the violin top (wich, the spruce absorbing the color uniformly) do you have experience of this kind? thank you
Is that a low tax yield tape? I’m struggling on which tape to use before my stain. I would also have put some red in with that yellow. That would have really popped!!
Massa
thank you sir
Man sieht mit wieviel liebe das Instrument gebaut wird. Leider sieht man das heutzutage selten. Meine Gitarre würde ich ohne zu zögern in ihre Hände geben :-)
Vielen Dank für das nette Kompliment.
Mega cool
Mit welcher Schleifpapierstärke hast du hier zwischengeschliffen (nass oder trocken?) und wie lange hast du die jeweiligen Schichten trocknen lassen?
Mit 400 Schleifpapier trocken. Kann man aber auch nass machen. be ich wenigsten 12 - 24 h trocknen lassen.
Sweet!
Nice song...
Vittorio, I always worry that using water stains may open the center seam on the bookmatched maple cap (ever so slightly)? I'm assuming you used a water based glue to join the two halves of the maple top (titebond glue)? Water stains are clearly the most beautiful and longest lasting compared to alcohol stains (from what I've read). I mostly work with veneers and curious what your thoughts and application processes are on using water stains over the center seam of the maple cap. I assume you use very little water/dye on each cloth during the process and avoid soaking the top? Awesome video! Thank you very much.
Hello Vittorio. Can you share how you constructed your stand you used for spraying this absolute beauty? I am doing my first kit, an LP custom in tobacco sunburst and using your video as a guide to aspire to. My kit is a set neck and I’d like to spray my lacquer with the guitar positioned horizontally.
Great job, but c'mon, man. You need to explain each step, and what you are doing and the materials/tools you are using, in order for this video to be instructive.
Hey you...Dogheadj “ Be Quiet”
Das ist gut.
ok, i need the StewMac stains. What sandpaper did u use?
Is there any way that I can get all this in English, I'd like to know where he purchased that guitar kit? Looks like it has a Cap instead of thin Veneer.
Hallo Frank, this is only available in german. This was no kit. I bought the body and neck by a german luthier. Look here: www.gitarrenbastler.de/. All the other parts I bought in several shops.
Hello, alcohol or water to dilute the liquid stain ? excuse my english, i m french.... :-))) thank you
The colours are waterbased.
Excuse my French I'm English LOL1
You can tell it's water due to him sanding after every coat because water raises the grain.
ronald richardson w
Nice job and sweet song?
looks killer
Who was the band for the soundtrack? I enjoyed the guitar work! And the sunburst looks great
Hermosa.
I don't know why, but to it looks like the truetint/colortone dyes always lead to better results than other tints.
Vittorio, gran lavoro, potresti indicare i passaggi anche in Italiano? Che prodotti hai usato? Ancora complimenti.
Prima!
Good!
thanks so much for the reply on the pigments and mixing ratio. 1 more questions: what was your sanding regimen and what grits did you use for each sanding?
the grit I used for sanding was 240 and 320 grits.
綺麗好き。気持ちいいね。
Two questions:
Did you mix the dyes with water or alcohol??
What were the ratios of dye to water (or alcohol)??
I vS I mixed the dyes with water. The ratio was about 4 or 5 drops of dye in 150 - 200 ml of water.
Vittorio Centofanti
Thank you for the information; it'll help me not have to do so much trial and error when mixing my colors.
Have you ever tried using a dark dye (like black or tobacco brown) first, then sanding that off and then doing the same amber/orange/red burst that you did here? I've heard that a dark stain applied first really brings out the woods figure, making the figured sunburst finish look almost 3D with lacquer over it?
I vS When You look in my Video at 1:06 you will see that I dye the wood with a darker red-mahogany mixture and sand them off. It's true that the figured sunburst look 3D with lacquer. You can see it in the Video Part 16 at 2:52 and 2:58. In nature it will look more 3D then the video can show it.
Proper ratio mixing is 1/2oz dye to 2oz or more of your solvent, water, etc. Depending on dye used.
@@VittorioCentofanti What grit do you sand down to?
Geil
Is the first layer the vintage amber or a blend of colors? It looks like a darker red mahogany layer was added after the first layer. Loved the build!
I am probably the least expert person who's ever watched this video, but I feel like I agree with you. The very first layer looked like straight amber, and then maybe a layer of unthinned red mahogany, which he used to accentuate the grain. Sanded that most of the way off and then started back with what I'll guess is the mixed color amber he talks about in the description. He does that for several coats in a row, then the red mahogany around the edges. (The mixed amber looks like it's in a drinking glass, the red mahogany in a jar, both end up camera right. The orange is never seen and always comes in from off screen camera left.) Feels like the orange was only used a few times as a buffer color and immediately he'd come back with the amber to feather the transition. It's an incredible end result, that's undeniable.
Google translate of description: Hi folks, as part of my best project, the replica of a 59 'Les Paul, here's the first part. Pickling the sunburst. About the body: One-piece made of Khaya mahogany, beige binding; Flamed Mapletop made of Canadian sycamore 17 mm; Weight 2.5kg. I used colors from Stewmac from the USA: Colortone Vintage Amber, Orange and Red Mahogany. The base tone is vintage amber, the darker edge is a mixture of vintage amber, orange and red mahogany. Further parts will follow in the course of the project. So, have fun watching. Comments and questions are expressly welcome.
Wow amazing even Gibsons Bursts don't look that good
perfekte Arbeit....