@@tha_factory_of_fun - Just import STEP, instead of STL, or 3MF. - The component/bodies come in as combos. - And, to get out STEP from F360, simply 'File>Export:STEP'.
Nice I do a lot of work with SVG's myself. Just a note you can z-hop unlimited colors so don't let having only one AMS limit you. I just did a 10 color print with 2 AMS's and a 8 color print on my SV06+ that has no AMS.
Hi There, Thanks so much for the awesome video. Helped me tremendously. I just had one quick question in regard to the lights. Can you expand on that a little. Do you cut the strip to length and then the dimmer controllers attach, etc? Sorry for my confusion in this, just trying to figure out the best way to do the lights. Thanks!
Question. I got all the way to exporting, but when I click on the "Make", my OK button is greyed out. And I can not export the body group. Any idea what I did wrong? Thank you!!
Sorry you are having issues. So the ok being greyed out is in the small export dialogue box that appears right? If so try changing the selection in your structure manager maybe the wrong level is selected so it’s finding any bodies. Usually this is the case. Let me know how it goes
@@tha_factory_of_fun Sorry, I should have started with THANK YOU! Cause I have watched so many videos and they are all hard to follow. Yours is by FAR the best! And I dont know what I did, I clicked SO much, but its not greyed out today. Wish I knew hat I did. Ha ha.. But thank you again!! 😄
@@Effect2o you are welcome just make sure you have something selected. I have had this happen where I thought I had bodies selected and then tried to export and the ok is greyed out. :)
@@tha_factory_of_fun I just had this same issue. The way I found around it was instead of using that "make" utility. I chose file > export then said to do stl format. That finally worked for me.
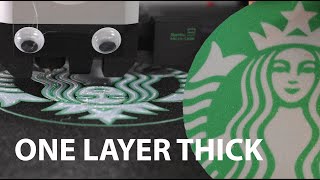
In my experience 0.6mm for some front layers is not enough and will make it very fragile as front side adhesion between colors is very weak. 1mm would be my recommended minimum.
Thanks for the input here! When it comes to the illuminated part of light boxes is always a tradeoff of strength vs light transmission.. As you point out, more layers are always stronger than less. However, Lightboxes do not generally need to be extremely strong as they just sit, the frame needs to be strong the faces not so much. There are a lot of variables that impact strength not just the face, and thickness is not black and white... Each color transmits light differently. 1mm works well for white, but darker colors (blue, green, even red etc..) need to be thinner unless you want a dim outcome (also depends on how deep your lightbox is. I have made over 20 lightboxes in various sizes, shapes, and forms. I have found the difference in light transmission on the whole ( and depending on color ) between 1mm and .6 is drastic. The result is less LED's are needed, and the glow is more vibrant. Just my 2 cents. Again thank you for the comment.
Nice tutorial :-) If i would make suggestions - try to export the model (especially if it is a multipart one) in 3mf-format. In that way it containts far more information within one file and you don't have to mess with multiple STL-files. Bambu as well as Prusa slicer (and their forks) handle them very well. I do it on regular basis. Regarding flow rate - I suggest to utilize OrcaSlicer (a fork of BambuSlicer) to tune in your filament - every manufactured filament is different and 'general' settings can work or don't. It take a few minutes for a new brand / type and helps alot.
Thank you for the comment @Wylaryzel. Bambu Studio now has a ton of the feature that Orca does in the latest 1.7.1 release! Yes you are right using a single file that can be used as parts is the way to go, adn STL supports this, you just have to right click and separate to parts. However, STEP file seems to be the best. When importing the model by STEP file, Bambu Studio will automatically create its Assembly View, which remembers the relative position of each part.


- Nice job. Looks great :)
- TIP: group bodies into components by color; export as STEP; makes filament assignment a snap :)
Wow I never thought to do that, and I dunno I actually know how. Any tips or video links would be great!
@@tha_factory_of_fun
- Just import STEP, instead of STL, or 3MF.
- The component/bodies come in as combos.
- And, to get out STEP from F360, simply 'File>Export:STEP'.
Hey Brady, thank you very much for the tutorial, appreciate your help!
Everything is a setting, you can turn off the flow lines, the brim, the skirt, etc. With a print that large, you don't need a brim at all.
Nice I do a lot of work with SVG's myself. Just a note you can z-hop unlimited colors so don't let having only one AMS limit you. I just did a 10 color print with 2 AMS's and a 8 color print on my SV06+ that has no AMS.
Hi There, Thanks so much for the awesome video. Helped me tremendously. I just had one quick question in regard to the lights. Can you expand on that a little. Do you cut the strip to length and then the dimmer controllers attach, etc? Sorry for my confusion in this, just trying to figure out the best way to do the lights. Thanks!
Check out this video for the lights! ua-cam.com/video/kvZ-BV_yBP8/v-deo.html
Question. I got all the way to exporting, but when I click on the "Make", my OK button is greyed out. And I can not export the body group.
Any idea what I did wrong? Thank you!!
Sorry you are having issues. So the ok being greyed out is in the small export dialogue box that appears right? If so try changing the selection in your structure manager maybe the wrong level is selected so it’s finding any bodies. Usually this is the case. Let me know how it goes
@@tha_factory_of_fun Sorry, I should have started with THANK YOU! Cause I have watched so many videos and they are all hard to follow. Yours is by FAR the best!
And I dont know what I did, I clicked SO much, but its not greyed out today. Wish I knew hat I did. Ha ha.. But thank you again!! 😄
@@Effect2o you are welcome just make sure you have something selected. I have had this happen where I thought I had bodies selected and then tried to export and the ok is greyed out. :)
@@tha_factory_of_fun I just had this same issue. The way I found around it was instead of using that "make" utility. I chose file > export then said to do stl format. That finally worked for me.
In my experience 0.6mm for some front layers is not enough and will make it very fragile as front side adhesion between colors is very weak. 1mm would be my recommended minimum.
Thanks for the input here! When it comes to the illuminated part of light boxes is always a tradeoff of strength vs light transmission.. As you point out, more layers are always stronger than less. However, Lightboxes do not generally need to be extremely strong as they just sit, the frame needs to be strong the faces not so much. There are a lot of variables that impact strength not just the face, and thickness is not black and white... Each color transmits light differently. 1mm works well for white, but darker colors (blue, green, even red etc..) need to be thinner unless you want a dim outcome (also depends on how deep your lightbox is. I have made over 20 lightboxes in various sizes, shapes, and forms. I have found the difference in light transmission on the whole ( and depending on color ) between 1mm and .6 is drastic. The result is less LED's are needed, and the glow is more vibrant. Just my 2 cents. Again thank you for the comment.
Nice tutorial :-) If i would make suggestions - try to export the model (especially if it is a multipart one) in 3mf-format. In that way it containts far more information within one file and you don't have to mess with multiple STL-files. Bambu as well as Prusa slicer (and their forks) handle them very well. I do it on regular basis.
Regarding flow rate - I suggest to utilize OrcaSlicer (a fork of BambuSlicer) to tune in your filament - every manufactured filament is different and 'general' settings can work or don't. It take a few minutes for a new brand / type and helps alot.
Thank you for the comment @Wylaryzel. Bambu Studio now has a ton of the feature that Orca does in the latest 1.7.1 release! Yes you are right using a single file that can be used as parts is the way to go, adn STL supports this, you just have to right click and separate to parts. However, STEP file seems to be the best. When importing the model by STEP file, Bambu Studio will automatically create its Assembly View, which remembers the relative position of each part.
💯 *Promo sm*