Knitting tutorial: applied i-cord edging

Вставка
- Опубліковано 12 вер 2024
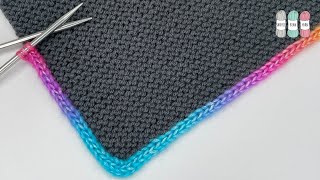
- How to add an applied i-cord edging to your knitted items. This method works well for adding a neat, minimal edge that stabilises the fabric without adding bulk. It's particularly effective in a contrast colour but works in one shade too! You'll need only 2 DPNs.
I used this method in my recent Upwards Top pattern to finish the armhole and keyhole edgings.
Where to find me
◼ Instagram: / lilykatemakes
◼ Newsletter: eepurl.com/hNfbw5
◼ Facebook group: / 10464. .
◼ Ravelry: www.ravelry.co....
◼ Etsy: www.etsy.com/u....
◼ Blog & Payhip patterns: www.jolihouse....
◼ AXIS yarn stockists: www.jolihouse.....
My knitting podcast is about my life as a knitwear designer; new knitting patterns 2021; how to knit; learn to knit; knitting tutorials; yarn inspo; knitting inspiration; knit sweaters; knit cardigans; chunky knitting; knitting photography tips; knitting instagram; knitting life; slow fashion; sustainable fashion; handmade fashion


Thanks for the tutorial. I really appreciate how you get to the point and clearly explain how to do an i-cord edge.
Thank you very much for the tutorial ! I am however very confused : why are you doing a yarn over slip 1 on the first two repeats, and then switching to slip 1 yarn over for the next ? You're saying "and then repeat those steps" but you changed the order of operations ... I would get it if just the first row was different for whatever reason, but why the first two rows ? Thanks for your help !
I think it was just easier when she was first starting. The yarn over before picking up the next stitch hides any main colour ridge showing through between the stitch attaching the icord and the icord roundness. It is possible that it doesn't matter whether you yarn over before the fourth stitch or after as long as you decrease the yarn over and the last stitch together.
@@DonnaDeCourcy well actually it does, I tried both to test it out and one of the two (forgot which one unfortunately) leaves a very obvious ridge of decreases at the join...
Ok, thanks for the feedback. I ended up using the yarn over after the slipped stitch and it worked out without a ridge and just seemed easier.
Seconding this question because it’s very confusing, it’s written as K3, s1, YO, pick up stitch in pattern
Excelente!
You go off frame. Advert for podcast also gets in the way. Just not clear!
Why the heck aren’t you doing this on the garment in the thumbnail 🙄
Because it is far easier to film tutorials on a small swatch than a whole garment 😊 The technique is the same either way so I’m not sure what difference it makes?
Seconding this question because it’s very confusing, it’s written as K3, s1, YO, pick up stitch in pattern