When Building my wooden gear clocks, Friction was always a problem I had to polish every tooth contact surface until it was super smooth. My channel was woodenloon, But I love the idea of 3d printing the clocks
I noticed that the weights are beginning to move, which leads me to believe that the mount is not quite solid enough. Eventually, the motion of the mount and the weights will "steal" the momentum of the pulley, and then not give it back. NB: ua-cam.com/video/h_eR7FJ_vkM/v-deo.html I have an 1891 Gilbert Co. Kitchen Clock, and the case was not stable forward to back, so as the pendulum went back and forth, the case "stole" the energy from the pendulum, and it would kill my clock in about 46 hours. I stabilised the case, and now it runs for its eight days on a winding.
You should add metal piping and shafting to reduce friction, I saw another design that can run for 8 days with these types of bearings, anyway, nice clock!
Thanks for the sugestion. Eventually I will make a more efficient clock, for now I try to keep them simple. There is also a huge amount of friction in the escapement alone. I would like to experiment with various filament, like brass fill, and one day make a grasshopper escapement
Saw that 8-day-runtime one, but the thing for me was that almost all of the shafts were in inches, not metric, so I couldn't make it. All I can get in inches here in Czechia are Whitford screws. But tubes and shafts are a no-no here.
You'll have to excuse my ignorance and lack of knowledge (Mechanical clocks are a very new interest of mine). Would making the gears our of brass increase run time and reduce friction but keep the frame out of 3D printed pla? I only ask as I have pieces of work waterjet cut regularly for work.
Low friction is a key to success for good and long lasting clock, so certainly brass would be a great choice. And for the anchor and escape wheel as well. Good luck with your projects! Stay tune for the next clock...
I used scrap steel rod, mounted inside a PVC pipe Another cheap option is to go to a tire shop and ask if you scrap some of the hold lead weights that they to balance the wheels, and put those inside a tube, Another cheap option is to use plastics bottles filed with water, or sand
@@jacquesfavre999 thanks, I'm thinking of using an old 2kg hammer with a 3D printed shell for nicer look. But maybe I will follow your suggestion to go to a tire shop. I will see which option is more viable for me. Now I'm in the process of printing the parts. Very nice model by the way.
I personally would say no the driving force for this clock it is a counter Weight so all of the energy is gravitational potential meaning the most important part is the timing of the pendulum any friction isn’t necessarily energy lost in the function of the clock
Oiling a clock would not be a good idea because it will grab onto dust. Cutting epicycloidal teeth for the wheels and radial pinions will eliminiate _ALL_ friction (the pinions must be ten teeth or greater for zero engaging friction). When an epicycloidal tooth face makes contact with the radial pinion, the surface _ROLL_ on each other. There is no lateral movement. Hope that helps.
Built this clock. love the simple design! I am having an issue getting it to run more than 20 minutes without manual assistance. The issue im noticing is the cord pully has a tendency to "grab" the cord on the weight side and pull it in close to the frame as it goes around, effectively stopping the driving torque. perhaps a drum type pully with a few wraps of the cord, or a clock chain driven assembly would be more effective? Also, consider adjusting the frame and ratchet pulley to accept 5x10x4 bearings, as this shaft takes all the drive weight. would make for a more reliable power train.
I have had issue too, I have used a small nylon cord, or if using paracord, I have removed the core. I have the project to improve the efficiency of the clock with bearings of some sort


Great work, Jacques !
Really Nice!
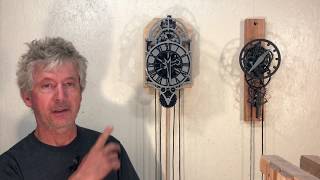
Neat, the concentric shafts on the hour and minute hands must have been tricky.
When Building my wooden gear clocks, Friction was always a problem I had to polish every tooth contact surface until it was super smooth. My channel was woodenloon, But I love the idea of 3d printing the clocks
Yes, friction is a big issue, dry lube made a huge difference.
I admire the patience it takes to cut all those teeth , one by one
I love 3D printing
I noticed that the weights are beginning to move, which leads me to believe that the mount is not quite solid enough. Eventually, the motion of the mount and the weights will "steal" the momentum of the pulley, and then not give it back. NB: ua-cam.com/video/h_eR7FJ_vkM/v-deo.html
I have an 1891 Gilbert Co. Kitchen Clock, and the case was not stable forward to back, so as the pendulum went back and forth, the case "stole" the energy from the pendulum, and it would kill my clock in about 46 hours. I stabilised the case, and now it runs for its eight days on a winding.
Fantastic!
grateful
You should add metal piping and shafting to reduce friction, I saw another design that can run for 8 days with these types of bearings, anyway, nice clock!
Thanks for the sugestion.
Eventually I will make a more efficient clock, for now I try to keep them simple.
There is also a huge amount of friction in the escapement alone.
I would like to experiment with various filament, like brass fill, and one day make a grasshopper escapement
Saw that 8-day-runtime one, but the thing for me was that almost all of the shafts were in inches, not metric, so I couldn't make it. All I can get in inches here in Czechia are Whitford screws. But tubes and shafts are a no-no here.
good evening
where can i find more detailed instructions for assembling the watch? those present in the pdf file are unclear. Thanks 1000 !!!
Check this
ua-cam.com/video/jo9qm485yME/v-deo.html
Very similar
So cool 👍
You'll have to excuse my ignorance and lack of knowledge (Mechanical clocks are a very new interest of mine). Would making the gears our of brass increase run time and reduce friction but keep the frame out of 3D printed pla?
I only ask as I have pieces of work waterjet cut regularly for work.
Low friction is a key to success for good and long lasting clock, so certainly brass would be a great choice.
And for the anchor and escape wheel as well.
Good luck with your projects!
Stay tune for the next clock...
Then it wouldn't be a 3D printed clock. ??
What did you use for the weights and where did you get it?
I used scrap steel rod, mounted inside a PVC pipe
Another cheap option is to go to a tire shop and ask if you scrap some of the hold lead weights that they to balance the wheels, and put those inside a tube,
Another cheap option is to use plastics bottles filed with water, or sand
@@jacquesfavre999 thanks, I'm thinking of using an old 2kg hammer with a 3D printed shell for nicer look. But maybe I will follow your suggestion to go to a tire shop. I will see which option is more viable for me. Now I'm in the process of printing the parts. Very nice model by the way.
Is this auto Rewinding.
Nicely done. How accurate is it?
It is within a couple minutes for the 5 hours it will run.
beautiful design, is there a way to get the CAD files so I can print one too? i am using solidworks 2019 and Ender3v2.
Link to stp in description
Could the efficiency of this be increased by oiling the teeth of gears, or routinely oiling the shafts to the gears?
I personally would say no the driving force for this clock it is a counter Weight so all of the energy is gravitational potential meaning the most important part is the timing of the pendulum any friction isn’t necessarily energy lost in the function of the clock
Oiling a clock would not be a good idea because it will grab onto dust. Cutting epicycloidal teeth for the wheels and radial pinions will eliminiate _ALL_ friction (the pinions must be ten teeth or greater for zero engaging friction).
When an epicycloidal tooth face makes contact with the radial pinion, the surface _ROLL_ on each other. There is no lateral movement. Hope that helps.
Download
Built this clock. love the simple design! I am having an issue getting it to run more than 20 minutes without manual assistance. The issue im noticing is the cord pully has a tendency to "grab" the cord on the weight side and pull it in close to the frame as it goes around, effectively stopping the driving torque. perhaps a drum type pully with a few wraps of the cord, or a clock chain driven assembly would be more effective? Also, consider adjusting the frame and ratchet pulley to accept 5x10x4 bearings, as this shaft takes all the drive weight. would make for a more reliable power train.
I have had issue too, I have used a small nylon cord, or if using paracord, I have removed the core. I have the project to improve the efficiency of the clock with bearings of some sort
Its infinity ?
How get the instrucitions?
All files and instructions here:
www.myminifactory.com/object/3d-print-clock-one-108295
cults3d.com/en/3d-model/gadget/clock-one
How much did it cost yo make this clock?
Once you have all the tools, a computer, a 3D printer, etc, cost is between 5 and 10$