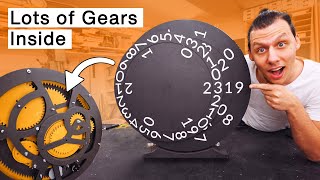
3D Printing and Building a Fully Mechanical Clock!

Вставка
- Опубліковано 10 лют 2025
- Sure newer 3D printers can print really fast, but are the accurate and precise enough to make a working clock?
Crazy Gear Wall Clock by Steve Peterson: www.myminifact...
My Qidi X-Plus 3 Review: • This Printer Solves Tw...
If you buy using my links below I may get small share of the sale.
Qidi X-Plus 3 3D Printer:
s.zbanx.com/r/...
Shipping from EU/US Warehouses
Tools, Equipment, & Materials:
Creality Blue Hyper-PLA: amzn.to/3OIddvV
Aquanet Unscented Hair Spray - Magical Bed Adhesion!: amzn.to/3EH0AMT
PPE:
Nitrile Gloves: amzn.to/3Xbo9WE
3M Half Face Respirator: amzn.to/3T8anjQ
3M Peltor Ear Muffs: amzn.to/3DYCWMf
3M Safety Glasses: amzn.to/3A4FAhp
Laser Safety Glasses: amzn.to/3EERNv5
Disclaimer: The content presented in this video is for entertainment purposes only. The information provided is not intended to substitute or replace professional advice, and viewers should not rely solely on the information presented in this video. Viewers should always do their own research and consult with professionals in the appropriate fields before making any decisions based on the information presented. The creator of this video does not guarantee the accuracy, completeness, or usefulness of any information presented in this video.
#DIY #3dprinting #3dprinter #QIDI #QIDITECH #3DPrinting #QIDIX-Plus3 #clock


Great project Curtis! I love it.
Thanks Ed!
Love it and great video. Thanks for sharing your process. btw, I am the designer of the clock. You did a great job getting the clock put together. This clock is intended to eventually get ported to wooden gears. It is on my list of things to do. The outer profiles of the gears should be ideal for CNC or laser cutting. The rim and spokes need some added strength. And the frame needs to be designed for cutting from flat stock.
Thank you! Your files are top notch. The instructions are super easy to follow and I had zero problems printing all the models!
Steve, your clock designs are great. I have finished multiple copies of three of your designs including the new "moon phase" clock and all work perfectly. One of these is now displayed in a school where my daughter teaches, as an inspiration to students who are learning to do 3D printing in a tech class.
@@Nahngunnarson Good to hear that you like them. That is exactly where they should be displayed. Hopefully, they will be an inspiration for the students to see what 3D printers are capable of making.
I built that exact clock 6 months ago, and it was such a great project. I plan on printing another one but with color shifting filament.
That's awesome! Hope your second one turns out well!
Pretty cool. I laughed that you took it apart multiple times. That always seems to be the case with me. It's good to know I'm not alone. 😁
Nothing in my shop goes together and stays together on the first try. 🤣
Curtis, That is so cool. Good job. Now to make a clock out of lasered wood.
That is the next step in my plan and journey. My last video I cut out the pendulum for the clock I'm planning to make so I've started! Hopefully I'll have a video about it in a couple months.
@@LetsMakeAThing I'm looking forward to seeing that. And maybe making it if you put the plans out there.
That is a wonder to behold, thanks for sharing
Thank you! This project was a lot of fun to build!
That is fantastic, how well does it keep time?
Sadly, I don't have this up and running anymore (no room). If I remember correctly it would only be off by a minute over a couple days of run time.
Steve does a great job designing these, I’ve purchased two kits.
Sounds to me like he’s got too much weight on it.
Always nice to see these kind of projects
What im wrondering is (because I have no idea, just my gut) is if the "bouncing" noise on the "toc" (to the "tic) might be pointing towards an issue somewhere? I never heard it from any clock (3d printed or not) and feel like it should snap without it. I can see on the video where it comes from and maybe the vibration could be messing with the clock long term
There is an issue somewhere that I wasn't able to figure out. I believe there is too much friction in the drive train because I needed to use way too much weight for it to run at all. I think one or more of the bearings I used just aren't smooth enough.
@@LetsMakeAThing I have observed the same issue on the clock I printed {SP2B model}, although I have not been running it long enough to tell if it affects the accuracy. I would like hear what Steve Peterson has to say on this subject. I did have some issues initially with getting the clock to work. I found that making sure it was hanging right and adjusting the standoffs was important. After it was running for a day or so I reduced the weight to power the clock. I think Steve mentions using as little as 2.5 lbs to power his clock. I doubt mine would run with that amount of weight. You must have purchased a lot more stuff to get your clock to work than I did. The most expensive part of the clock I ran into was the lead shot until a friend gave me a generous amount. I ordered most of the parts from Aliexpress. I printed my clock with a Qidi Q1 Pro using Sunlu high speed filament.
Nice! What are those gear tooth profiles? They don't really look like involute or cycloid.
Honestly, I don't know. If you check the link in the description you can find more information about the clock. I don't remember if the designer talks about what they are on his page or not.
The outside surfaces are involute. The inner portions of the spokes and rim can be any shape, so they are optimized for 3d printing. In fact, this profile is only good for 3d printing. All other technologies would do the rims differently.
I have SLTs for a few different clocks. I wanted to try to put one together myself. What is the run time on this clock?
The plans come several different wheels for time. It comes with an 8 day, an 11 day, and a third wheel that I can't remember the runtime for. I'm running the 8 day wheel but I haven't been able to let it run that long as it's just sitting in my shop and doesn't have a permanent home yet.
How long does run? How accurate did you manage to get it?
The design comes with an 8 day, 11 day, and 14 day run wheel. I was using the 8 day wheel in my design. Sadly, I have too much friction from the non-printed parts I bought and wasn't able to get it to run consistently. Nothing to do with the design, it's a great design and many other people have success running this clock for days at a time!
Is it adjustable (Daylight Saving time purposes)
Yes! The hands have a clutch built in so you can freely spin them to the correct position while the clock is running.
Great project--you honestly could have made your video longer and I would have enjoyed it (would help with your watch time and appeasing the algorithm gods as well..)