The Clock and Compass - Master the basics of Lighting for portrait photography

Вставка
- Опубліковано 21 сер 2024
- Learn how to master the basics of lighting. Mark Cleghorn will show by using his clock and compass lighting technique how easy it is to create great images every time straight out of camera.
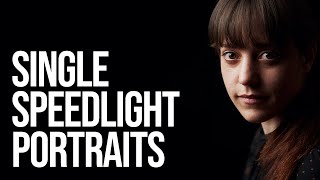
The clock and compass lighting method is quite simply lighting by numbers and this step by step guide makes it so easy to remember the direction of lighting and its effect it will have on the subject and the photograph. This technique can be applied studio flash, speedlites, strobes and continuous lighting.
We will show you results key, fill, accent, rim and background lights have on and how to use these to create soft, hard, feathered, split or beauty lighting. This knowledge of lighting is fundamental to all photographers from creating beautiful soft lit portraits to edgy hard lit fashion images. We also look at the effects of light modifiers and accessories play in creating the photograph.
One light for one job is the basis of Mark’s teaching and in this film we start by explaining the whole process with just one light. We then start to add a 2nd, 3rd and 4th light and still with the clock and compass technique show you the results and why and when to use them to create incredible images.
You can find the whole series of Mark’s Clock and Compass films on The Photographer Academy thephotographer...
The Photographer Academy has been creating content for enthusiastic Hobbyists & Pro Photographers alike since 2008.
Catch the next live webinar checkout what’s on www.thephotogr...
Social Media: / thephotographeracademy
/ tpaphoto linktr.ee/thep...
www.buymeacoff...
Every week we deliver added content for our members as well as to our UA-cam Channel.
Remember, if you like what you see, then subscribe to this channel.
The Photographer Academy is all about for the love of photography If you would like to have an photograph reviewed in one of our "What Makes A Great Photograph" Sessions you can upload via link below or via the website.
Academy has everything from real client shoots to model shoots used as training films. We show everything from the basics & pro techniques, through how to establish a photography business.
Topics from real weddings, portraits, fashion shoots to kids, “How To” techniques in Adobe Photoshop, all based on techniques to save you time in workflow and creativity. Bi-Weekly webinars and Bi-Weekly photo critiques, with new weekly content and qualifications.


This is the best video I have ever seen on positioning - thank you so much! As a former voice-activated light stand operator, I now understand what I was doing!
Another great tutorial! This is the most definitive description of light positioning I’ve found. Thank you!! I’m headed off to your Compass tutorial video!
Congratulations! This is the best lighting positioning I've seen! Clear and simple, very easy to understand.
This video is priceless, definitely I am going to pay for the year subscription, for the training.
Thank you
This is the best lighting video i have ever seen. Thank you!
Yes it is
The clock face is such a helpful tool. Thanks for introducing me to it.
Very useful video , I learned lot from it, looking forward more videos like this keep it up good work, R.manohar , india,chennai
AMAZING AMAZING AMAZING tutorial, straight forward and easy to digest but yet very complicated in squeezing large info in very short time, MASTER INDEED you are sir.
This was the best tutorial I have seen on UA-cam for beginners. I learnt a lot in this video. Thanks for sharing .
The best one I have seen on youtube. So few likes?
Can't get tired of this video. Thanks
This is a FANTASTIC video. Thank you so much for making videos such as this.
So amazing... I feel every thing can be done from watching this tutorial, I really really thank you for this great and amazing job!!!
I haven't yet done a vlog properly yet but this is exactly the video I was thinking about. I can't stand watching vlogs saying the same thing, so thank you. I'm thinking the same way so I am proud of watching a pro at work doing the same as I was thinking. fab concept thanks....
Thank you!
I'm very grateful for this video,learned so much out of it!!!
Thanks for your support!
This was really informative and easy to follow. Thank you for making this!
Very good explained!
Couldn’t have been better. Thanks for that.
Absolutely fantastic! This is hands down the best explanation video on studio lighting I've ever seen. Very easy to understand and to get a grip about the different lights.
This gonna be a useful guide for me that I'm sure to come back to. Thank you very much!
Mark, you are a genius!
Brilliant, clear, and full of great examples. Thanks.
Excellent demonstration and explanation. Appreciate it
Thanks for sharing this. Amazingly explained.
Brilliant video! Thank you for sharing these insights in such an accessible and engaging way. Big up!
Am ferbano fron Nigeria. love this video, it is more detailed and well explained. this video has boost my confidence on lighting. I now have more understanding about 3 point lighting. God bless you
Great 😀 good for both beginner's and they who want an refresh. Want to see more videos like this.
Unbelievable!!!
Please more like this video!
best light explanation for photography
Thank you so much for your great & valuable teachings and information!
You are an amazing person, delivering value to the world!
Thank you again
Excellent video. Very informative with great examples. I wish I found your channel earlier!
Wow, what an amazing video on lighting for photography. Thank you.
This is a great video ! I am learning so much 👍👍👍
Wow, thank you so much for sharing.
Very very good video!!!
Wow, thank you so much
As clear as possible! Thank you very much!
Excellent tutorial, and easy to understand!
Very great way to teach...very helpful Sir thankyou so much
Absolutely brilliant! Thank you
Thank you. This realy helped me.
Glad it helped!
great tutorial, I also enjoyed the way it was all delivered. thank you
Thank you for this wonderful tutorial.
Excellent video tutorial!
Excellent Video Thank you so much
Excellent tutorial, thanks.
Excellent explanation!
Excellent tutorial, and easy to understand
Very well made and helpful!
Very well done tutorial. Helped a lot. Thank you.
very informative excellent tutorial .... thanks alot please make some more video how much power and f/ stop needed in different angles of light. PLZZ make more video we all need to know about light.. thank u...
That was sooo helpful!! Thank u
Great Video......
Very informative, thank you.
Very informative video. Thank yoU!
excellent!!
Thanks. I've watched the video several times and it's been very useful. This is designed for the model to be looking at the camera. But what if the model looks away, say at the 4 O'clock position? Should the lighting positions change accordingly?
thank you for the very very good video. having said that: Is 8 or 4 really the best position? not talking about the catchlight but the overall illumination of the face. the nose shadow is very dominant in 4 and 8 o clock. the darker cheek not yet really illuminated. of course the diagonal light gives the face a very 3dimensional impression but I would prefer 4:30 or 7:30 more?
I hope this isn't a bad question. But I am wondering why the fill light is at 5 o'clock and not 7 o'clock? Hey! Thanks.
What is the compass part?
Thanks
fantastic tutorial..but yku don t speak about how much power for every light how many stops difference between the fill the main etc..cause by just positioning the lights you will not achieve the desired effect.
What about power? I assume all the lights are set to the same output? I went to a few of Marks Classes about a thousand years ago and I think I remember him saying the the rim/hair light appear in picture a stop or 2 brighter, I cant remember if you stop down to compensate or not?
ua-cam.com/video/hdD1E-T4UKE/v-deo.html Ahhh... found it :) Thanks Mark for not leaving us high and dry :P
When you start to use a 2nd and 3rd light how is the % compared to the main light concidered as 100%?
Usuqlly start with an exposure of 1 stop less, but this all depends on how the flash is diffused, which direction the flash is pointed and the effect your trying to achieve
What`s the difference between 6 oclock fill light and 5 o`clock fill ?