I’ve done the batteries for a logo etch, and a battery charger for a full immersion Celtic design on an axe head, but the idea of a power adapter is a great one. “Etching” to try it! Thanks Nick! 😉
There are a lot of other things I was going to use to test, but I got too excited and just had to move on with the process. I may revisit this in the future and test the other things.
Thanks for the tip friend, I would say since your already etching it it shouldn't hurt to have just put the stencil on the bottle then cut out the symbol. It would be slightly more difficult to cut do to it's roundness but you wouldn't have any transfer trouble
That's a great tip! I was worried about cutting the surface initially, but after I thought about it, it's going to get etched right up to that point anyway, so it wouldn't really matter, as long as you didn't go over your line. I think I might just have stencils cut when I do it again, rather than doing it by hand.
The best process I've seen for this is one used by lightsaber makers you cover the entire object being etched except for the pattern in vinyl tape like electrical tape and submerge it in a saltwater bath with the negative attached to that and then the positive attached to a rod or sheet of the same metal being etched and you can just connect that to a battery charger and leave it and you can get really nice clean very deep edges
I have seen that process and it works great, especially if you have small objects or large designs. You do have to be careful though cause on an object like this, it's easy to miss a part and accidentally etch something you don't want. I prefer this process for stuff like mugs as it gives you complete precision on a difficult to cover object.
There are a lot of things I would do different and may give it a try again in the future, but the basic idea is easy and can be done with a minimal of equipment. I hope you enjoy playing with the process, I'd love to see your results! Tag @theeverymaker if you post it somewhere.
Nick, instant subscribe. I can't wait to make mine. I wonder if a powder coating would adhere to that new surface better. Of course, you'd have to tape off the rest of the mug, but it's a thought, right? Would be a cool project to try.
Make Things with Rob Thank you for subscribing! An interesting idea to powder coat. It could certainly make an interesting design to mix the two processes!
Seriously! Like you said, pop out those ideas and don't be afraid to try it. Still though, I like what you did in its raw form. I see this video exploding someday, honestly. This is such a simple process with big results.
I have had my cup for several years now and there is no rust. It's just exposing fresh metal though, so treat it as you would the rest of the blade and you should be good.
This should work with aluminum as well. I have seen people do full on baths with the positive connected to the item you are etching, and the negative attached to another piece of metal (like stainless steel). Then just plug it in and let it do it's thing. You can also use paint to protect the surface of the metal. Probably want to use a latex paint or some other water resistant paint. I've not tried it, so do at your own risk, but experiment away!
I noticed the first test line on your sample piece was much darker than the rest. I assume longer exposure to the electrolysis causes a darker (or deeper) result, correct? Did you establish a correlation of exposure time to the shade / darkness of the etched surface?
If I stayed in one spot for too long, it would darken considerably. I'm not sure the science of why, but my guess is oxidation of the steel. Even stainless steel can rust. I didn't like that look, so on my final project I took some steel wool to it and cleaned it up, mainly because it wasn't even. I'm sure with some more practice and experimenting, you could come up with a pattern to avoid (or create) as you wish. I didn't really get a feel for it based on my limited experimenting.
Thanks for an informative video! Im wondering, does it make a difference when having something metal behind the cotton like you did with the pliers as opposed to when you only used the cotton swab? Ive seen so many different videos and am just trying to understand what exactly the etching tool needs to be
It's all about conducting the electricity. For me, I used the plyers as a stiff base to wrap the cotton around and conduct the electricity. Plus, the rubber handles made me a little more comfortable, those as these voltages/amperage, it's not that big of a deal. As long as you have something attached and there is enough saturation in the cottons swab, you should be fine.
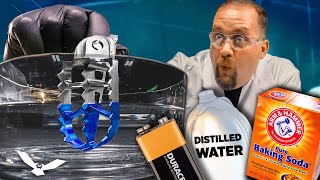
As far as I know, the gas causing the bubbles is O2, H2, Cl and HCl which is explosive when exposed to UV light. Do you know if there will be created enough gas to be dangerous following your setup?
I had good ventilation when I did the project. It took a long time to do and there was very little gas produced. Though if you have concerns, I would definitely suggest investigating the amount necessary to be a concern.
I have never tried it with bronze or brass, however I have seen metal etching with other metals. I feel like it would work, but my best suggestion is to try it on a small test piece first.
I am no expert, but looking up a specialty etching machine, it is 12v at 3a. They have a plus model that is 24v at 3a. I would still be careful, especially when dealing with the salt water at those levels, but it should still be safe with the proper precautions.
It should, however somethings there is a coating that you need to take off first. You may also need to take some steel wool to the part that you are etching to give it something to grab hold of. Wouldn't take much.
Hi ! Thank you for this cool video ! I was please wondering, for engraving sterling silver, do I need to use " a drill bit" or piece of sterling silver to engrave it ? Does it have to be the same metal as the plate to be engrave on ? or can it be a steel bit ? Merci again for this cool video ! Teri
I've never done silver myself so I'm not sure the best way to do it. Considering the cost of want to do a bit more research before giving it a try. If suggest checking out ua-cam.com/video/D-DACg-jthw/v-deo.html which is a great video on the process for silver.
There are definitely many ways to achieve this kind of etching, but I found this to be not only a fun project, but an interesting introduction into electrical etching. My dad used to have a sand blasting station, which would be great for something like this. I've seen people just use clear mat paint to make it look like an etch, or just sanding it in. I like the ability to get finder detail with this method and not having to buy any other materials other than what I had on hand. What method would you use?
Yes you do. Electricity travels toward the negative lead, so if you are doing plating you want the negative on the thing you are plating. In this case we are etching, so you want the positive in the item and the negative on the plyers.
Usually the wires are color coded. Red is positive, black is negative. Or white is positive and black negative. Other than that, you can use a volt meter, though I would look that up to make sure you don't damage the volt meter.
I didn't saturate the saline, just added enough to provide a bit of a current flow. I haven't experimented with different saturation levels, though that doesn't sound like a fun weekend project.
You can use this process to etch the steel, though it did give a darker etch than I was expecting. I've seen a few ways of doing something similar, from sand blasting, steel wool, using a flat clear coat to give a subtle effect or even an etching spray. I would suggest experimenting and see what result you like the best.
Use a circuit to cut out removable vinyl then use a sand blasting cabinet with some fine grit aluminum oxide blasting media (I've used both 250 and 400 grit). You will get sharper results, and you can blast anything....I usually use it for stainless steel and for glass.
There is a local Makerspace that has a vinyl cutter, though I didn't know about it at the time. I think there are also some online services you can order vinyl cutouts, that would have made this much easier! I do like the idea of sandblasting, though this was a way I could do this project without investing in any additional tools. I like the idea though, if you have access!
Thank you! Electricity is a tricky thing. Typically 12v isn't really enough to get through the resistance of the skin, but if you poke yourself and the wires go into your fingers, it can be lethal. So if you are going to use that adapter, take every precaution and make sure you don't touch the leads. I am by no means an expert, so I do suggest you do your research and know the risks.
Awesome tip! I'll be using this for sure! Awesome channel you have here! I'm a new supporter of your work :) #304. Keep making the great videos my friend! :)
He said 5V @ 2 amps... only 10 watts! Not sure why he seemed so concerned about people not feeling comfortable around electricity at that level. But then again, people freak out when they lick a 9-volt battery too!
Great question. In dealing with this it's a voltage and amperage issue. Since we are using such a low amperage and voltage, there really was no risk to me. It's been a while since I've done the project, but there is a lot of good information out there about the level of voltage and amperage you need to be concerned about.
I have seen people use them, you want to be careful not to drain the battery too much, it can also cause the batteries to overheat, so just be careful.
Well thank you! O have been getting back out in the shop recently, but had a bit of an accident yesterday that I have to take care of before I can do more projects. Shouldn't take long though, I'll have some new stuff soon!
Using a power adapter makes it go faster, but you have to be very careful with electricity. Making sure there is enough salt in the water also helps. It is a time consuming process though.
@@감자-e9j9m I've never used Copper Sulfate for etching, but from my understanding, it does work, and as a matter fact, a mixture of the two is supposed to amplify the effect. The reason I went with table salt though is one, I had it on hand. Two, copper sulfate can be dangerous to local waterways and requires special attention when disposing.


this is the best version I've seen thus far can't wait to try it
It was really fun to play with, I hope you enjoy working on your own project!
I’ve done the batteries for a logo etch, and a battery charger for a full immersion Celtic design on an axe head, but the idea of a power adapter is a great one. “Etching” to try it!
Thanks Nick! 😉
So glad you found the video! I'd love to see your work, have it posted anywhere?
@@TheEveryMaker just did the power adapter etch… thing is, I only had a 4mA adapter….. light etch, and took all day
I can’t believe that was just salt water! It turned out great, Nick!
There are a lot of other things I was going to use to test, but I got too excited and just had to move on with the process. I may revisit this in the future and test the other things.
Dude that’s awesome! Thanks for sharing this video 🎉
Glad you found it useful! It was a lot of fun to do, I just need a better stencil and I'm definitely going to do it again.
I'm totally doing this! Great video Nick!
Thanks Gabe! It's a really cool addition to the arsenal of tools.
Thanks for the tip friend, I would say since your already etching it it shouldn't hurt to have just put the stencil on the bottle then cut out the symbol. It would be slightly more difficult to cut do to it's roundness but you wouldn't have any transfer trouble
That's a great tip! I was worried about cutting the surface initially, but after I thought about it, it's going to get etched right up to that point anyway, so it wouldn't really matter, as long as you didn't go over your line. I think I might just have stencils cut when I do it again, rather than doing it by hand.
I was surprised by how quick that worked. Thanks for the idea.
It really went quick, especially for the size of my logo that I etched. A small piece would only take a couple of minutes!
It's nice to have a use for the orphaned power cables that I have hoarded over the last 2 decades.
I know right?! I have a bin full of them in the attic.
That's so cool! I know J is going to want to try that!
It's pretty awesome! Especially with his forge, I'm sure he could make something, then take it to the next level and etch it!
Dude cool video!
You're definitely going to gain tons of subscribers with this quality.
Looking forward to more.
Thank you! That really means a lot!
The best process I've seen for this is one used by lightsaber makers you cover the entire object being etched except for the pattern in vinyl tape like electrical tape and submerge it in a saltwater bath with the negative attached to that and then the positive attached to a rod or sheet of the same metal being etched and you can just connect that to a battery charger and leave it and you can get really nice clean very deep edges
I have seen that process and it works great, especially if you have small objects or large designs. You do have to be careful though cause on an object like this, it's easy to miss a part and accidentally etch something you don't want. I prefer this process for stuff like mugs as it gives you complete precision on a difficult to cover object.
that's great man. a cricut would make that so much easier. i'm definitely going to give this a go.
thank you!
There are a lot of things I would do different and may give it a try again in the future, but the basic idea is easy and can be done with a minimal of equipment. I hope you enjoy playing with the process, I'd love to see your results! Tag @theeverymaker if you post it somewhere.
Thank you for sharing knowledge 👍👍👍
I happy you got some useful infomration!
Nick, instant subscribe. I can't wait to make mine. I wonder if a powder coating would adhere to that new surface better. Of course, you'd have to tape off the rest of the mug, but it's a thought, right? Would be a cool project to try.
Make Things with Rob Thank you for subscribing! An interesting idea to powder coat. It could certainly make an interesting design to mix the two processes!
Seriously! Like you said, pop out those ideas and don't be afraid to try it.
Still though, I like what you did in its raw form. I see this video exploding someday, honestly. This is such a simple process with big results.
Make Things with Rob I've been thinking about getting a powder coating rig, but not quite high enough on the priority list, not yet anyway.
Very nice, high quality content you're posting. I like this video, something I'll definitely try!
@FolivoraMaximus, Thank you! I have a ton of fun making videos, and will get back to it soon!
@@TheEveryMaker I'm really happy to hear that!
Awesome job! Do you know if the etching will rust? I’m thinking about doing this to a high carbon blade.
I have had my cup for several years now and there is no rust. It's just exposing fresh metal though, so treat it as you would the rest of the blade and you should be good.
Thanks! How simple it is!
i want to etch some textures on aluminum any help please...
This should work with aluminum as well. I have seen people do full on baths with the positive connected to the item you are etching, and the negative attached to another piece of metal (like stainless steel). Then just plug it in and let it do it's thing. You can also use paint to protect the surface of the metal. Probably want to use a latex paint or some other water resistant paint. I've not tried it, so do at your own risk, but experiment away!
I noticed the first test line on your sample piece was much darker than the rest. I assume longer exposure to the electrolysis causes a darker (or deeper) result, correct? Did you establish a correlation of exposure time to the shade / darkness of the etched surface?
If I stayed in one spot for too long, it would darken considerably. I'm not sure the science of why, but my guess is oxidation of the steel. Even stainless steel can rust. I didn't like that look, so on my final project I took some steel wool to it and cleaned it up, mainly because it wasn't even. I'm sure with some more practice and experimenting, you could come up with a pattern to avoid (or create) as you wish. I didn't really get a feel for it based on my limited experimenting.
Thanks for an informative video!
Im wondering, does it make a difference when having something metal behind the cotton like you did with the pliers as opposed to when you only used the cotton swab?
Ive seen so many different videos and am just trying to understand what exactly the etching tool needs to be
It's all about conducting the electricity. For me, I used the plyers as a stiff base to wrap the cotton around and conduct the electricity. Plus, the rubber handles made me a little more comfortable, those as these voltages/amperage, it's not that big of a deal. As long as you have something attached and there is enough saturation in the cottons swab, you should be fine.
@@TheEveryMaker thankyou!
As far as I know, the gas causing the bubbles is O2, H2, Cl and HCl which is explosive when exposed to UV light. Do you know if there will be created enough gas to be dangerous following your setup?
I had good ventilation when I did the project. It took a long time to do and there was very little gas produced. Though if you have concerns, I would definitely suggest investigating the amount necessary to be a concern.
Does this work with other metals? I have a project coming up with bronze or brass.
I have never tried it with bronze or brass, however I have seen metal etching with other metals. I feel like it would work, but my best suggestion is to try it on a small test piece first.
Nice! If I used a power supply (like for anodizing), is there any specific voltage i should have it at?
I am no expert, but looking up a specialty etching machine, it is 12v at 3a. They have a plus model that is 24v at 3a. I would still be careful, especially when dealing with the salt water at those levels, but it should still be safe with the proper precautions.
will this work on super shiny stainless steel ?
It should, however somethings there is a coating that you need to take off first. You may also need to take some steel wool to the part that you are etching to give it something to grab hold of. Wouldn't take much.
Hi ! Thank you for this cool video !
I was please wondering, for engraving sterling silver, do I need to use " a drill bit" or piece of sterling silver to engrave it ?
Does it have to be the same metal as the plate to be engrave on ? or can it be a steel bit ?
Merci again for this cool video !
Teri
I've never done silver myself so I'm not sure the best way to do it. Considering the cost of want to do a bit more research before giving it a try. If suggest checking out ua-cam.com/video/D-DACg-jthw/v-deo.html which is a great video on the process for silver.
@@TheEveryMaker Thank you for taking the time to reply !
Of course! Good luck with your projects!
Super cool Nick! Great and informative video - must try this in the future! :-)
Thank you! It's really easy and gives such a cool effect!
I am just wondering why you use the electricity you can get the same results without it
There are definitely many ways to achieve this kind of etching, but I found this to be not only a fun project, but an interesting introduction into electrical etching. My dad used to have a sand blasting station, which would be great for something like this. I've seen people just use clear mat paint to make it look like an etch, or just sanding it in. I like the ability to get finder detail with this method and not having to buy any other materials other than what I had on hand. What method would you use?
Do you need to figure out what wires on the power adapter is positive and negative or does it not matter?
Yes you do. Electricity travels toward the negative lead, so if you are doing plating you want the negative on the thing you are plating. In this case we are etching, so you want the positive in the item and the negative on the plyers.
@@TheEveryMaker ......How do I find out which is which?
Usually the wires are color coded. Red is positive, black is negative. Or white is positive and black negative. Other than that, you can use a volt meter, though I would look that up to make sure you don't damage the volt meter.
Just out of curiosity, are you using a saturated saline solution?
Or is just any added amount of salt an increment for the conductivity?
I didn't saturate the saline, just added enough to provide a bit of a current flow. I haven't experimented with different saturation levels, though that doesn't sound like a fun weekend project.
Do you know how I could make water marks on stainless steel? I want to decorate some trays I have.
You can use this process to etch the steel, though it did give a darker etch than I was expecting. I've seen a few ways of doing something similar, from sand blasting, steel wool, using a flat clear coat to give a subtle effect or even an etching spray. I would suggest experimenting and see what result you like the best.
I want to try this but have a question on how it holds how long term? Any rust in the etched area?
I have been using the mug nearly every weekday since I made it and I haven't had any issues with Rust. It holds up great!
Use a circuit to cut out removable vinyl then use a sand blasting cabinet with some fine grit aluminum oxide blasting media (I've used both 250 and 400 grit). You will get sharper results, and you can blast anything....I usually use it for stainless steel and for glass.
There is a local Makerspace that has a vinyl cutter, though I didn't know about it at the time. I think there are also some online services you can order vinyl cutouts, that would have made this much easier! I do like the idea of sandblasting, though this was a way I could do this project without investing in any additional tools. I like the idea though, if you have access!
That was very cool. nice job.
Thank you! It was so easy and really cool. I definitely plan on doing more of this.
Great Nick from aussie
Thank you! I'm amazed at all the places people who have seen my videos are from. Thank you for letting me know!
Thanks, it’s going to be my next project.
That's great! I'd love to see it when it's done!
Great video!
Thank you Woody120, it was fun to do!
Nice vid, dude. Thank you.
Glad you liked it! Thanks for watching!
I have tried it and it really works. Folks you have to try
Its so cool to be able to etch your own stuff. I always have people ask where I had my mug done.
Great Video
Thank you!
Great work Sir. Can i use 12v 2 Amp Adapter?
Thank you! Electricity is a tricky thing. Typically 12v isn't really enough to get through the resistance of the skin, but if you poke yourself and the wires go into your fingers, it can be lethal. So if you are going to use that adapter, take every precaution and make sure you don't touch the leads. I am by no means an expert, so I do suggest you do your research and know the risks.
@@TheEveryMaker you said can use 5v 2 A.... I am planning to use 12v 2A
@@kashifjkm .....did you have any issues with the 12v-2A adapter?
Awesome tip! I'll be using this for sure! Awesome channel you have here! I'm a new supporter of your work :) #304. Keep making the great videos my friend! :)
Thank you! It's so easy to do, I'm going to be using it a lot more too! I'll have more videos coming soon, thanks for subscribing!
Sweet! How many volts did you use after you graduated from the batteries?
It was just a 5v cell phone charger. I don't remember the amperage offhand, I think it was just 1 amp.
@@TheEveryMaker Thanks for the tips and inspiration! 🤙
He said 5V @ 2 amps... only 10 watts! Not sure why he seemed so concerned about people not feeling comfortable around electricity at that level. But then again, people freak out when they lick a 9-volt battery too!
Whats the risk of electrocution, considering youre touching both + and -?
Great question. In dealing with this it's a voltage and amperage issue. Since we are using such a low amperage and voltage, there really was no risk to me. It's been a while since I've done the project, but there is a lot of good information out there about the level of voltage and amperage you need to be concerned about.
It also works white vinegar and salt
Never tried it with vinegar before, I'll have to give that a shot!
Can i use bike or car batteries?
I have seen people use them, you want to be careful not to drain the battery too much, it can also cause the batteries to overheat, so just be careful.
awesome bro
Glad you liked it! Thanks for watching!
AC orr DC current
Plz reply buddy
The power supply was DC current. It works best when you have the negative attached to the metal and the positive attached to the plyers.
Greeting 05:13 ? your video is so cool friend. Keep Goin' On
Well thank you! O have been getting back out in the shop recently, but had a bit of an accident yesterday that I have to take care of before I can do more projects. Shouldn't take long though, I'll have some new stuff soon!
Good
Thank you!
how can i make etching rate faster??
Using a power adapter makes it go faster, but you have to be very careful with electricity. Making sure there is enough salt in the water also helps. It is a time consuming process though.
@@TheEveryMaker thx. is there any difference when i use CuSO4 instead of NaCl? Which is better ?
@@감자-e9j9m I've never used Copper Sulfate for etching, but from my understanding, it does work, and as a matter fact, a mixture of the two is supposed to amplify the effect. The reason I went with table salt though is one, I had it on hand. Two, copper sulfate can be dangerous to local waterways and requires special attention when disposing.
Cool
Thank you!
Mind blown!!!! Why am I still acid etching?!?!
I had the same thought when I saw this process! It was so much fun to try and I really want to use it more.
I used a CPU Power Supply to give the juice. worked out well.
Nice! I've been debating on making a more permanent setup.
Very cool. Let’s see how fast 220 gets it done lol
I'm not sure there'd be anything left, including the person who tries, lol.
👍👍👍👍👍👍👍👍👍👍👍👍
Well, thank you!
Etching stainless? Nah homie hexavalent chrome cancer risk
Good ventilation is the key, also you can wear a mask, but always better to be safe.
Can I marry u🤭?
I'm not sure my wife would appreciate that, but hopefully you enjoy the channel!
can I use non-kosher salt?
It's more to allow the conduction of the electricity through the water, so any salt will do.