You Might be Surprised by My Woodworking Design Process

Вставка
- Опубліковано 16 бер 2024
- I’m often asked how I design a woodworking project. This video shows my process as I build a beautiful wood tray to give away as a gift. Maybe some people agonize over every decision, and while I’ve certainly felt that way when attempting to design a project ahead of time, I work best running and gunning! I design each aspect of the project a step at a time. This lets me look at how it’s progressing and the appearance of the wood, in this case walnut and maple, so I’m properly informed enough to decide on the next step.
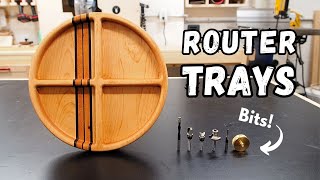
This wood tray has beautiful curves. I used a router to do the bulk of the work. Double sided tape and clamps secured the tray to the workbench when I routed the profile. The exterior was shaped with a combination of router bits. Once sanded, I applied a hard wax finish.
GET THE BUILD PLANS TO THIS PROJECT HERE: www.newtonmakes.com/shop/p/ro...
Get extra perks and help to support this channel by joining the Superhero Community: / newtonmakes
Check it out our Newton Makes merch here: newtonmakes.com/merch
Here’s a list of tools and materials that I used to make this project. As an Amazon Associate I earn from qualifying purchases.
•• Tools & Materials ••
My Amazon Store: www.amazon.com/shop/newtonmakes
Thin walnut lumber: amzn.to/48QH3Hj
Walnut lumber: amzn.to/4a0iFUb
Thin maple lumber: amzn.to/3wVOLSz
Table Saw: amzn.to/2RwQTJa
Jig Saw: amzn.to/2RzXZg9
Drum sander: amzn.to/2MyjpKG
Planer: amzn.to/38LarPW
Jointer: amzn.to/310uabK
Aluminum clamps: amzn.to/3TEcory
Wood Glue: amzn.to/2tU6B8d
The BEST glue roller: amzn.to/46jJBwv
Push Block: amzn.to/3IBPOrT
My FAVORITE Push stick: amzn.to/49SL3aP
Forstner Bit Set: amzn.to/3ps65F8
Combination square: amzn.to/3aPMN6n
CA glue: amzn.to/2XcgrO0
Miter gauge: amzn.to/3y1HM8C
Random Orbit Sander amzn.to/2RxjkXo
120 grit sandpaper discs: amzn.to/2QW835c
180 grit sandpaper discs: amzn.to/39y5kVM
Bench cookies: amzn.to/3n1D026
Bench cookie cones: amzn.to/3hpgP4R
Osmo Polyx-Oil: amzn.to/3zUITYN
Finishing Applicator Pad: amzn.to/3NQ8BSs
Bowl router bit: amzn.to/3IDBbFQ
Core box router bit: amzn.to/3TFSj4j
Round over router bit: amzn.to/3ThP2Xr
Sanding profiles: amzn.to/43lVj92 - Навчання та стиль


GET THE BUILD PLANS TO THIS PROJECT HERE: www.newtonmakes.com/shop/p/routed-wood-tray-project-plans
I was thinking, "What a lucky random person." But then you decided to keep it for yourself...I love that decision way better!
I really like the way you added the handles.
Love the tip on clearing out the handle excess on the saw before routing. Going up on my tip board!
That Independence Day clip!
Beautiful design. Your methods are teaching this newbie some things!
Billy that looks amazing turned out beautiful may have to try this with some elm and chestnut. 🏴👍🤔
Ok awesome as always problem is now I am going to have to make one I like it so much.
Amazing looking tray, Billy! Beautiful work!!! 😃
Stay safe there with your family! 🖖😊
Your mind works in strange and mysterious (nonconventional) ways. That's why your projects are always "awesome".
Bill
Beautiful project! SWEEEEET!
Excited for a new newton video!
Yes, this is superb!
That looks amazing.
Great idea! Thank you🐝
Nice
That came out so nice. Great idea on how to make the handles.
Another great build! JimE
Beautiful
Beautiful.
Thanks!
great idea keep it for yourself haha. nice job
beautiful tray, made by a different method than I have seen. How thick is the tray?
great looking piece. Just curious what design software you render the 3D image in?
Nice tray... Where did you get the shaped rubber sanding forms??
Link in the description to the sanding forms. They're awesome!
What did apply the finish with?
Billy, do you even know how to make ugly projects 🤔. Excellent as usual